Whitelisting tells the controllers which devices are allowed in the network. Think of it like the guest list of all serial numbers of devices allowed to join the SD-WAN domain. When a router tries to join the fabric, controllers first ask a simple question: “Is this router’s serial number in the organization’s whitelist?” If it is, the device is allowed.
But a serial number by itself is not undeniable proof that the device is genuine. A rogue device could “say” any serial number. It could just say a serial number that is in the whitelist.
This is where identity becomes critical. Cisco SD-WAN uses X.509 certificates and cryptography so that routers and controllers can prove who they claim to be. Here’s the key idea: during the DTLS/TLS handshake, each device must prove two things:
- It has a valid SSL certificate issued and signed by a trusted root CA.
- It has the private key that matches that certificate and can prove it by signing handshake data (proof of possession).
A rogue device can fake a serial number, but it cannot fake a trusted certificate and the matching private key. This idea is called the chain of trust. To understand it, let’s first discuss what trust is.
What is Trust?
Let’s take real life as an example. There are two main types of trust: direct and third-party trust, as shown in the diagram below.
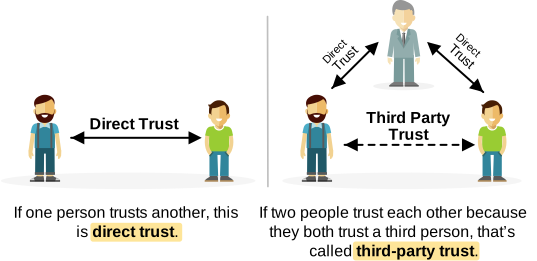
- Direct trust is when you trust someone because of your own experience with them. For example, you trust your friend because you’ve known him for years.
- Third-party trust is when you trust someone because a third person you already trust says so. For example, you don’t know Bob. But your best friend (whom you trust) says, “Bob is reliable; you can trust him.” So, in the end, you trust Bob, even though you don't personally know him.
Because the Internet is enormous, with billions of devices, websites, and services, the direct trust model just doesn’t scale and isn’t practical.
That is why the Internet and modern IT infrastructure rely on the third-party trust model. In this model, one entity, such as a router, website, or online service, trusts another entity because both trust the same third-party organization, called a Certificate Authority (CA), as shown in the diagram below.
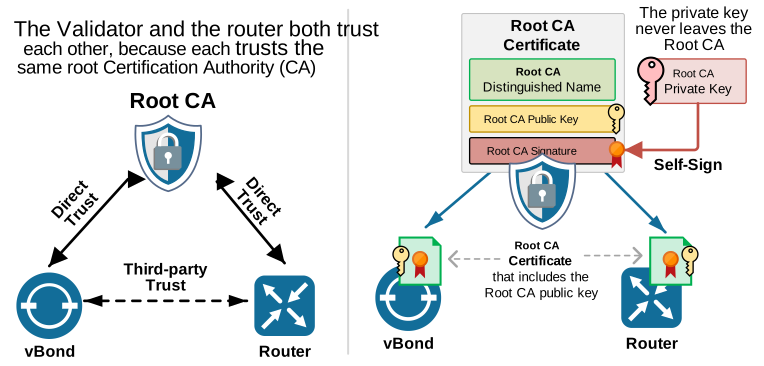
You can think of the Certificate Authority (CA) as a trusted friend. The device does not need to know the other device personally. It only needs to trust the CA that verified and signed that device’s certificate. If both sides trust the same CA, they can build trust through that third-party relationship.
A network device knows which Certificate Authorities it trusts from the root certificates it has installed in its root store, as shown on the right side of the diagram above. These root certificates form the starting point of trust. Each root certificate includes the CA’s public key, which is used to verify digital signatures on certificates issued by that CA.
You will see later in the lesson why this public key is so important and how it helps a device confirm that the certificate it receives is genuine and has not been changed.
What is Certificate Authority (Root CA)?
A Certificate Authority (CA) is a trusted third-party organization that issues digital certificates to verify the identities of websites, servers, network devices, and other entities on the internet. To understand the concept, let's make an analogous example with the process of issuing passports by the Government, as shown in the following diagram.
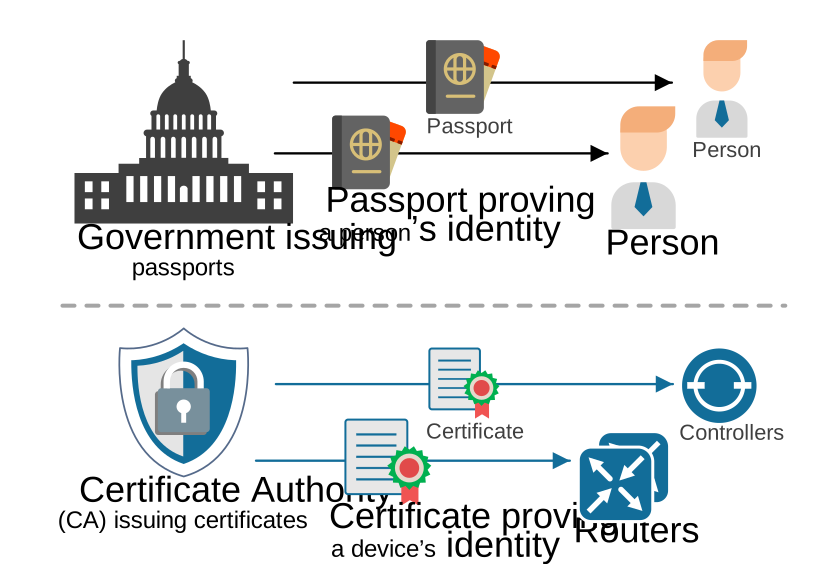
How do people prove who they are in real life? In most countries, a person applies for a passport. The government issues the passport, and then the person uses it to prove their identity to other institutions all over the world.
The same idea exists in the digital world. A digital entity like a router, server, or website applies for an SSL certificate from a Certificate Authority (CA). The CA issues the certificate, and the entity uses it to prove its identity to users and other entities all over the Internet and the internal IT infrastructure.
SSL certificate as a passport
In that sense, an SSL certificate, also referred to as x.509 certificate, is very similar to a person’s passport. When a person needs to prove who they are, they show their passport. In the same way, when a device wants to prove its identity to a remote controller, it sends its SSL certificate during the SSL/TLS handshake.
Now imagine you are at an airport in a country you are visiting for the first time. At border control, you show your passport to prove who you are. The officers can verify your identity if they recognize and trust your country’s passports and have the tools to check that your passport is genuine. If they do not trust your country’s passports or cannot verify them, your passport will not be accepted as proof of identity.
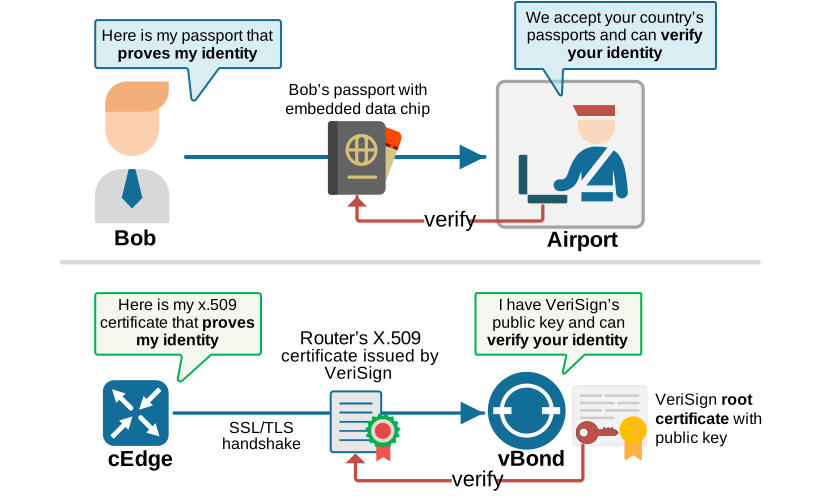
The same idea applies to certificates in Cisco SD-WAN. When a WAN Edge router or a controller starts a secure DTLS or TLS connection, it presents its X.509 device certificate. The other side checks whether the issuing Certificate Authority (CA) is trusted and then uses the CA root chain to verify the certificate’s digital signature. If the checks succeed, the device can trust that the public key in the certificate really belongs to that peer. This idea is shown in the bottom part of the diagram above.
In practice, Cisco SD-WAN does this in both directions, so each side validates the identity of the other before the control connection becomes permanent.
There is one more important detail about SSL (x.509) certificates. An SSL certificate is the last link in the chain of trust. It cannot be used to issue new certificates to others (similar to a passport, which cannot issue new passports...). Its only job is to represent the identity of that one client or device. It is not allowed to issue certificates to other devices. Only the Certificate Authority can do that.
How does the chain of trust work?
Now, let's zoom in and see how the chain of trust works and how everything fits together so that every SD-WAN device can identify whether the remote side is real or fake.
The Root CA Private Key
Everything starts with the Certificate Authority's private key. It is a secret piece of data, used in cryptography mathematics to "sign" other certificates. The following CLI block shows the root CA private key we use to issue and sign certificates in our lab environment. It is a 2048-bit-long value (some lines are omitted for brevity).
vBond:~$ cat ROOTCA.key
-----BEGIN PRIVATE KEY-----
MIIEvQIBADANBgkqhkiG9w0BAQEFAASCBKcwggSjAgEAAoIBAQDi0F+IPAVfIO9R
...
FTLVuG0A89Gv/sJU5osd0TOnStE4ezuALBrnaM6c8xwefCVAqU4qqCcXleVV6wIA
5Kz50ptPIXt3s29LlquJfQk=
-----END PRIVATE KEY-----
The private key is the most sensitive piece of information in the whole certificate system. If someone stole it, they could create fake certificates that every digital entity would trust. That's why CAs store their private keys locked in secure vaults in data centers with extremely strict physical and digital security measures, as shown in the diagram below.
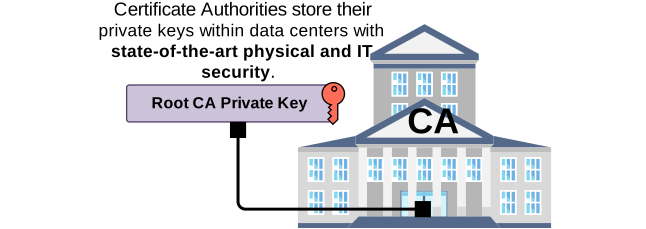
The private key never leaves the data center. All signing happens inside it, and if someone tries to break in or steal the key, the security system can shut down or even destroy the key.
The private key is not meant to be copied, exposed, or moved around. Most Certificate Authorities keep their root private key completely offline. The key is powered on only during rare, controlled events called signing ceremonies.
What is a certificate?
A certificate is a digital document that proves the identity of an entity, such as a website, server, or network device. It does this by binding that identity to a public key and by carrying a trusted digital signature.
Today, certificates are based on the X.509 standard. This standard defines what information a certificate contains, how identities are written, how the public key is stored, and how the certificate is signed. In general, every certificate has two main parts, as shown in the following diagram:
- The first part contains the certificate data. This includes information about the subject, the issuer, the validity period, the public key, and the certificate’s own serial number.
- The second part is the digital signature from the Certificate Authority. This signature proves that the certificate is authentic and that its contents have not been altered.
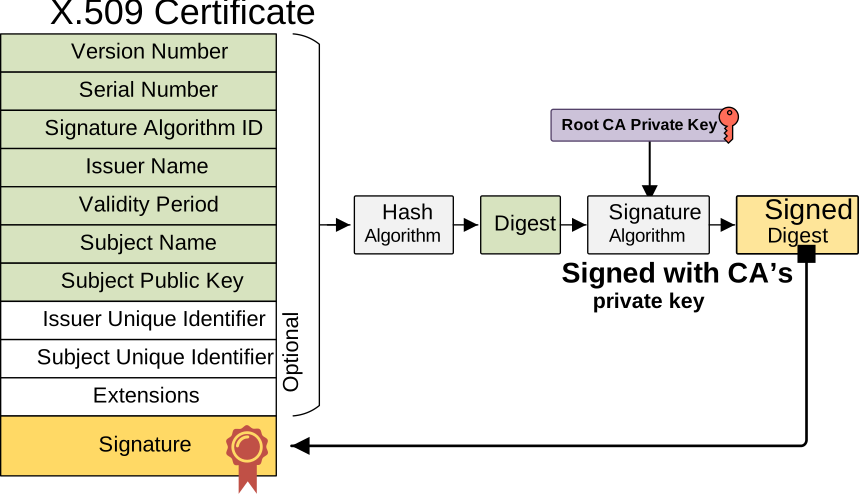
The signature is the key part. It is what makes the certificate trustworthy. Root CA creates this signature by taking the certificate data, running it through a hash function, and then signing that hash with its private key. You do not need to know all the math behind this process.
The receiver can then use Root CA’s public key to verify the signature. If the verification succeeds, the receiver knows that the certificate was signed by the trusted CA and that the certificate data has not been altered.
What is a Root Certificate?
Every Certificate Authority creates a certificate for itself and signs it with its own private key. This special certificate is called a root certificate. It sits at the top of the chain of trust and acts as the trust anchor for all certificates issued under that CA. If a device trusts the root certificate, it can also trust certificates that chain back to it.
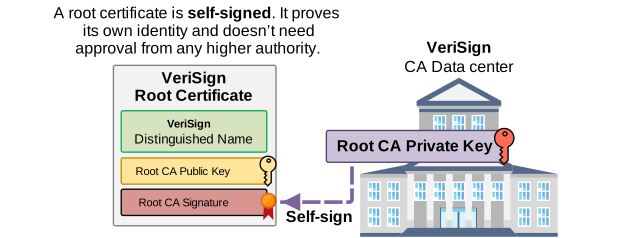
At first, this may sound strange. Why would a device trust a certificate that was signed by the same CA that created it? The answer is that the root certificate is trusted at the organization level. For example, Cisco decided they trust VeriSign as a certificate authority. Therefore, the self-signed root certificate of VeriSign is pre-installed in software on all Cisco devices and is trusted by default.
WAN Edge routers and control components must have the correct root CA chain so they can validate the certificates used by other SD-WAN devices. Without that trusted root chain, certificate validation cannot succeed. For example, if a router sends a VeriSign certificate to a controller, the controller must have the VeriSign root certificate and use the VeriSign root certificate’s public key to verify the signature on the router’s certificate.
In summary, every SD-WAN component must have the root certificate of the Certificate Authority that the organization uses to issue and sign device certificates. At this point, you may ask a practical question: do we need to manually install that root certificate on every controller and WAN Edge router?
Distributing root certificates
The answer depends on the deployment. If your SD-WAN fabric uses a commonly supported Certificate Authorities like VeriSign, Symantec, DigiCert or Cisco PKI, the needed root certificate is already present in the firmware.
Root CAs don’t send their root certificates to every device in the world one by one. Obviously, this cannot scale. Instead, the root certificates are pre-installed into the systems we already use.
Operating systems like Windows, macOS, iOS, Android, and Linux all come with a pre-installed list of trusted root certificates for the most popular CAs. Similarly, all Cisco SD-WAN devices and controllers come with a list of pre-installed root certificates of the most popular Root CAs, as shown in the diagram below.
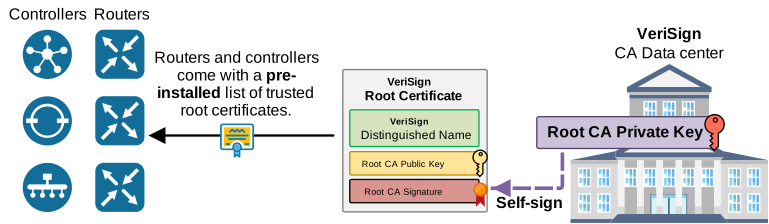
In deployments that use one of the most popular Certificate Authorities, the root certificates are already built into the SD-WAN system. For example, you can see that the vSmart controller (version 20.18.2.1) that we use at the moment, comes with the following list of pre-installed root certificates. Of course, the most commonly used built-in root CA is the Cisco PKI chain.
vSmart# show certificate root-ca-cert | in Issuer
       Issuer: C=US, O=VeriSign, Inc., OU=VeriSign Trust Network
       Issuer: C=US, CN=2023e25d-a4de-47aa-b15a-44eb2daf911a, O=Cisco Systems
       Issuer: C=US, ST=NY, L=NY, O=networkacademy-io, CN=root.certificate
       Issuer: C=US, O=DigiCert Inc, OU=www.digicert.com, CN=DigiCert Global Root G2
       Issuer: C=US, O=DigiCert Inc, OU=www.digicert.com, CN=DigiCert Global Root G2
       Issuer: C=US, O=DigiCert Inc, OU=www.digicert.com, CN=DigiCert Global Root CA
       Issuer: C=US, OU=Arcturus, O=Cisco, CN=Internal Customer Root CA
       Issuer: C=US, O=Symantec, CN=Symantec Trust Services SHA256 Root CA
       Issuer: C=US, O=VeriSign, Inc., OU=VeriSign Trust Network
       Issuer: C=US, O=Symantec, CN=Symantec Trust Services Private SHA256 Root CA
If your organization decides to use its own enterprise CA, it must install its own root CA certificate, and sometimes intermediate CA certificates, on the controllers and WAN Edge devices.
In our lab environment, we use our own Root CA called “networkacademy-io”. Therefore, we manually installed the root CA certificate on every device, as you can see highlighted in yellow in the output above.
Validating a certificate
Now let’s see how certificate validation works in the context of Cisco SD-WAN. When an edge router tries to build a secure control connection to a controller, both sides must first prove their identity. Cisco SD-WAN uses signed certificates to authenticate devices in the overlay. For edge routers, this is combined with the authorized WAN Edge serial number list, which tells the controllers which routers are allowed to join the fabric.
Let’s zoom into the verification process in one direction. Suppose our deployment uses VeriSign certificates. The router cEdge-1 initiates a DTLS control connection to the vBond controller. During the DTLS handshake, cEdge-1 sends its VeriSign signed device certificate to the controller, as shown on the right side in the diagram below.
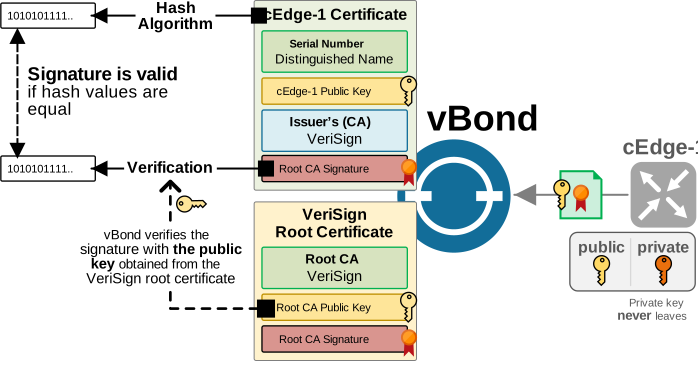
vBond receives cEdge-1’s certificate. It validates the certificate signature. In simple terms, it does two things:
- First, it runs cEdge-1’s certificate data through a hash function and gets a hash value.
- Second, it uses the public key of the issuing CA - VeriSign- from the pre-installed VeriSign root certificate to verify the digital signature attached to cEdge-1’s certificate.
If the values are equal as shown on the diagram, the signature is valid. This proves that the certificate was signed by VeriSign and that its contents were not altered in transit.
Notice that for vBond to validate cEdge-1’s certificate, it must have the root certificate of the CA that issued and signed cEdge-1’s certificate pre-installed. In this example, VeriSign.
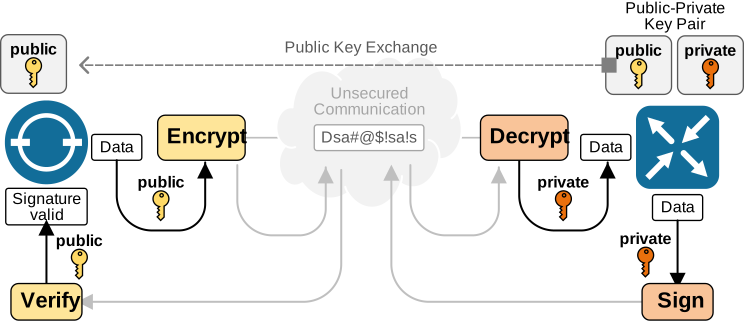
If the signature check succeeds, vBond can trust the public key carried inside cEdge-1’s certificate. This is important because the certificate has now established a trusted link between cEdge-1’s identity and its public key. The handshake then continues, and cEdge-1 must also prove that it owns the matching private key (proof of possession):
- Challenge: During the handshake, both parties exchange random values (ClientHello.random and ServerHello.random).
- Signature: cEdge-1 takes the received random value and signs it with its private key.
- Verification: vBond uses cEdge-1’s public key (from cEdge-1’s certificate that it already has) to verify the signature.
If the verification succeeds, vBond can be confident that the device presenting the certificate (cEdge-1) also owns the matching private key. This is what prevents a rogue device from simply copying someone else’s device certificate and serial number and pretending to be that device.
Notice that this example also highlights the basic role of the key pair of cEdge-1, as shown in the diagram above:
- cEdge-1 shares its public key openly through its device certificate, while its private key always remains secret on the device.
- Other devices use cEdge-1’s public key to encrypt data, and ONLY cEdge-1’s matching private key can decrypt it.
- cEdge-1 can also use its private key to create digital signatures, and ONLY remote sides that received cEdge-1’s public key can verify that signature. This proves that the data came from the owner of the private key – cEdge-1 and that the data was not altered.
- In practice, this process is mutual, because both sides exchange certificates, both sides validate the peer’s identity, and both sides prove possession of their own private keys.
Intermediate CAs
I intentionally left out one crucial part of the chain of trust to simplify the process and make it easier to understand. However, in practice, there is an extra link in the chain called the intermediate CA.
Even though a root certificate is enough to build digital trust, all well-known Certificate Authorities use intermediate certificates. This adds an extra layer of security and makes the system easier to scale. You may wonder why?
We discussed earlier that CAs keep their private keys offline and in extremely secure vaults. But CAs need to issue millions of certificates every year. If their private key had to sign all of them, it would have to stay online nonstop and remain at constant risk. To avoid this, Certificate Authorities use intermediate CAs, as shown in the diagram below.
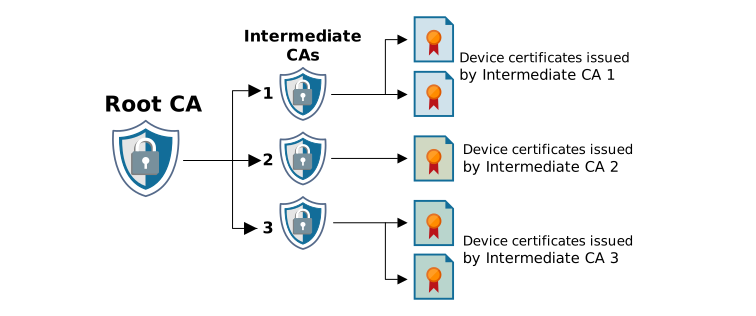
These intermediate CAs handle the everyday signing work, while the root private key stays offline and protected. If a security incident happens, the CA can revoke only the compromised intermediate certificate instead of revoking the root certificate and every certificate signed by it.
This approach also makes the trust model more flexible. A single root CA can issue several intermediate CA certificates, each used for a different purpose, region, or customer group. For example, one intermediate CA may issue server certificates, while another may issue website certificates. This separation limits the scope of problems and makes certificate management much easier.
From the point of view of the device that validates a certificate, nothing changes in principle. The device still builds a chain of trust, but now it checks one extra step: the end certificate is signed by the intermediate CA, and the intermediate CA is signed by the trusted root CA. If every signature in that chain is valid, and the root CA is trusted, the end certificate is accepted as valid.
Now let's see an example of how Intermediate CA fits in in the Cisco SD-WAN context. When a WAN Edge router opens a DTLS connection to a controller, what does the controller check?
It does not just look at the router’s certificate and stop there. It walks the chain upward as shown in the diagram below. Was this router certificate signed by an intermediate CA? Was that intermediate CA signed by a trusted root CA? Does the chain end at a root certificate that this controller already trusts? If the answer is yes, the identity check can continue. If not, the control connection should not become trusted.
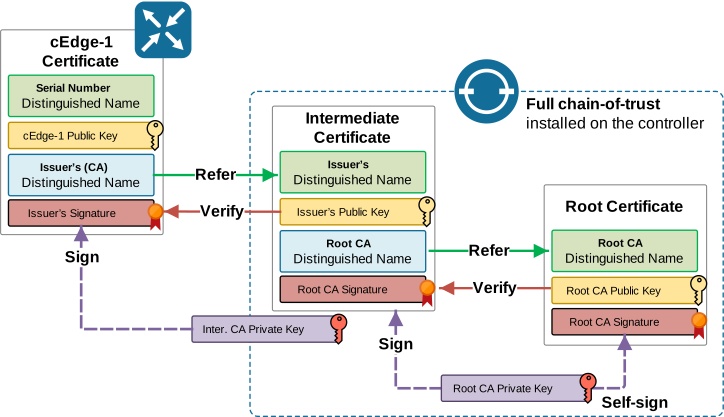
After the controller verifies the full certificate chain and confirms that the router’s certificate ends at a trusted root, it continues with proof of private-key possession. In other words, the router must prove that it owns the private key that matches the public key in its certificate. Only then is the device truly trusted in the overlay.
As you can see in the diagram, the controller that receives a device certificate signed by an Intermediate CA’s private key needs to have both the Intermediate and Root certificates installed to verify the device certificate. This is called the root chain (intermediate CA → root CA) and can be installed as one bundle on Cisco SD-WAN devices if the organization uses Enterprise CA.
Putting it all together
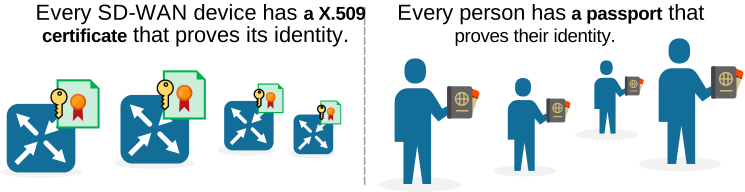
Now, let’s put everything together and see the bigger picture. First, it is essential to understand that every SD-WAN device must have an X.509v3 certificate that proves its identity across the control plane. In the same way, every person must have a passport that proves who they are anywhere in the world, as shown in the diagram below. Additionally, every device must also have the trusted root certificate (or root chain) needed to verify the certificates presented by remote devices. For example, if devices use Cisco certificates, they must also have the Cisco root certificate.
Now, let’s shift the focus and discuss where devices get their certificates.
- Hardware SD-WAN routers come from the factory with a built-in device identity. Their device certificate and key pair are stored in the Trusted Anchor module (TAm), which we discussed already.
- Software SD-WAN devices, such as controllers and virtual routers, do not use the same factory-installed identity model. They come with no device certificate pre-installed. They must go through the Certificate Signing Request (CSR) process.
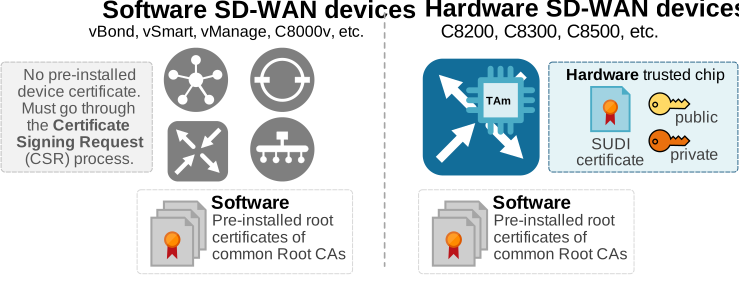
Software SD-WAN devices obtain their certificates through a Certificate Signing Request (CSR) process, where the device generates a request, a Certificate Authority (CA) signs it, and the signed certificate is installed back on the device, as shown in the diagram below.
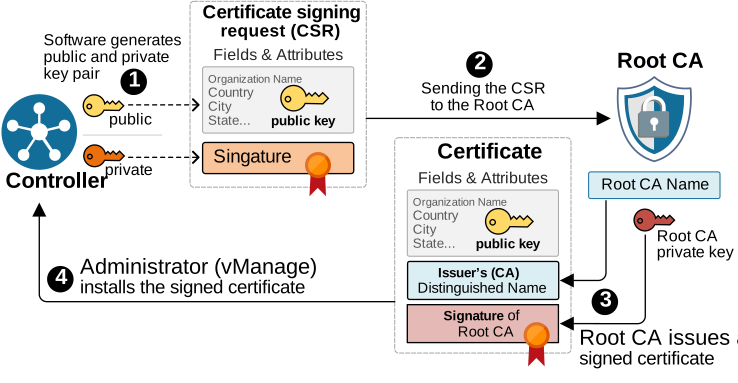
We can summarize the Certificate Signing Request (CSR) process in four high-level steps:
- Step 1: The software device generates a public and private key pair. The public key will be placed in the CSR, while the private key stays on the device. The device signs the CSR with its own private key to prove ownership of the key pair.
- Step 2: The device, or more often vManage, builds the certificate signing request and sends it to the Certificate Authority that will sign the certificate. In a lab, this may be directly the Root CA. In production, it is typically an intermediate CA.
- Step 3: The CA verifies the request and signs the certificate. The certificate can then be validated with the root CA’s public key, which is available through the CA root certificate.
- Step 4: Lastly, the signed certificate is installed on the software device, usually by vManage. The device can now use that certificate to prove its identity to controllers and other SD-WAN devices.
If you choose Cisco PKI and connect vManage to your Smart Account, certificate-based identity becomes plug-and-play. vManage generates a CSR for each control component, sends it to Cisco PKI for signing, retrieves the signed certificates, and installs them automatically. Additionally, the Cisco root certificate is installed by default on the control components.
For hardware edge routers, the process is even simpler. These routers are manufactured with a factory-installed device certificate (SUDI), while the required root trust chain is also pre-installed in software. Once a router is authorized in the WAN Edge list and has reachability to the controllers, it can onboard automatically and prove its identity during control connection setup. However, if you use Enterprise CA, the workflow is less automatic. You must install the enterprise root chain, generate CSRs, have them signed, and then install them on the control components.
Verifying controllers' identity
Once all controllers and WAN edge routers have valid X.509 certificates installed, they can authenticate each other before forming DTLS/TLS control connections. The following diagram visualizes the authentication process between two SD-WAN controllers – vSmart and vBond.
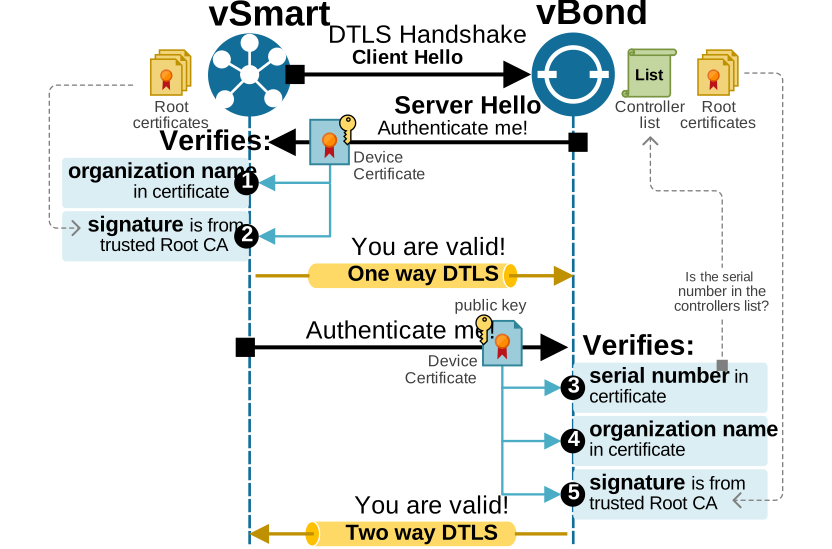
- Step 0: vSmart initiates a control connection to vBond with a DTLS Client Hello message. vBond responds with a Server Hello and its x.509 certificate.
- Step 1: vSmart compares the Organization Name in the certificate with its configured one. Both names must match.
- Step 2: vSmart verifies the certificate signature using the public key obtained from the CA’s root certificate that is pre-installed in its firmware. If both checks succeed, vSmart establishes a one-way DTLS connection with vBond and sends back its certificate.
- Step 3: vBond verifies the serial number in the certificate against the list of authorized SD-WAN controllers distributed by vManage (as per Figure 12.4).
- Step 4: It also compares the Organization Name with its configured one.
- Step 5: Lastly, it verifies the certificate signature using the CA’s public key.
If all validation steps succeed, the controllers establish a permanent DTLS control connection.
Verifying edge routers' identity
When a WAN edge router establishes control connections to SD-WAN controllers, the process is pretty much the same. The router initiates a DTLS connection to vBond by sending a DTLS Client Hello message. vBond responds with a Server Hello message and its x.509 certificate.
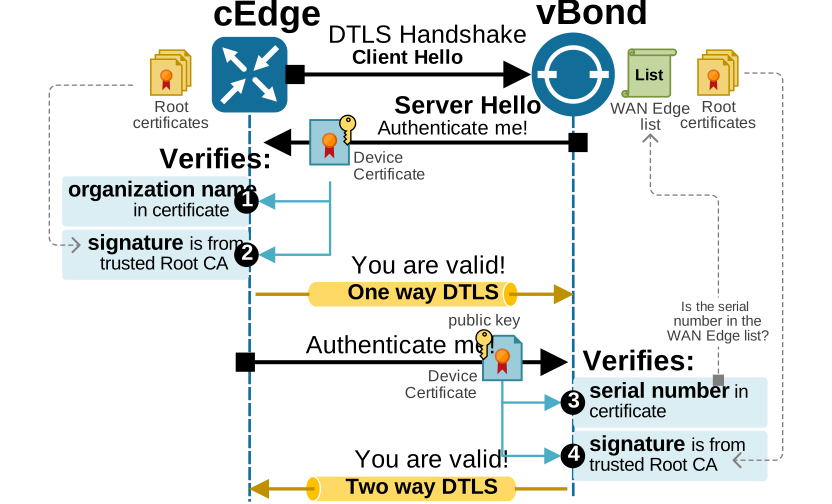
The router first checks that the certificate’s Organization Name matches its local configuration. If it does, it verifies the vBond certificate’s signature using the CA root public key already installed in its firmware. If both checks pass, the router sends its own X.509 certificate to vBond.
vBond checks whether the router’s serial number is in the list of authorized WAN edge devices received from vManage. If the router is authorized, vBond then verifies the router’s certificate. If all checks pass, the router and vBond establish a two-way DTLS control connection.
Notice that there is a difference in the validation process for virtual and physical routers.
- The x.509 certificate of a hardware edge router is installed during manufacturing (SUDI). Therefore, it is impossible to encode an organization's name into the certificate because it is unknown at the time of manufacturing which organization will use this exact unit.
- On the other hand, virtual routers generate a Certificate Signing Request (CSR) only after the org-name is configured on the device. As a result, the OU field is included in the x.509 certificate when the CA signs the request. Because of this, their authentication process is the same as the one used between controllers (both sides verify the organization name).