Now that we have the SD-WAN controllers already deployed, we will show the procedure for onboarding the Catalyst 8000V cloud routers to the SD-WAN fabric using a manual bootstrap configuration and an Enterprise CA. This is the most manual approach to onboarding cEdges, but it is also the most instructive.
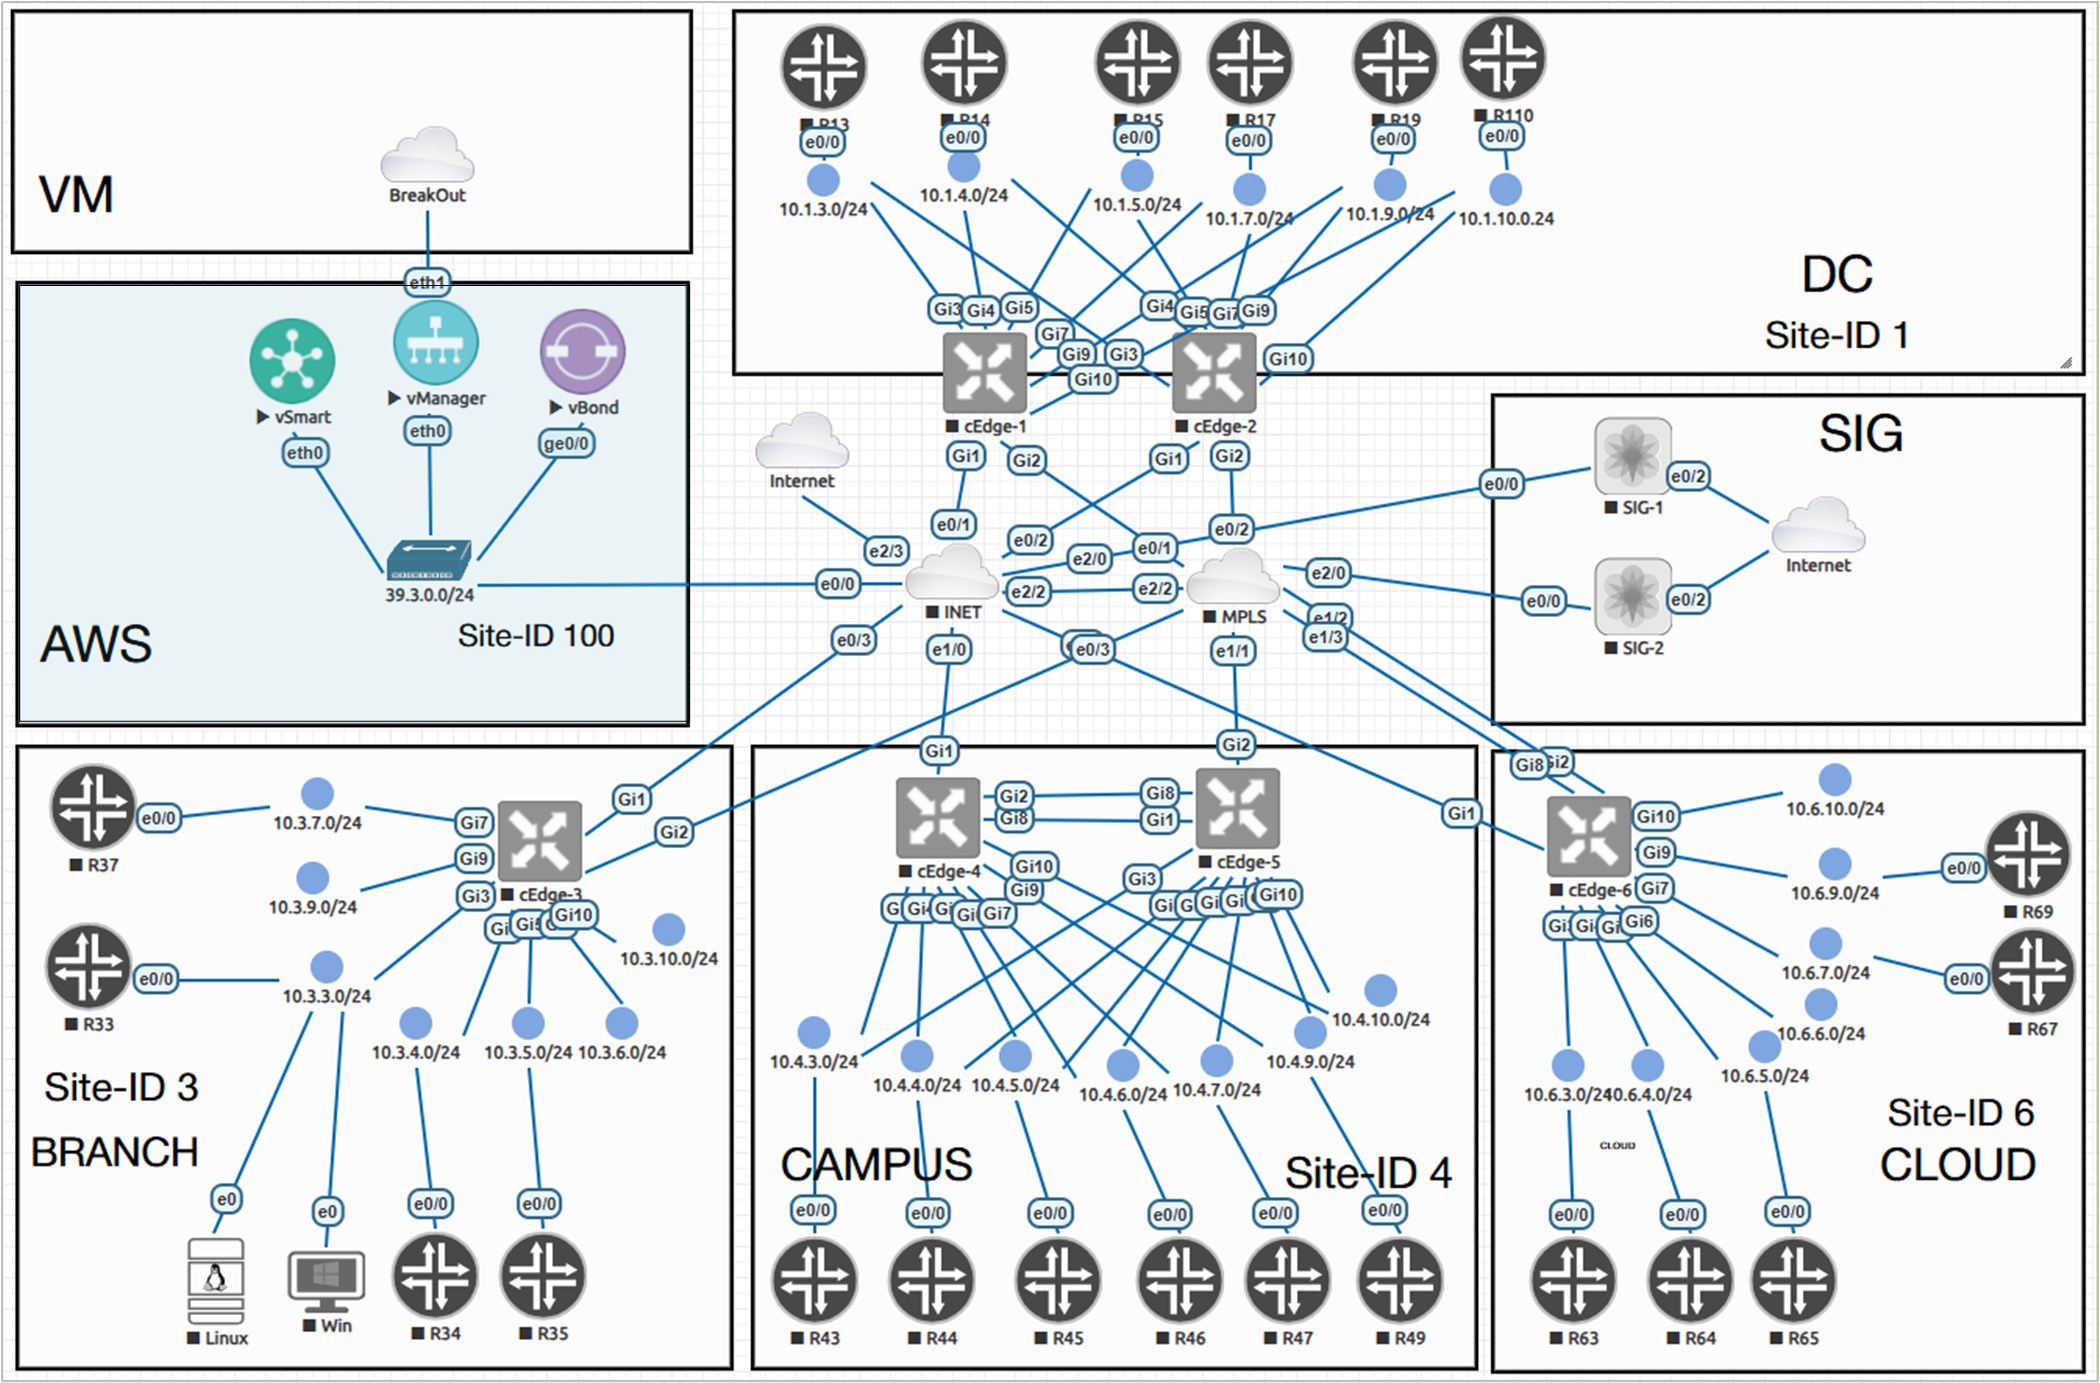
Initial Topology
The following diagram shows the physical topology that we will use in this example. All cEdge devices are Catalyst 8000V routers running IOS-XE version c8000v-26.1.1.
Prepare the software image
When a Catalyst 8000V router is powered on for the first time, it boots into AUTONOMOUS mode, as shown in the output below.
%BOOT-5-OPMODE_LOG: R0/0: binos: System booted in AUTONOMOUS modeThe router asks if you would like to enter the initial config dialog. We answer no.
Then we provide a new enable password and save the configuration to NVRAM.
% Please answer 'yes' or 'no'.
Would you like to enter the initial configuration dialog? [yes/no]: no
 The enable secret is a password used to protect
 access to privileged EXEC and configuration modes.
 This password, after entered, becomes encrypted in
 the configuration.
 -------------------------------------------------
 secret should be of minimum 10 characters and maximum 32 characters with
 at least 1 upper case, 1 lower case, 1 digit and
 should not contain [cisco]
 -------------------------------------------------
 Enter enable secret: ************
 Confirm enable secret: ************
The following configuration command script was created:
enable secret 9 $9$uYATfwi9sBtruU$A4/FPncLMnru9Oo4oQjaF89yHqrCXDJBp**********
!
end
[0] Go to the IOS command prompt without saving this config.
[1] Return back to the setup without saving this config.
[2] Save this configuration to nvram and exit.
Enter your selection [2]: 2
Building configuration...
Guestshell destroyed successfully command to modify this configuration.
Press RETURN to get started!
Now, it is time to install the root CA certificate on the cEdge router. In our previous lessons, we deployed the SD-WAN controllers using the Enterprise CA approach, with the vBond controller acting as a Root CA.
If you have deployed the SD-WAN controllers according to the book instructions, you should have the Root CA certificate on vBond named ROOTCA.pem. The easiest way to install the root certificate on a Catalyst 8000v router is by creating a local file directly on the router using TCLSH, as shown in the following example. In the highlighted section, you should paste the ROOTCA.pem certificate you take from vBond, using the "cat ROOTCA.pem" command in vshell mode.
cEdge# tclsh
cEdge(tcl)# puts [open "bootflash:ROOTCA.pem" w+] {
+> paste root-cert-here
+> }
cEdge-1(tcl)# exit
In the end, you should have the root certificate in the cEdge router's bootflash, as shown below.
Router# dir bootflash:
Directory of bootflash:/

38      -rw-             1319   Jul 4 2026 08:16:11 +00:00  ROOTCA.pem
30      drwx             4096   Jul 4 2026 06:13:58 +00:00  tracelogs
19      drwx             4096   Jul 4 2026 06:02:46 +00:00  .installer
67      -rw-              412   Jul 4 2026 05:54:28 +00:00  cvac.log
70      drwx             4096   Jul 4 2026 05:54:28 +00:00  license_evlog
135     -rw-              157   Jul 4 2026 05:54:27 +00:00  csrlxc-cfg.log
66      -rw-               30   Jul 4 2026 05:54:22 +00:00  throughput_monitor_params
17      -rwx              677   Jul 4 2026 05:53:48 +00:00  mode_event_log
...
...
5183766528 bytes total (3968655360 bytes free)
Now, it is time to reboot the router in CONTROLLER mode, which is required for SD-WAN. The router will notify you that a bootstrap configuration isn't available, but we will continue anyway.
Router# controller-mode enable
Enabling controller mode will erase the nvram filesystem,
remove all configuration files, and reload the box!
Ensure the BOOT variable points to a valid image
Continue? [confirm]
% Warning: Bootstrap config file needed for Day-0 boot is missing
Do you want to abort? (yes/[no]): no


*Jul  4 08:28:28.795: %SYS-7-NV_BLOCK_INIT: Initialized the geometry of nvram
*Jul  4 08:28:29.479: %BOOT-6-MODECHANGE: Mode change success
*Jul  4 08:28:35.569: %SYS-5-RELOAD: Reload requested by Exec.
                      Reload Reason: Enabling controller-mode.
Once the router boots in Controller mode, we need to install the Root CA certificate. You log in with the default admin/admin credentials and then install the certificate as shown in the CLI block below.
cEdge# request platform software sdwan root-cert-chain install bootflash:ROOTCA.pem
Uploading root-ca-cert-chain via VPN 0
Copying ... /bootflash/ROOTCA.pem via VPN 0
Updating the root certificate chain..
Successfully installed the root certificate chain
If everything has gone smoothly, you should see our Enterprise CA Root certificate installed on the router.
cEdge# show sdwan certificate root-ca-cert | in network
       Issuer: C=US, ST=NY, L=NY, O=networkacademy-io, CN=root.certificate
       Subject: C=US, ST=NY, L=NY, O=networkacademy-io, CN=root.certificate
Bootstraping cEdge-1
Configuring basic IP connectivity
Once the router loads up with the SD-WAN software, we can go ahead and configure the minimal configuration required to join the SD-WAN overlay fabric. Notice that when the cEdge router runs in Controller mode (basically SD-WAN mode), we enter the configuration mode using the config-transaction command instead of the well-known configure terminal or simply conf t.
In the following example, we configure basic IP addressing and default routing, along with essential system parameters such as system-IP, site-id, and vBond address. In this example, we will configure a DNS name for vBond, as recommended by Cisco.
cEdge# config-transaction
hostname cEdge-1
!
 int GigabitEthernet1
 ip address 39.3.1.1 255.255.255.0
 no shut
!
int GigabitEthernet2
 ip address 10.10.1.1 255.255.255.0
 no shut
 exit
!
 ip route 0.0.0.0 0.0.0.0 39.3.1.254
 ip route 0.0.0.0 0.0.0.0 10.10.1.254
 ip host vbond.networkacademy.io 39.3.0.10
!
system
 system-ip 1.1.1.1
 site-id 1
 organization-name "networkacademy-io"
 vbond vbond.networkacademy.io
commit
At this point, you should be able to ping all Cisco SD-WAN controllers from the cEdge router that is being onboarded. If there is no IP connectivity between the WAN edge router and the controllers, there is no point in continuing further. You should troubleshoot the problem first.
cEdge-1# ping 39.3.0.10 !pinging vBond
Type escape sequence to abort.
Sending 5, 100-byte ICMP Echos to 39.3.0.10, timeout is 2 seconds:
!!!!!
Success rate is 100 percent (5/5), round-trip min/avg/max = 1/3/5 ms
cEdge-1# ping 39.3.0.20 !pinging vManage
Type escape sequence to abort.
Sending 5, 100-byte ICMP Echos to 39.3.0.20, timeout is 2 seconds:
!!!!!
Success rate is 100 percent (5/5), round-trip min/avg/max = 1/1/5 mscEdge-1# ping 39.3.0.30 !pinging vSmart
Type escape sequence to abort.
Sending 5, 100-byte ICMP Echos to 39.3.0.30, timeout is 2 seconds:
!!!!!
Success rate is 100 percent (5/5), round-trip min/avg/max = 1/2/4 msConfiguring Tunnel interfaces
We are ready to configure the SD-WAN data plane tunnels if IP reachability exists between the cEdge router and the controllers. Notice something very important - the Tunnel keyword in the "interface Tunnel" command should always be with a capital T. It is unlike a regular Cisco IOS, where you can create a new tunnel using the "interface tunnel 1" command.
sdwan
 int GigabitEthernet1
 tunnel-interface
  color biz-internet
  encapsulation ipsec
!
 int GigabitEthernet2
 tunnel-interface
  color mpls restrict
  encapsulation ipsec
!
interface Tunnel 1
 ip unnumbered GigabitEthernet1
 tunnel source GigabitEthernet1
 tunnel mode sdwan
!
interface Tunnel 2
 ip unnumbered GigabitEthernet2
 tunnel source GigabitEthernet2
 tunnel mode sdwan
commit
At this point, the Catalyst 8000V router has the required configuration to join the SD-WAN fabric. However, it still cannot join the SD-WAN fabric for two reasons:
- It doesn't have a device identity certificate.
- It is not whitelisted on the control plane (its serial number is not known to the controllers).
Whitelisting (The WAN Edge list)
Before a router can join the SD-WAN control plane, it must be whitelisted first. Why? This prevents any unauthorized devices from trying to join your network.
In practice, this means you must either automatically or manually add all device serial numbers to your Cisco PnP Portal using your Cisco Smart Account, then download the WAN Edge list, as shown in Step 1 of the deployment process.
The file is typically named serialFile.viptela. At this point, you must download it from the PnP portal and have it with you, as shown in step 2b in the diagram below.

Now, before we upload the WAN edge list to the vManage controller, it is a good practice to first create the Network Hierarchy. This means defining the different sites that we have in the topology.
We go to Configuration > Network Hierarchy and add all five sites that we have in the topology, as shown in the screenshot below.
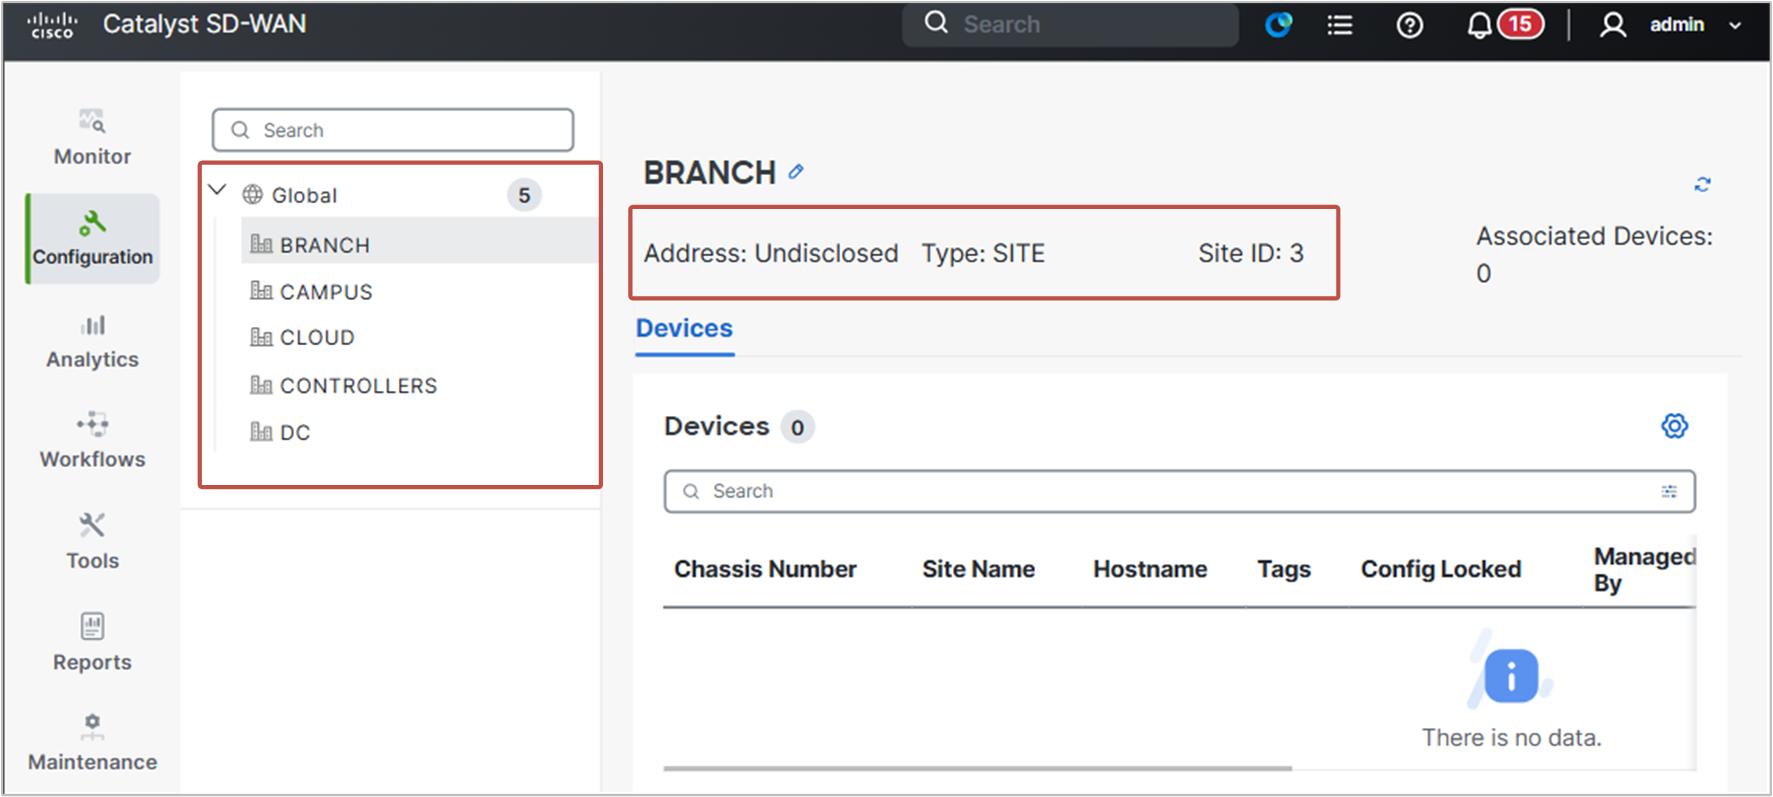
The sites are as follows:
- CONTROLLERS: Site-id 100
- DC: Site-id 1
- BRANCH: Site-id 3
- CAMPUS: Site-id 4
- CLOUD: Site-id 6
Next, we go to Configuration > Devices > WAN Edges > Add WAN edges > Upload WAN Edge list and upload the serialFile.viptela list.
The list could contain serial numbers of many WAN Edge routers. You need to select only six serial numbers for model vedge-C8000V and then click Next.
Then, on the Add and Review Device Configuration page, we add Hostname, System-IP, and Site Name to all six routers, as shown in the screenshot below.
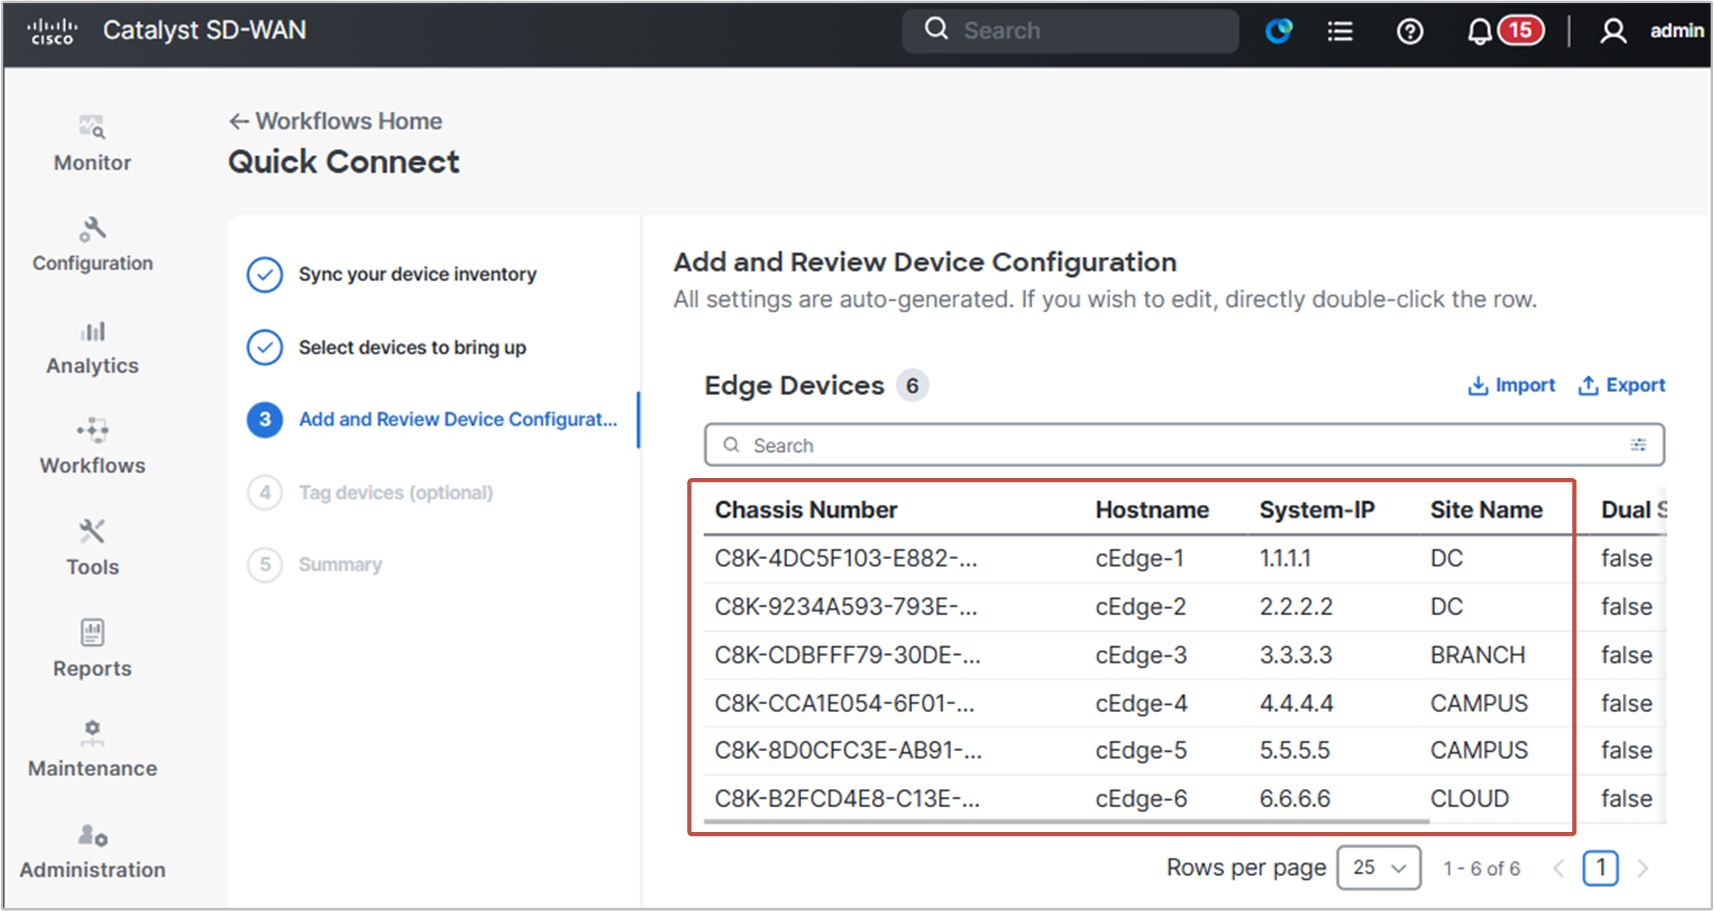
On the next page, you can also add Tags to each router. For example, cEdges 1 and 2 can be tagged with DC, cEdge-3 with Branch, and so on.
Lastly, you click Onboard.
Identity Certificate
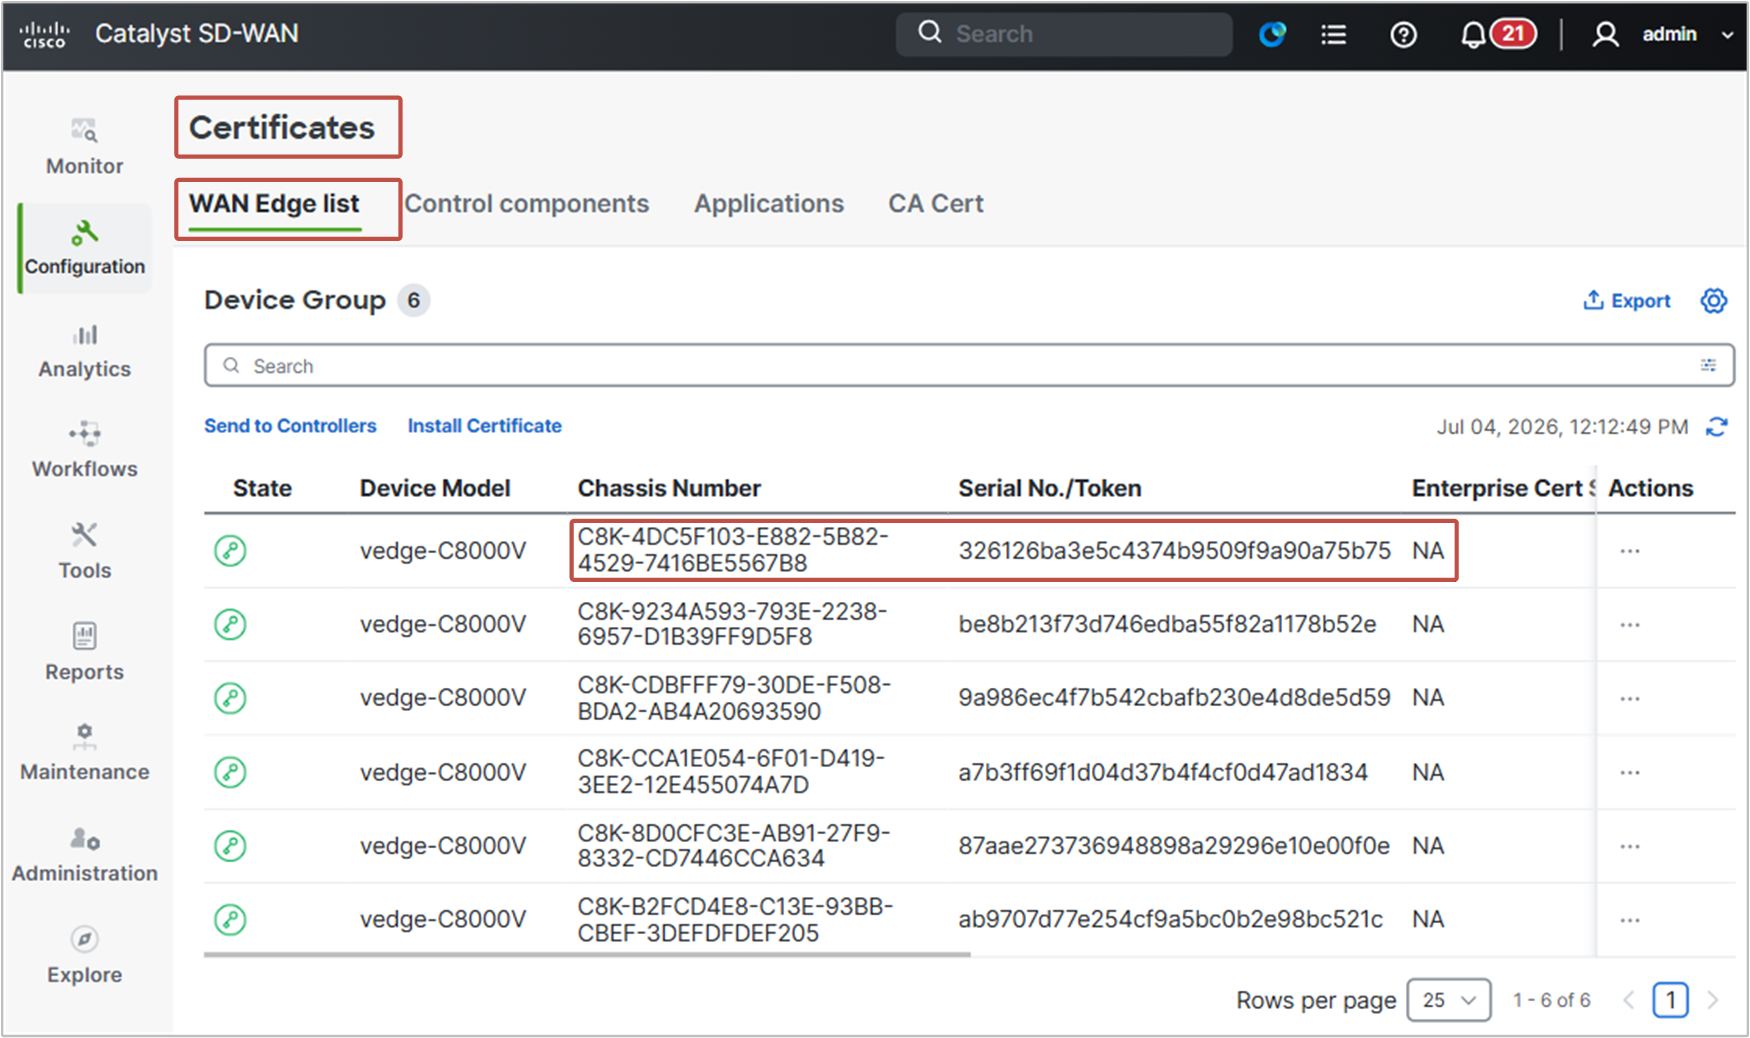
Now, all SD-WAN controllers have the WAN edge list, which tells them which serial numbers are allowed to join the SD-WAN fabric, as shown in the diagram below.

The last step in the onboarding process is to install a device (identity) certificate on cEdge-1 so it can join the SD-WAN network.
First, we need to have an unused chassis number and token in vManage under Configuration > Certificates > WAN Edges. We use them to activate the cEdge router, as shown in the example below.
Then, we activate the cEdge-1 router using the chassis number and the token we have taken from vManage, as shown in the CLI output below.
cEdge# request platform software sdwan vedge_cloud activate chassis-number C8K-D4B9356B-XXXX-XXXX-XXXX-XXXXXXXXXXXX token bf6bd685das45996xxxxxxxxxxxxxxxxOnce you've done that and a few minutes have passed, you should see in the vManage GUI that the State of this WAN Edge router changed from Token Generated to CSR Generated. This means that vManage logged into cEdge-1 and generated a Certificate Signing Request (CSR).
Now we need to take this CSR from cEdge-1, add it to vBond (since it is our Enterprise CA), sign it with the Enterprise CA private key (ROOTCA.key), and then install the certificate via vManage.
First, let's take the CSR from cEdge-1. We can do it in two ways:
- From vManage, click on Actions > View Device CSR and then download the CSR.
- Directly from cEdge-1, using the following CLI command. This is our preferred approach.
cEdge-1# show sdwan certificate signing-request
-----BEGIN CERTIFICATE REQUEST-----
MIIDYTCCAkkCAQAwgeAxFjAUBgNVBAoTDUNpc2NvIFN5c3RlbXMxGjAYBgNVBAsT
EW5ldHdvcmthY2FkZW15LWlvMTAwLgYJKoZIhvcNAQkBFiFjaXNjby1zZHdhbi1j
ZXJ0LWFkbWluc0BjaXNjby5jb20xETAPBgNVBAcTCFNhbiBKb3NlMRMwEQYDVQQI
EwpDYWxpZm9ybmlhMQswCQYDVQQGEwJaUzFDMEEGA1UEAxM6dmVkZ2UtQzhLLTRE
QzVGMTAzLUU4ODItNUI4Mi00NTI5LTc0MTZCRTU1NjdCOC0xLmNpc2NvLmNvbTCC
ASIwDQYJKoZIhvcNAQEBBQADggEPADCCAQoCggEBANuOmS1QziONMJ8los1PdA38
wF3GKx2SI3vFgVkJ4id+cqrdZw0+Ic4IDOJrEMT0Hk2duXtgJ8RWDW73Mdxk/Loc
EWyOwj/2J+oq329k/mosFpcob2JMSYxJT5NX/3IjHaGaKuDvnfMGqQRug4VLKEQ0
C7asmtii2DSidRUgFhP9rl3xccuuEDOLhkcpvhRfuMFvRt7j+usTkhVclEwshfy5
jSrwDvyPhR/5iCNlByvtyGfpmhM39r7VuFLfrxgiAoo8ye8TdpPe27W8Vwl61gtD
7WsBm5SxMPi6Eq1M0Cq9YblCN015ozUDK/pU9kCGRCTCqKrYfmiIHr0Zep3q//cC
AwEAAaA7MDkGCSqGSIb3DQEJDjEsMCowCQYDVR0TBAIwADAdBgNVHQ4EFgQUP6h0
kXPjoHjgykPCLKM947QNFiEwDQYJKoZIhvcNAQELBQADggEBAFH3wGICB1RNmNii
gP8W5n8erfKaBQj1vkvDnSN/mPNBMSpW2gyhi2dxy4srigkga7vNgWZgEkTH4s/9
+0JtkIwK4HH2PBfSygopYhwKB6mAErGxvTsb7PYAGzVuN2tsbywLYqlk/cJpTX3h
iS0o6LQnpA1ZDHfS6xzmoqxLyUG63LYIG7EEnjb3e3k0Suwn8HTIdPoGJ4XI8OQk
A527fTAJrjMCT0+GW4MDL+7xSBHMLw+i98LT5gLNU96HenkBwki/6/obn6c8wPjh
g+SgiwMjfHex1M8Tus8rZZYr9vO9FsAoCUXq2IriN++LTGJn9Rf6Z3GFOcCuZfOk
lTY0Mkk=
-----END CERTIFICATE REQUEST-----
Next, we add the CSR to vBond, as shown in the following CLI block.
vBond# vshell
vBond:~$ echo "-----BEGIN CERTIFICATE REQUEST-----
> MIIDYTCCAkkCAQAwgeAxFjAUBgNVBAoTDUNpc2NvIFN5c3RlbXMxGjAYBgNVBAsT
> EW5ldHdvcmthY2FkZW15LWlvMTAwLgYJKoZIhvcNAQkBFiFjaXNjby1zZHdhbi1j
> ZXJ0LWFkbWluc0BjaXNjby5jb20xETAPBgNVBAcTCFNhbiBKb3NlMRMwEQYDVQQI
> EwpDYWxpZm9ybmlhMQswCQYDVQQGEwJVUzFDMEEGA1UEAxM6dmVkZ2UtQzhLLTRE
> QzVGMTAzLUU4ODItNUI4Mi00NTI5LTc0MTZCRTU1NjdCOC0xLmNpc2NvLmNvbTCC
> ASIwDQYJKoZIhvcNAQEBBQADggEPADCCAQoCggEBANuOmS1QziONMJ8los1PdA38
> wF3GKx2SI3vFgVkJ4id+cqrdZw0+Ic4IDOJrEMT0Hk2duXtgJ8RWDW73Mdxk/Loc
> EWyOwj/2J+oq329k/mosFpcob2JMSYxJT5NX/3IjHaGaKuDvnfMGqQRug4VLKEQ0
> C7asmtii2DSidRUgFhP9rl3ND3uuEDOLhkcpvhRfuMFvRt7j+usTkhVclEwshfy5
> jSrwDvyPhR/5iCNlByvtyGfpmhM39r7VuFLfrxgiAoo8ye8TdpPe27W8Vwl61gtD
> 7WsBm5SxMPi6Eq1M0Cq9YblCN015ozUDK/pU9kCGRCTCqKrYfmiIHr0Zep3q//cC
> AwEAAaA7MDkGCSqGSIb3DQEJDjEsMCowCQYDVR0TBAIwADAdBgNVHQ4EFgQUP6h0
> kXPjoHjgykPCLKM94aQNFiEwDQYJKoZIhvcNAQELBQADggEBAFH3wGICB1RNmNii
> gP8W5n8erfKaBQj1vkvDnSN/mPNBMSpW2gyhi2dxy4srigkga7vNgWZgEkTH4s/9
> +0JtkIwK4HH2PBfSygopYhwKB6mAErGxvTsb7PYAGzVuN2tsbywLYqlk/cJpTX3h
> iS0o6LQnpA1ZDHfS6xzmoqxLyUG63LYIG7EEnjb3e3k0Suwn8HTIdPoGJ4XI8OQk
> A527fTAJrjMCT0+GW4MDL+7xSBHMLw+i98LT5gLNU96HenkBwki/6/obn6c8wPjh
> g+SgiwMjfHex1M8Tus8rZZYr9vO9FsAoCUXq2IriN++LTGJn9Rf6Z3GFOcCuZfOk
> lTY0Mkk=
> -----END CERTIFICATE REQUEST-----" > cEdge1.csr
Next, we sign the CSR with the Roor CA private key as shown in the CLI block below.
vBond:~$ openssl x509 -req -in cEdge1.csr -CA ROOTCA.pem -CAkey ROOTCA.key -CAcreateserial -out cEdge1.crt -days 500 -sha256

Certificate request self-signature ok
subject=O=Cisco Systems, OU=networkacademy-io, emailAddress=cisco-sdwan-cert-admins@cisco.com, L=San Jose, ST=California, C=US, CN=vedge-C8K-4DC5F103-E882-5B82-4529-7416BE5567B8-1.cisco.com
Next, we copy the content of the signed certificate, as shown in the CLI block below.
vBond:~$ cat cEdge1.crt
-----BEGIN CERTIFICATE-----
MIIEEDCCAvigAwIBAgIUKPlIi3tfI6gomjnCBa9cIfHeYw0wDQYJKoZIhvcNAQEL
BQAwXzELMAkGA1UEBhMCVVMxCzAJBgNVBAgMAk5ZMQswCQYDVQQHDAJOWTEaMBgG
A1UECgwRbmV0d29ya2FjYWRlbXktaW8xGjAYBgNVBAMMEW5ldHdvcmthY2FkZW15
LWlvMB4XDTI2MDcwNDA5Mjc1NVoXDTI3MTExNjA5Mjc1NVowgeAxFjAUBgNVBAoT
DUNpc2NvIFN5c3RlbXMxGjAYBgNVBAsTEW5ldHdvcmthY2FkZW15LWlvMTAwLgYJ
KoZIhvcNAQkBFiFjaXNjby1zZHdhbi1jZXJ0LWFkbWluc0BjaXNjby5jb20xETAP
BgNVBAcTCFNhbiBKb3NlMRMwEQYDVQQIEwpDYWxpZm9ybmlhMQswCQYDVQQGEwJV
UzFDMEEGA1UEAxM6dmVkZ2UtQzhLLTREQzVGMTAzLUU4ODItNUI4Mi00NTI5LTc0
MTZCRTU1NjdCOC0xLmNpc2NvLmNvbTCCASIwDQYJKoZIhvcNAQEBBQADggEPADCC
AQoCggEBANuOmS1QziONMJ8los1PdA38wF3GKx2SI3vFgVkJ4id+cqrdZw0+Ic4I
DOJrEMT0Hk2duXtgJ8RWDW73Mdxk/LocEWyOwj/2J+oq329k/mosFpcob2JMSYxJ
T5NX/3IjHaGaKuDvnfMGqQRug4VLKEQ0C7asmtii2DSidRUgFhP9rl3ND3uuEDOL
hkcpvhRfuMFvRt7j+usTkhVclEwshfy5jSrwDvyPhR/5iCNlByvtyGfpmhM39r7V
uFLfrxgiAoo8ye8TdpPe27W8Vwl61gtD7WsBm5SxMPi6Eq1M0Cq9YblCN015ozUD
K/pU9kCGRCTCqKrYfmiIHraZep3q//cCAwEAAaNCMEAwHQYDVR0OBBYEFD+odJFz
46B44MpDwiyjPeO0DRYhMB8GA1UdIwQYMBaAFIfpf60fbbEU0qD3CGBCv7sBmHDU
MA0GCSqGSIb3DQEBCwUAA4IBAQB+mbAkPheH3tnaSPmGY1HNMZNAuyQV06sSfNhU
rx0Ce/rwzZ0RcYfP7ZuDm7wYRUDjVndw9l+eKL+niDgfcYgM5V/cpib1Avg1y8yw
BwXUyTfA3CtPef0yXvdhpL5sM1T+Hbtd1a+Mno7Ui0/GYCCmqnNO8zqV0YsXgROw
oBrm+wRjJXUK2PTzGpjSgZE8AgEoqbggNyXi9QGOBULD39c+8hyv6thjbwjrcxaU
eVx/Mq1DJDb3cipgp0nHTTAJHBqWP6i6BoqdCnOIOpdmp8jUhe8GXIQAZ2BP97vP
3Nr9xl+JfslDKpqeaT74/61UyUytbsBKdB//b/rLsWSPxOPI
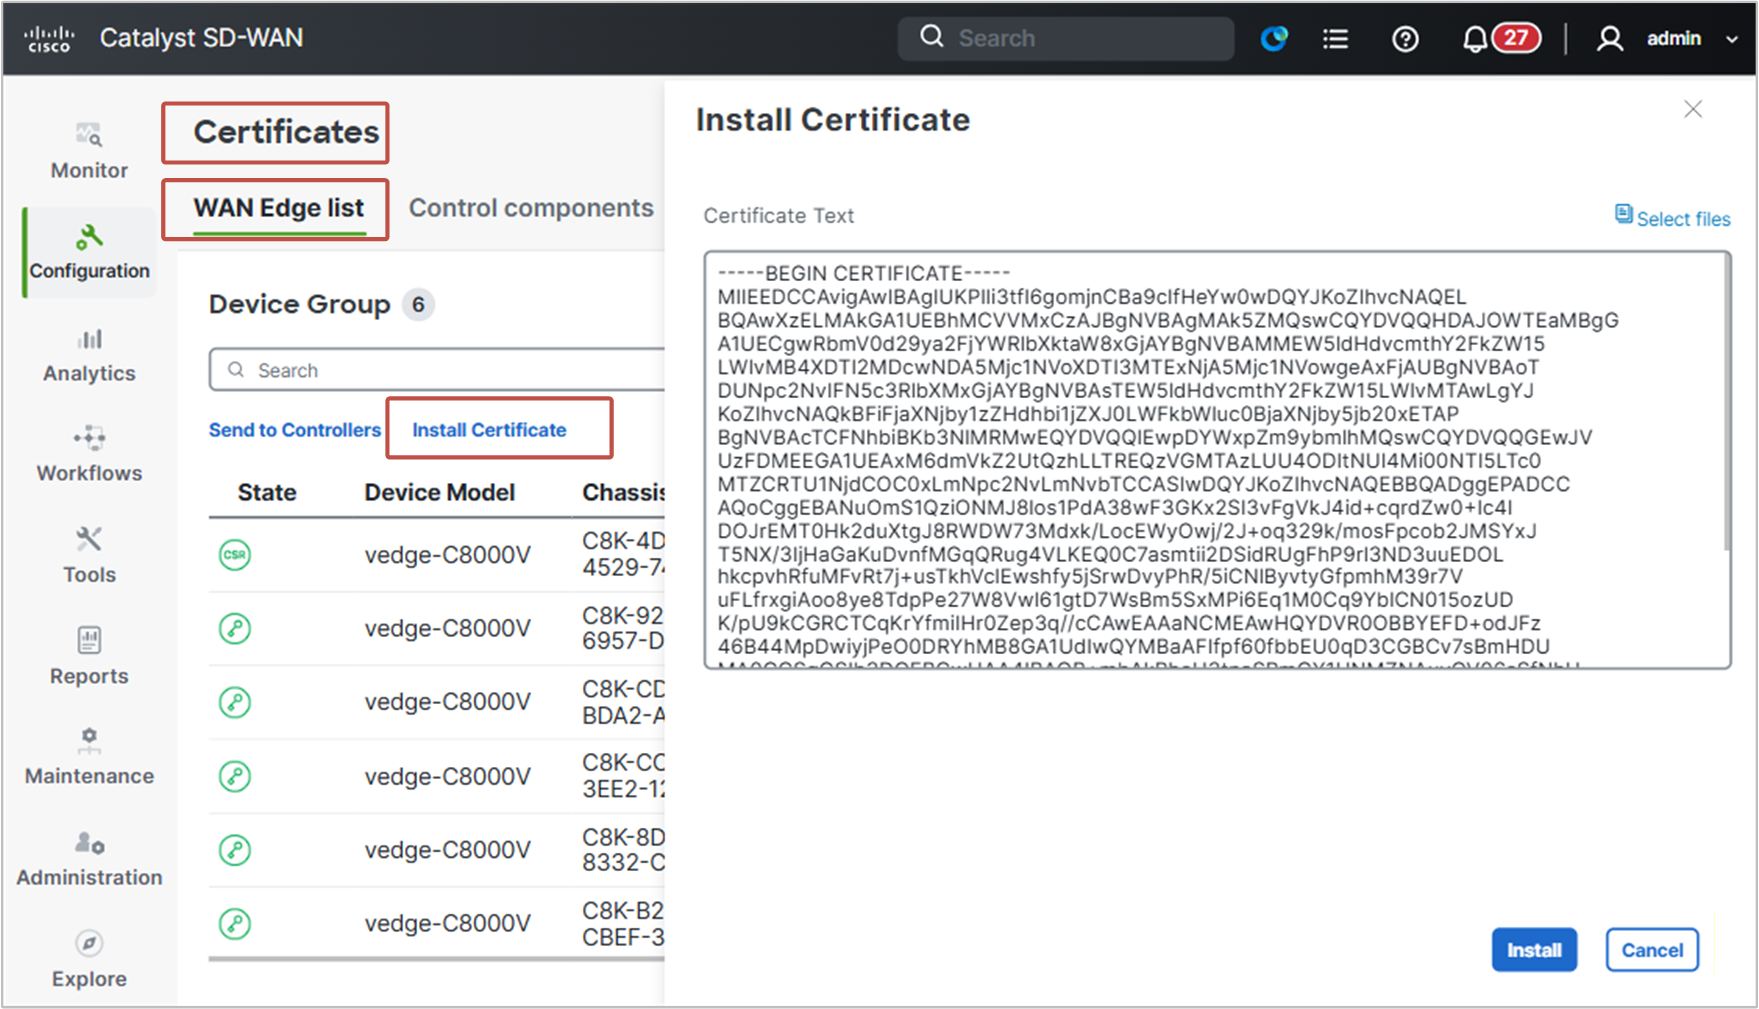
-----END CERTIFICATE-----Last, we go to Configuration > Certificates > WAN Edges > Install Certificate and paste the certificate in clear text, as shown in the screenshot below.
The following diagram shows a high-level overview of the process that we have done so far. Upon booting, the router has generated a public/private key pair. Then, it generated a Certificate Signing Request (CSR). We took it and uploaded it to the Root CA (in our example, on vBond). Then we signed the CSR with the Root CA's private key and then gave the signed certificate to vManage so it can install it on the router, as shown below.

Now, let's verify that the router successfully onboarded to the SD-WAN fabric.
Verifications
If you've done everything and the onboarding process has been successful, the router should have logged something similar, as highlighted below.
cEdge-1#
*Jul4 09:30: %DMI-5-AUTH_PASSED: R0/0: dmiauthd: User 'vmanage-admin' authenticated successfully
*Jul4 09:30: %CERT-5-ROOT_CERT_CHAIN_INSTALLED: Root certificate chain installed
*Jul4 09:30: %VDAEMON-5-CONTROL_CONN_STATE_CHANGE: R0/0: vdaemon: Control connection to vBond
*Jul4 09:30: %CERT-5-CERT_STAGED: A new certificate has been staged
*Jul4 09:31: %CERT-5-CERT_INSTALLED: A new certificate has been installed
*Jul4 09:30: %VDAEMON-5-CONTROL_CONN_STATE_CHANGE: R0/0: vdaemon: Control connection to vBond is UP
*Jul4 09:31: %VDAEMON-5-CONTROL_CONN_STATE_CHANGE: R0/0: vdaemon: Control connection to vSmart is UP
*Jul4 09:31: %OMPD-3-PEER_STATE_INIT: R0/0: ompd: vSmart peer 1.1.1.30 state changed to Init
*Jul4 09:31: %OMPD-6-PEER_STATE_HANDSHAKE: vSmart peer 1.1.1.30 state changed to Handshake
*Jul4 09:31: %OMPD-5-PEER_STATE_UP: R0/0: ompd: vSmart peer 1.1.1.30 state changed to Up
*Jul4 09:31: %OMPD-6-NUMBER_OF_VSMARTS: R0/0: ompd: Number of vSmarts connected : 1
You can see that vManage logged in to the router and then installed the device certificates (highlighted in green).
At the bottom, we can see that the router then successfully established control connections to vBond and vSmart and started an OMP peering with the vSmart controller.
We can also verify that the router onboarded successfully via the vManage GUI. You can see under WAN Edges, that one router is reachable.

Lastly, check the output of the show sdwan control local-properties command. It is the one that gives the most information when it comes to onboarding edge routers to the SD-WAN fabric. It is also the best command when it comes to troubleshooting onboarding issues.
cEdge-1# show sdwan control local-properties

personality                       vedge
sp-organization-name              networkacademy-io
organization-name                 networkacademy-io
root-ca-chain-status              Installed
root-ca-crl-status                Not-Installed

certificate-status                Installed
certificate-validity              Valid
certificate-not-valid-before      Jul  4 09:27:55 2026 GMT
certificate-not-valid-after       Nov 16 09:27:55 2027 GMT

enterprise-cert-status            Not Applicable
enterprise-cert-validity          Not Applicable
enterprise-cert-not-valid-before  Not Applicable
enterprise-cert-not-valid-after   Not Applicable

dns-name                          vbond.networkacademy.io
site-id                           1
domain-id                         1
protocol                          dtls
tls-port                          0
system-ip                         1.1.1.1
chassis-num/unique-id             C8K-4DC5F103-E882-5B82-4529-7416BE5567B8
serial-num                        28F9488B7B5F23A8289A39C205AF5C21F1DE630D
subject-serial-num                N/A
enterprise-serial-num             No certificate installed
token                             Invalid
keygen-interval                   1:00:00:00
retry-interval                    0:00:00:15
no-activity-exp-interval          0:00:00:20
dns-cache-ttl                     0:00:02:00
time-since-last-port-hop          0:00:01:07
embargo-check                     success
device-role                       edge-router
region-id-set                     N/A
mrf-migration-mode                disabled
mrf-management-region             no
number-vbond-peers                1

INDEX   IP                                      PORT
----------------------------------------------------
0       39.3.0.10                               12346

number-active-wan-interfaces      2


 NAT TYPE: E -- indicates End-point independent mapping
           A -- indicates Address-port dependent mapping
           N -- indicates Not learned
           Note: Requires minimum two vbonds to learn the NAT type

                         PUBLIC          PUBLIC PRIVATE         PRIVATE                                 PRIVATE                        WAN   MAX   RESTRICT/           LAST         SPI TIME    NAT  VM          BIND
INTERFACE                IPv4            PORT   IPv4            IPv6                                    PORT    VS/VM COLOR            STATE CNTRL CONTROL/     LR/LB  CONNECTION   REMAINING   TYPE CON REG     INTERFACE
                                                                                                                                                   STUN                                              PRF IDs
--------------------------------------------------------------------------------------------------------------------------------------------------------------------------------------------------------------------------
GigabitEthernet1              39.3.1.1        12366  39.3.1.1        ::                                      12366    1/1  biz-internet     up     2      no/yes/no   No/No  0:00:00:14   0:22:06:49  N    5  Default N/A
GigabitEthernet2              10.10.1.1       12386  10.10.1.1       ::                                      12386    0/0  mpls             up     2     yes/yes/no   No/No  0:00:00:01   0:22:36:49  N    5  Default N/A
Onboarding the other routers (cEdges 2-6)
This example showed how to onboard one router. To onboard the other five WAN edges, you must repeat the process for each one again. Only the part with uploading the WAN edge list is not necessary anymore, since we have already uploaded the WAN edge list to the controllers.
Common Onboarding Issues
If you have done all the steps as shown in this example but encounter an error, make sure to check the following two very common issues:
- The time on the controllers and the routers is not synced. Most virtual environments, such as EVE-NG and CML, synchronize the time of all devices with the time of the parent virtual machine. However, sometimes the time may differ, which will make the certificate verification process fail. If you have issues with the onboarding process, try using NTP with an accurate clock on all devices.
- Version mismatch. Often, people try to onboard routers with a higher software version than the controllers, which results in failure. There is an official Cisco compatibility matrix that says which controller versions are compatible with which router versions. However, for lab environments, it is best to use the exact same version on both routers and controllers.
- Other issues. If you encounter other onboarding issues, please leave a comment below, and we or other readers will try to help.