In this lab, we are going to make some traffic engineering by modifying the TLOC preference of one of the WAN edge routers at the hub site.
The Lab Topology
By default, the overlay fabric load-share the traffic across all equal paths. In our lab topology, this means that the traffic towards the datacenter is load-shared across all IPsec tunnels between vEdge-4 and vEdges 1 and 2. If we look at the example shown in figure 1, vEdge-4 receives four OMP routes for prefix 172.16.50.0/24.

Therefore, vEdge-4 knows that it can reach this prefix 172.16.50.0/24 via TLOCs 1,2,3, and 4 if they are in an Active state. A TLOC is active when there is at least one BFD session associated with that TLOC. So at this point, WAN edge router 4 has four equal-cost routes towards 172.16.50.0/24 and is doing an ECMP routing toward the hub. This can be verified using the following command:
vEdge-4# show ip fib 172.16.50.0/24 | tab

     ADDRESS                        OUT     NEXTHOP    NEXTHOP  SA
VPN  FAMILY   ROUTE           PATH  IFNAME  ADDRESS    LABEL    INDEX  TLOC IP      COLOR
-----------------------------------------------------------------------------------------------------
1    ipv4     172.16.50.0/24  1     ipsec   10.50.1.1  1        15     50.50.50.50  mpls
1    ipv4     172.16.50.0/24  2     ipsec   50.1.1.1   1        13     50.50.50.50  public-internet
1    ipv4     172.16.50.0/24  3     ipsec   10.50.2.1  1        14     50.50.50.51  mpls
1    ipv4     172.16.50.0/24  4     ipsec   50.1.2.1   1        16     50.50.50.51  public-internet
You can see that there are 4 equal-cost routes about prefix 172.16.50.0/24 as is shown in figure 1. In order to influence the OMP Best-Path algorithm, we are going to increase the TLOC preference of the TLOCs of vEdge-2 (highlighted in yellow).
vEdge-4# show omp tlocs detail | tab
#some lines and columns are omitted for clarity

ADDRESS
FAMILY   TLOC IP        COLOR            ENCAP  FROM PEER PREFERENCE WEIGHT
---------------------------------------------------------------------------
ipv4     50.50.50.50    mpls             ipsec  1.1.0.3   0          1
         50.50.50.50    public-internet  ipsec  1.1.0.3   0          1
         50.50.50.51    mpls             ipsec  1.1.0.3   0          1
         50.50.50.51    public-internet  ipsec  1.1.0.3   0          1
The goal of this lesson is to create a Centralized Control Policy that will influence the TLOC preference values of vEdge-2's TLOCs. This will then influence the routing decision made by all spoke routers that have vRoutes pointing to vEdge-2's TLOCs.
OMP Best-Path Selection
As we have already learned, WAN edge routers advertise their local network routes to the vSmart controllers using OMP. Depending on the centralized control policy in place and the network topology, the vSmart controllers re-advertise these omp routes back to all other vEdge devices. Considering that most sites have multiple vEdge devices, a network can be advertised by multiple vEdge devices. Therefore, the other vEdge devices must perform the following Best-Path Selection algorithm in order to decide which omp route to use for the actual data forwarding:
- The Best-Path selection algorithm is performed only against valid OMP routes. Invalid routes are ignored. A route must have a next-hop TLOC that is known and reachable to be valid.
- Prefer ACTIVE routes over STALE routes. A route is ACTIVE when there is an OMP session in UP state with the destination TLOC.
- Select the route with the lower administrative distance (AD) value.
- If AD values are equal, select the route with the higher OMP route preference value.
- If OMP preference values are equal, select the route with the higher TLOC preference value. (on vEdges only)
- If the TLOC preference values are equal, compare the route type and select the route based on the origin in the following order:
- Connected
- Static
- EBGP
- OSPF Intra-area
- OSPF inter-area
- OSPF external
- iBGP
- Unknown
- If everything up to this point is equal, select the route with the lower IGP metric.
- If the origin and IGP metric are equal, select the route coming from the node with the lowest router ID.
- If the router IDs are the same, a vEdge router selects the OMP route with the lowest private IP address.
To enforce the desired traffic engineering (making traffic destined to 172.16.50.0/24 to prefer the routes via vEdge-2), we are going to manipulate step 4 of the OMP best path algorithm - we are going to increment the TLOC preference of both TLOCs of vEdge-2 and because all other values up to step 4 are equal, the OMP route from vEdge-2 will be preferred over the OMP routes advertised by vEdge-1.
Inbound Centralized Policy
With an inbound centralized policy, we can modify any given property of a particular vRoute before it goes into the routing table of the vSmart controller. This will then influence the best-path selection and lead to a different output from the best-path algorithm. Remember that the best routes are then advertised downstream to all WAN edge routers. Therefore, manipulating the controller's routing table will change the control-plane information across the whole overlay fabric.

This lab's goal is to ensure that traffic from all spoke vEdges enters the hub site through vEdge-2 instead of load-balancing between both vEdge-1 and vEdge-2. We will do this by creating an Inbound Centralized Policy that matches the TLOCs originated by the hub vEdges and modifying the TLOC preference values in the following manner. The TLOCs coming from vEdge-1 will be modified to have a TLOC preference of 100, and those from vEdge-2 will be modified to have a TLOC preference of 200. Note that this control plane information will be modified before the TLOC routes are inserted into the vSmart's TLOC table.
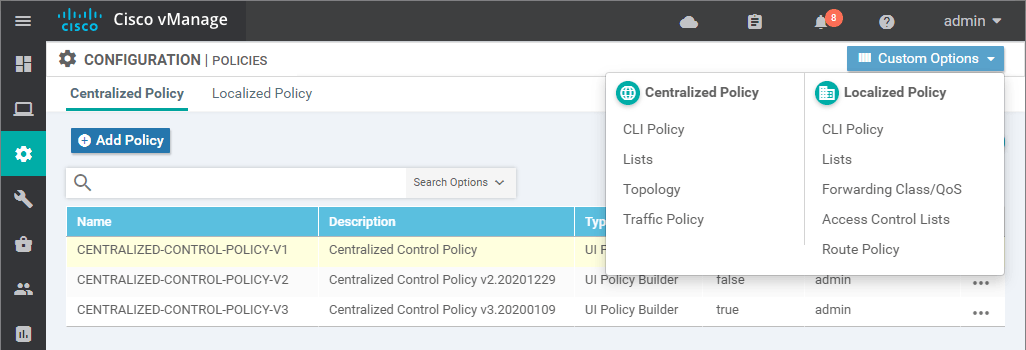
Let's create a new Centralized Control Policy using the vManage GUI. We go to Configuration > Policies, and from the dropdown menu at the right top corner, we select Topology.
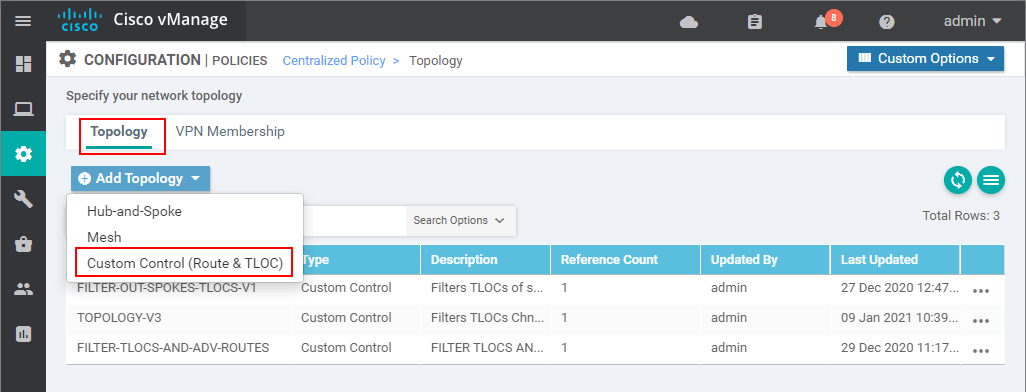
There we are going to see the Topology policies we have created in the previous labs. To create another one we go to Topology > Custom Control (Route & TLOC).
For this policy, we will use the name TLOC_PREFERENCE_V4 and the same name for a description. Then we click the Sequence Type button to add a new sequence and select TLOC. Then we will match the TLOC routes coming from vEdge-1 by specifying the System-IP address of vEdge-1 as Originator.
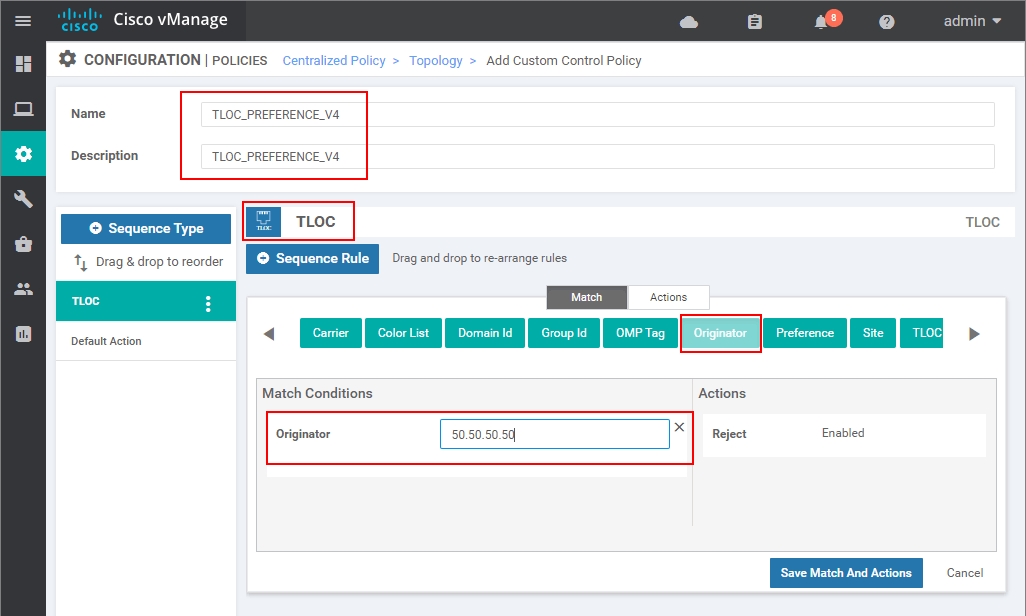
Then we go to the Actions tab and specify the action to be Accept. After that, we set the Preference value to be equal to 100.

At this point, we have created a TLOC sequence that matches the TLOCs of vEdge-1 by using the Originator value of 50.50.50.50. Then we accept these TLOCs and set a preference value of 100.
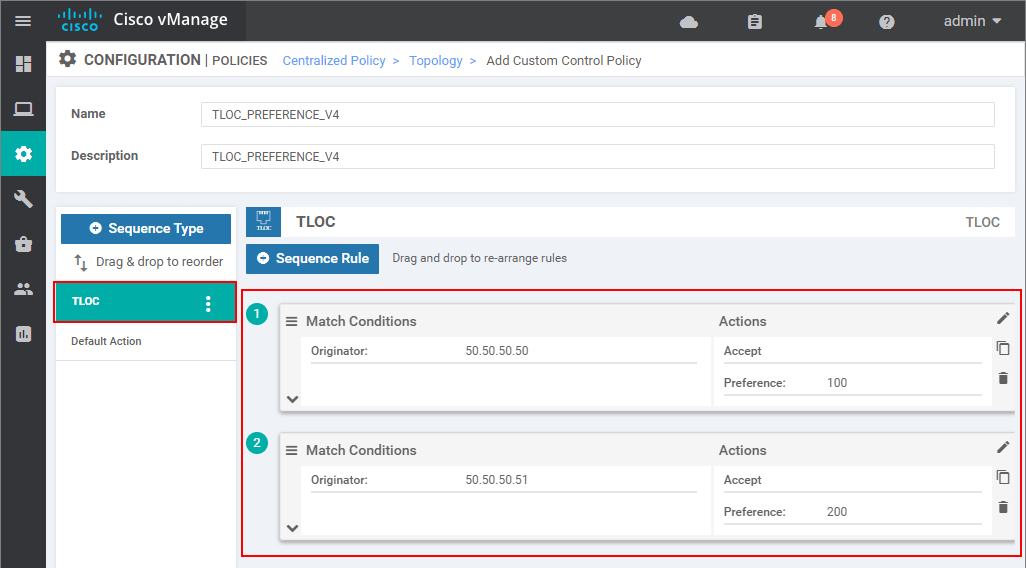
Now we have to do the same for the TLOCs of vEdge-2, but this time we are going to specify a higher TLOC Preference value in order to make all WAN edge routers prefer vEdge-2 as an entry point for the hub site. We add another Sequence of type TLOC and specify the System-IP address of vEdge-2 50.50.50.51. Then on the Actions tab we accept these TLOCs and set the Preference to be 200 (higher than the one specified for vEdge-1's TLOCs)

At this point, we must have the following TLOC sequences, as shown in the screenshot below:
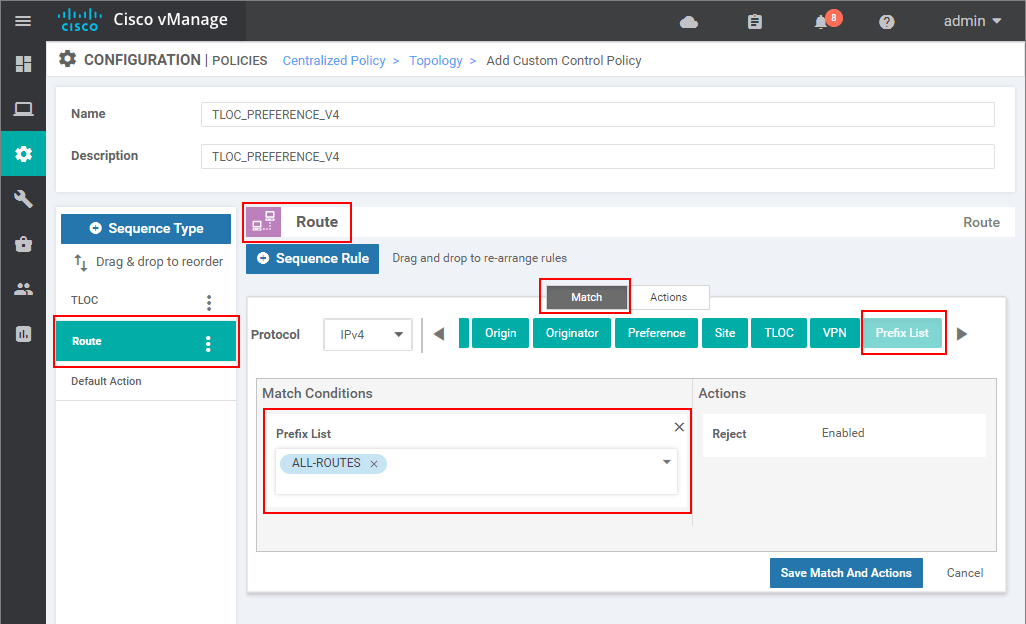
Now we must add another sequence to the policy, but this time it would be of type Route. There we must match the pre-defined ALL-ROUTES prefix-list and then specify the action to be Accept. This basically tells the controller to accept all vRoutes because otherwise, they will be rejected by the default action at the end, which is Reject.
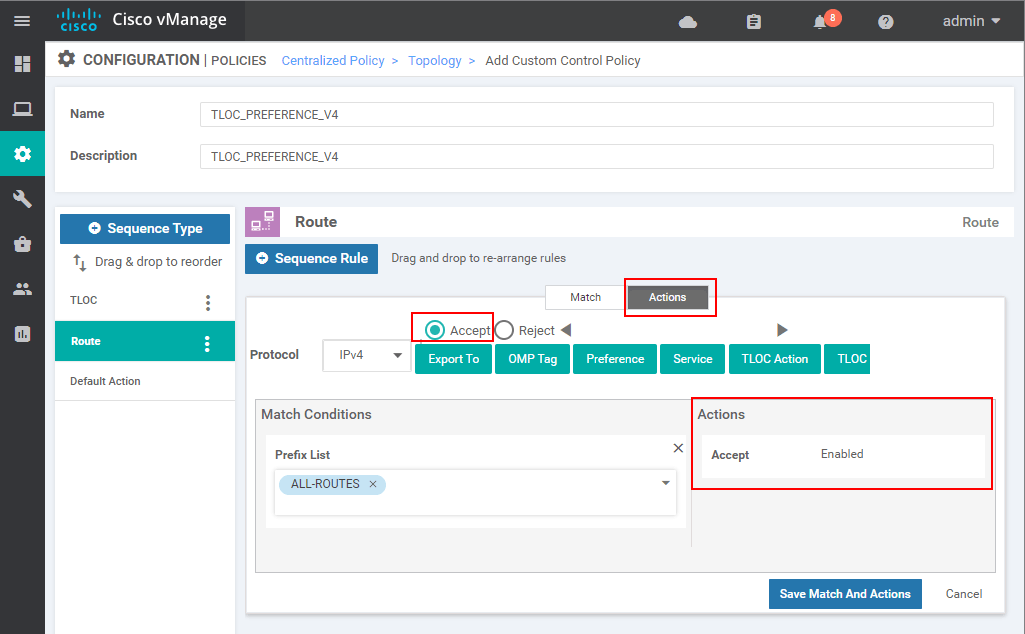
On the Actions tab we click on the Accept radio button.
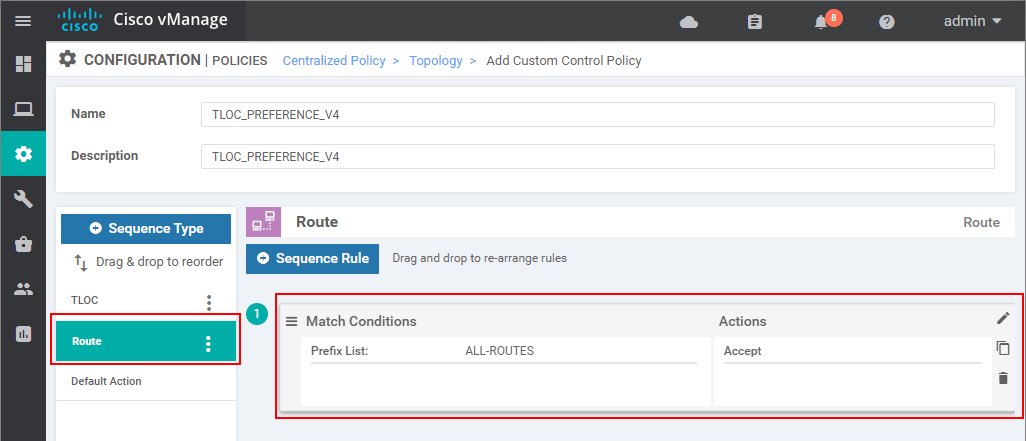
In the end, we must have the following Route Sequence as shown in the screenshot below:
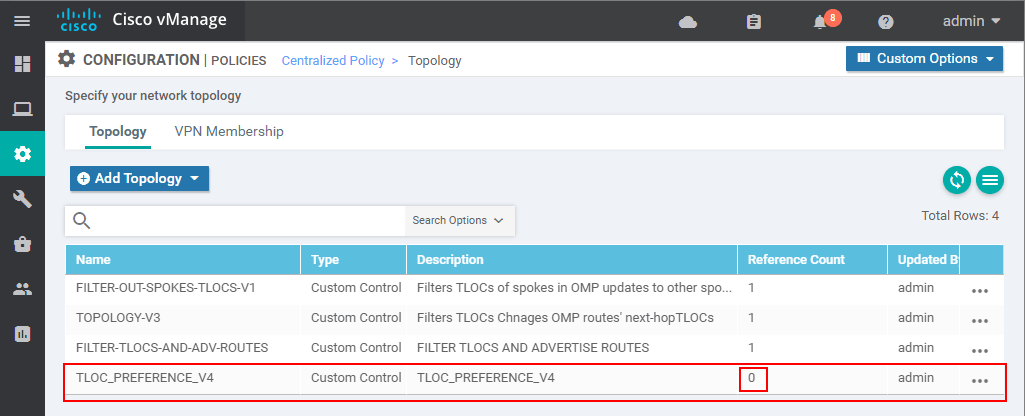
Now our new topology policy is created. However, you can see that the Reference Count is still zero, which means that it is not used in any Centralized Policy at the moment.
If we go back to Configuration > Policies, we can see that the current active Policy is CENTRALIZED-CONTROL-POLICY-V3 (the one created in the previous lesson). As we have already said many times, we cannot edit a Centralized Policy while it is activated on the vSmart controllers and in effect. That is why we are just copying the policy into one with another name and changing the Topology Definition, leaving all other settings as they are.
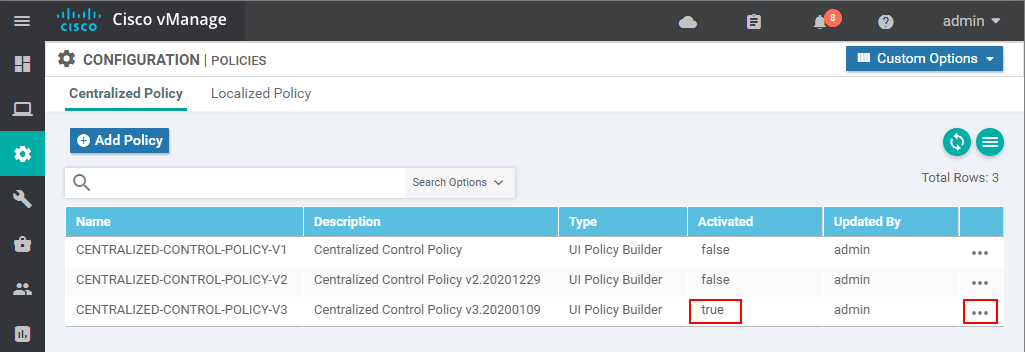
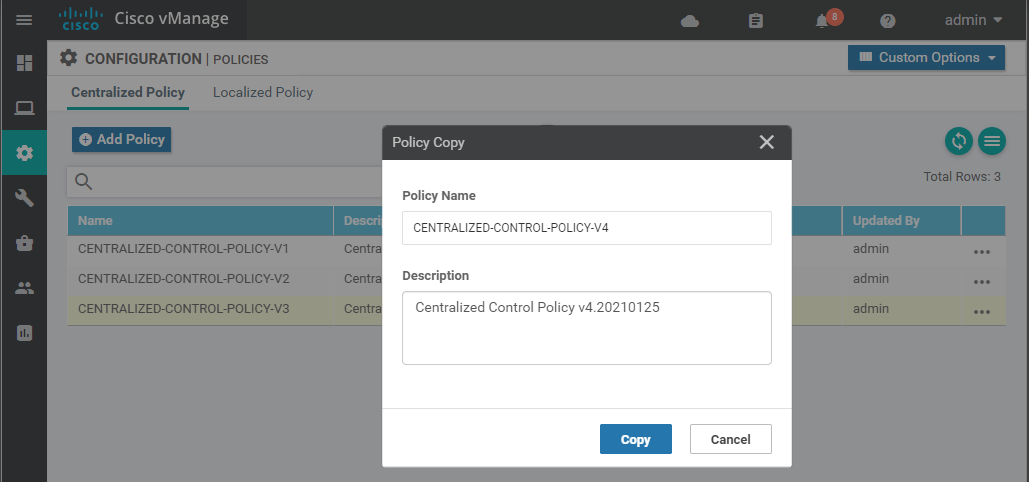
We go to the more options button, select copy, and specify the name CENTRALIZED-CONTROL-POLICY-V4 for the new policy.
Once it is created, you can see that it is still not Activated. We will need to edit it and point to the Topology definition that we have created.

We go to Edit > Topology and then on the Add Topology dropdown we select Import Existing Topology.
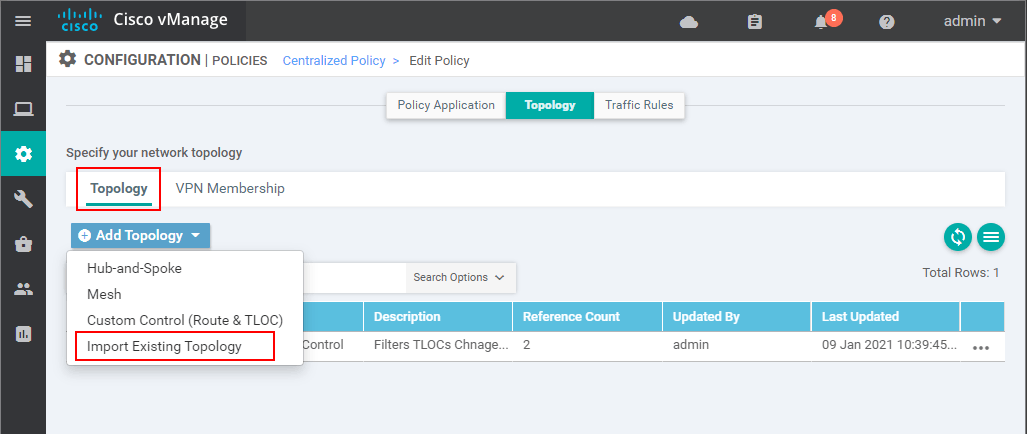
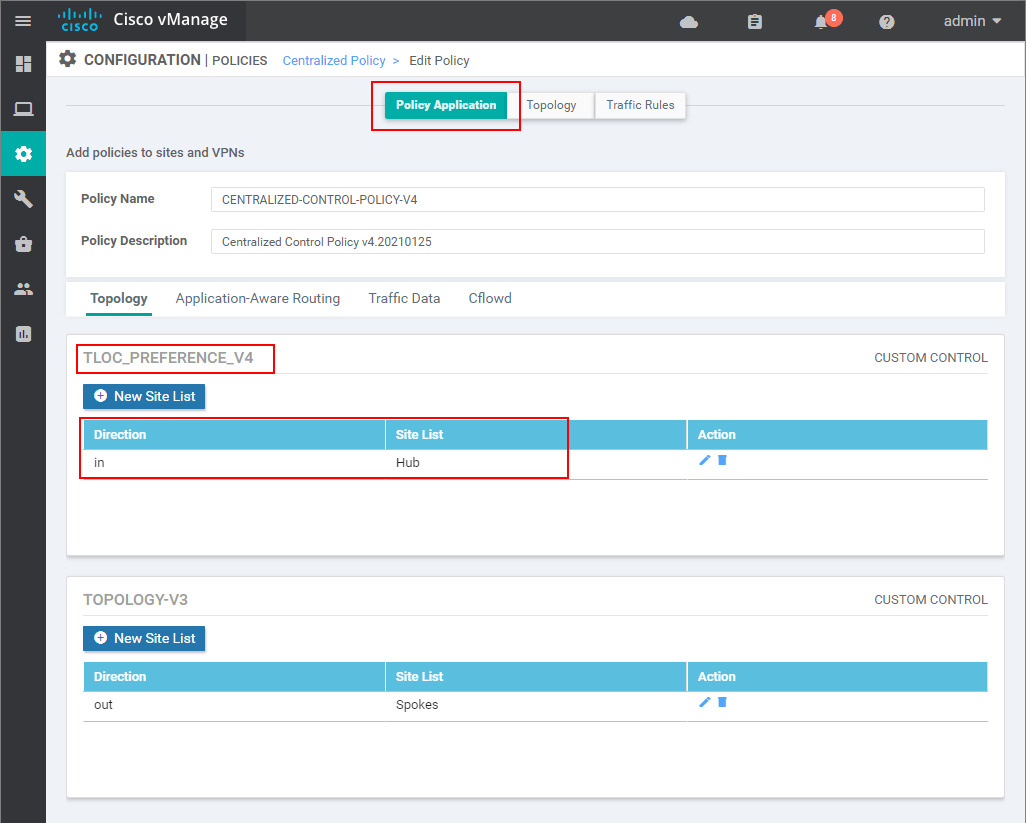
In there, we select the one we created - TLOC_PREFERENCE_V4. After that, we go back to the Policy Application and apply the TLOC_PREFERENCE_V4 to site-list Hub in inbound direction as shown in the screenshot below:
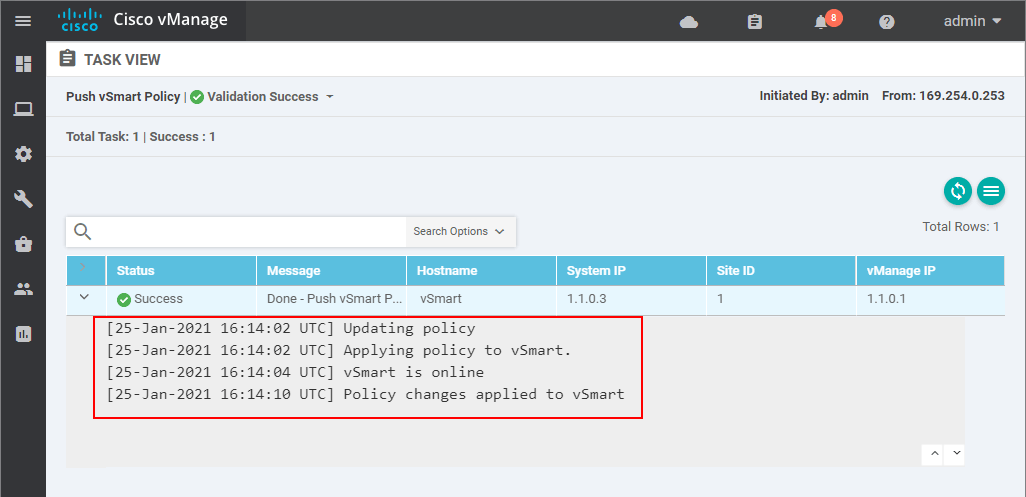
Then we go back to Configuration > Policies and Activate the newest one named v4.
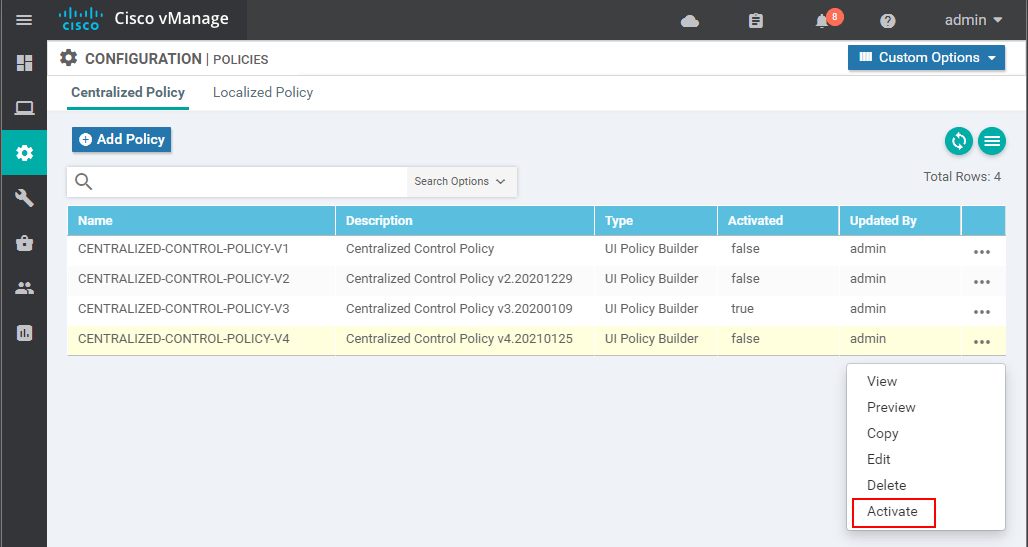
If everything has gone to plan, the activation should be successful.
Verifications
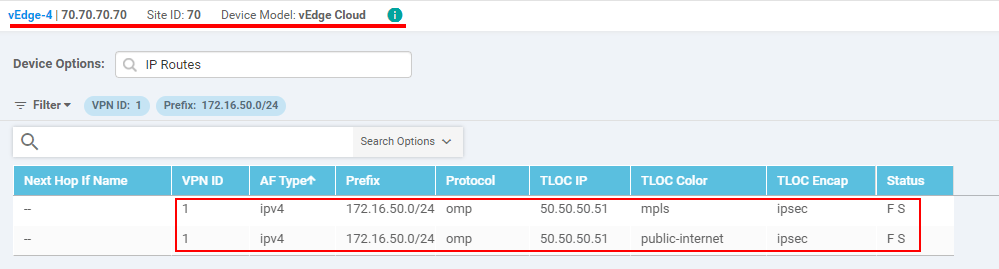
Now if we check the routing information of vEdge-4 about the prefix 172.16.50.0/24, we can see that it prefers the omp routes with a next-hop TLOC address of vEdge-2 because the vEdge-2's TLOCs have a higher preference that the ones of vEdge-1.
This can be verified using the CLI as well with the following command:
vEdge-4# show ip route vpn 1
Codes Proto-sub-type:
  IA -> ospf-intra-area, IE -> ospf-inter-area,
  E1 -> ospf-external1, E2 -> ospf-external2,
  N1 -> ospf-nssa-external1, N2 -> ospf-nssa-external2,
  e -> bgp-external, i -> bgp-internal
Codes Status flags:
  F -> fib, S -> selected, I -> inactive,
  B -> blackhole, R -> recursive


VPN PREFIX           PROTOCOL  TLOC IP       COLOR            ENCAP  STATUS
---------------------------------------------------------------------------
1   172.16.50.0/24   omp       50.50.50.51   mpls             ipsec  F,S
1   172.16.50.0/24   omp       50.50.50.51   public-internet  ipsec  F,S
And the ultimate verification step would be to actually trace the traffic path using a traceroute. You can see that the traffic enters the data center via vEdge-2, which is the desired outcome.
SITE-70#traceroute vrf VPN1 172.16.50.10
Type escape sequence to abort.
Tracing the route to 172.16.50.10
VRF info: (vrf in name/id, vrf out name/id)
  1 172.16.70.1 21 msec 19 msec 21 msec -> vEdge-4
  2 172.16.50.3 42 msec 38 msec 51 msec -> vEdge-2
  3 172.16.50.10 75 msec 75 msec *  -> SITE-50-VPN5
SITE-70#