A Cisco SD-WAN device can be either in one of these configuration modes at any given time:
- CLI mode – a template is not attached to the device by vManage and the device's configuration can be modified locally using the cli, for example via console or SSH. This is the default mode for all Cisco SD-WAN devices.
- vManage mode – a template is attached to the device by vManage and the device's configuration can not be modified locally using the cli.
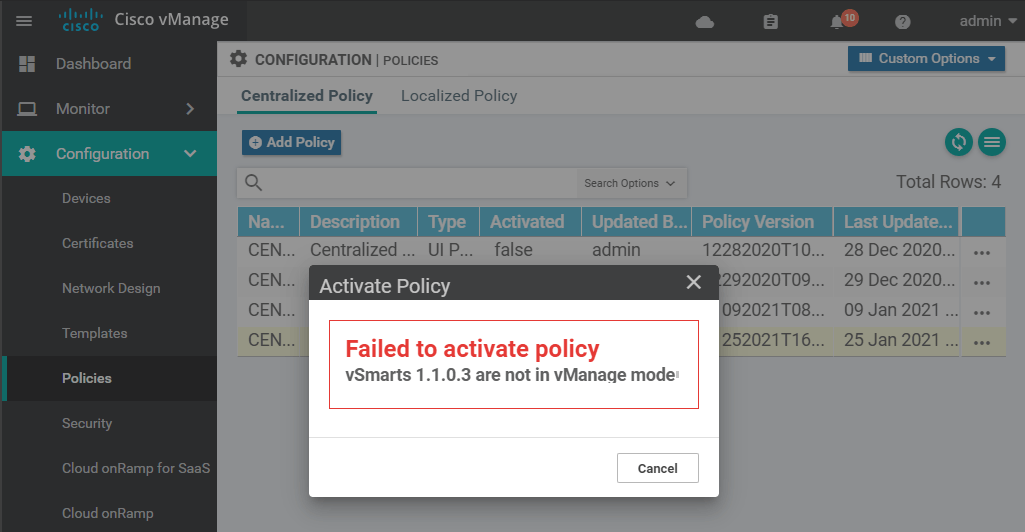
When you try to activate a Cisco SD-WAN Policy from vManage to a device that is in CLI mode, you will encounter the following error:
Failed to activate policy
vSmarts 1.1.0.3 are not in vManage mode
When I started playing with policies for the first time - it took me quite some time to understand what I am doing wrong and how to get around that. Going through Cisco's Viptela documentation wasn't much of a help because this particular topic was somehow convoluted. That is why I decided to create this lesson so that engineers that study Cisco SD-WAN know about this in advance. An actual screenshot of this can be seen in the figure below:
What is vManage Mode?
By default, all Cisco SD-WAN controllers are in "CLI mode". That means that they allow configuration changes done using the CLI only. However, as we have explained in our lesson for Cisco SD-WAN Policies when we activate a centralized policy through the vManage GUI, what happens behind the scenes is that the vManage is actually making configuration changes on the vSmart controller using NETCONF. But by default, like all other devices, the vSmart controller is in CLI mode (allowing config changes via cli only) and thus it does not accept NETCONF transactions from vManage. That is why the policy activation fails.
To successfully activate a policy, we should change the configuration mode of the device, that the policy will be applied to, to be in “vManaged" mode. This is done by applying a template from vManage to that device. This tells the affected node that from now on it will not be configured manually via CLI but in a centralized fashion using templates and policies from vManage.
You can check whether a device is in vManaged mode or not with the following command:
vSmart# show system status
Viptela (tm) vsmart Operating System Software
Copyright (c) 2013-2017 by Viptela, Inc.
Controller Compatibility:
Version: 18.4.4
Build: 82

## lines omitted

Personality:             vsmart
Model name:              vsmart
Services:                None
vManaged:                false
Commit pending:          false
Configuration template:  None
Policy template:         None
Policy template version: None
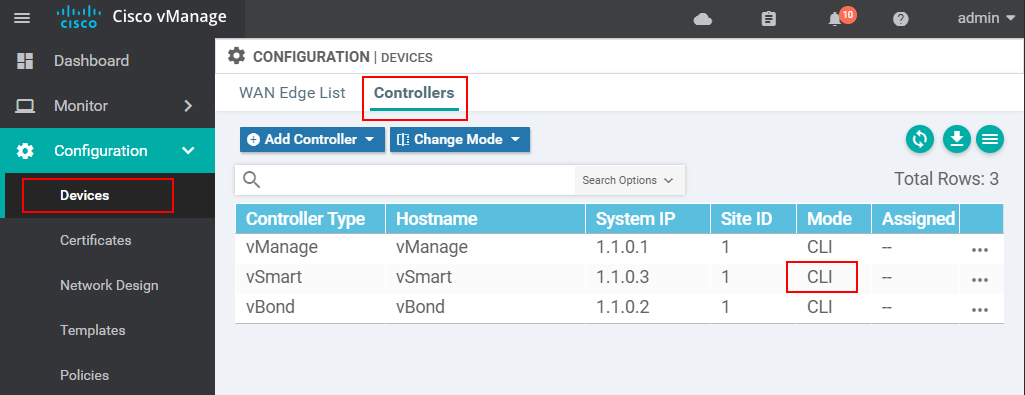
Or alternatively on vManage under Configuration > Devices > Controllers, the configuration mode is listed in a tab as you can see in the following screenshot:
Applying a template to vSmart
Applying a configuration template to vSmart allows vManage to have authoritative control of vSmart’s configuration. Any type of template does the job - it does not matter whether it is a CLI or Feature template. In typical production deployments, it is very common to use CLI templates for this use case, as they are very simple and quickly made, and do not require administration beyond the initial deployment.
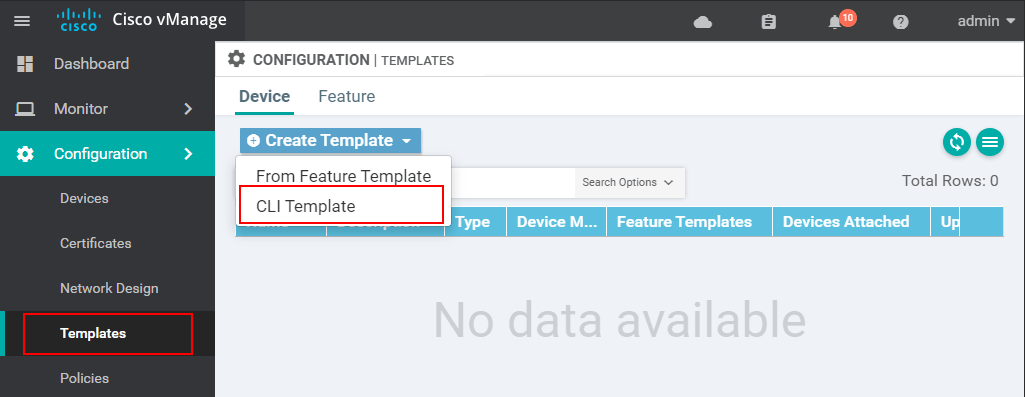
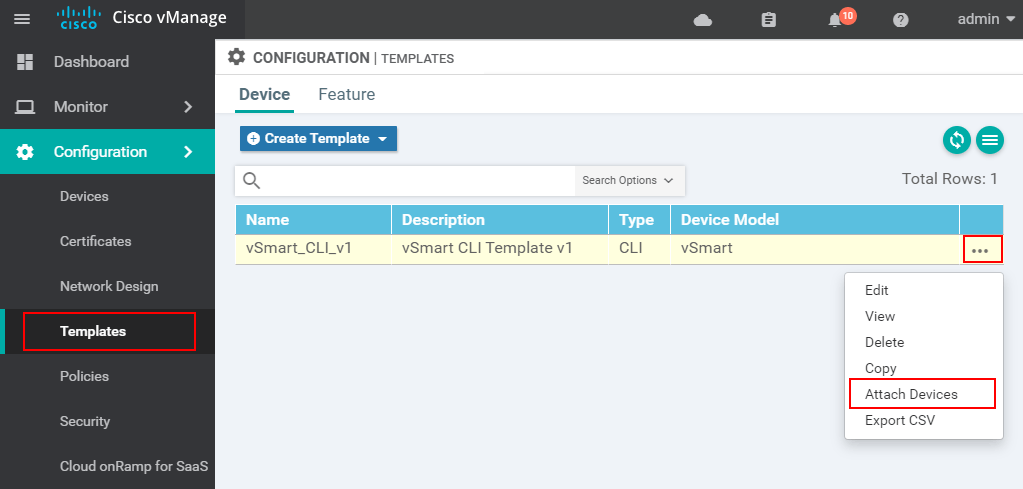
Practically speaking, the easiest way to change a controller to be in vManaged mode is to create a CLI template and attach it to vSmart. Let's create a CLI template by going to Configuration > Templates > Create Template > CLI.
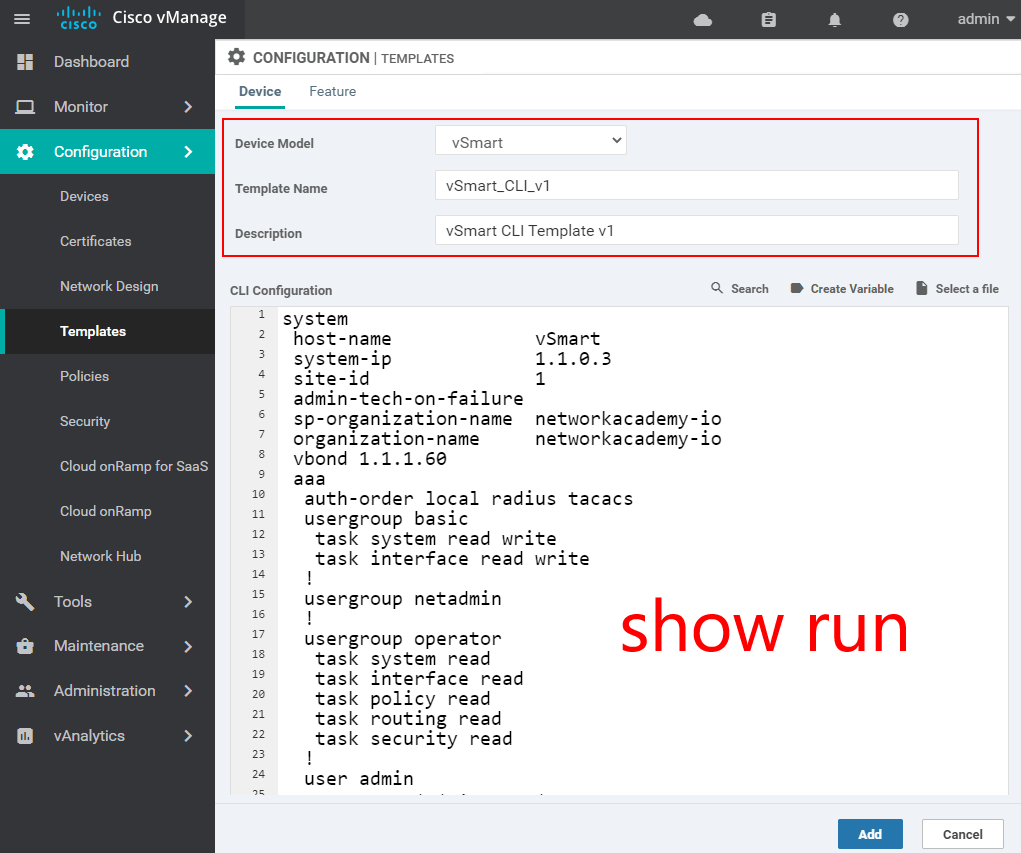
Then we select the device model (in our case vSmart) from the dropdown menu and specify the name and description for the template. At this point, we SSH to the controller, get the output of the show run command, and paste it in the CLI configuration section as shown below.
Then we go to the additional options and select Attach Devices. In the next window, you are going to see all vSmart controllers that are known to vManage. You select the one, which you got the show run output from.
In the next window, you will be prompted to validate the configuration that is going to be applied. Once you confirm it, vManage will push the configuration template to vSmart.
vManaged Mode
At this point, the device is fully managed in a centralized fashion by vManage. This can be verified using the following cli command on vSmart:
vSmart# show system status
Viptela (tm) vsmart Operating System Software
Copyright (c) 2013-2017 by Viptela, Inc.
Controller Compatibility:
Version: 18.4.4
Build: 82

## lines omitted

Personality:             vsmart
Model name:              vsmart
Services:                None
vManaged:                true
Commit pending:          true
Configuration template:  vSmart_CLI_v1
Policy template:         None
Policy template version: None
Or alternatively, you can go to Configuration > Devices > Controllers, and check under the Mode column.