Achieving compliance with the security requirements of regulatory standards such as PCI DSS, HIPAA and GDPR is a time-consuming burden for each organization. That's why companies look to embrace a WAN architecture that applies robust security at scale within and across each deployment - data center, campus, branch, and cloud.
Cisco SD-WAN integrates all necessary security technologies such as Firewall, IPS, URL filtering, and AMP in edge routers' firmware, eliminating the need for separated dedicated hardware appliances enforcing the security rules. This eliminates the network sprawl at branches. The vManage controllers come with pre-defined security workflows designed to make compliance as straightforward as possible. In this lesson, we will use the first pre-defined scenario - Compliance.
Use-case Compliance
The primary goal of the Compliance use case is to protect organizations' sensitive information, such as patient info, cardholder data, or privacy details, against data breaches.

Figure 1 illustrates an example of applying the pre-defined compliance workflow to a payment network that must comply with the PCI DSS standard.
Configuring Compliance Security Policy
Figure 2 shows the lab topology that we are going to use in this lesson. cEdge-3 is a remote branch. cEdges 1 and 2 are located in the data center and provide Internet access via Direct Internet Access links.

Initial State
Before we begin with the configuration, let's describe the initial state of the topology.
- Cardholder LAN is in VPN3 subnet 10.3.3.0/24 at the branch.
- Billing LAN is in VPN4 subnet 10.1.4.0/24 at the DC.
- The branch router is attached to a device template named "SPOKE-SINGLE-HOMED."
- The data center routers are attached to a device template named "HUB-DUAL-HOMED."
- Cardholder LAN has full IP reachability to the Billing LAN and vice versa. (A centralized control policy performs route-leaking between VPNs 3 and 4)
- Cardholder LAN has Internet access via the data center's DIA links. (Data center routers provide Internet access via a centralized data policy applied to VPN3 in the from-tunnel direction)
Lab Requirements
Table 1 lists the security requirements needed to make the lab topology PCI-compliant. The first column shows each requirement, and the last column lists the SD-WAN technique that satisfies the requirement.
| Use case | Security Requirement | SD-WAN Security Technique |
| Compliance | Transport security - Cardholder traffic must be secured while in transit to prevent man-in-the-middle attacks and other transport risks. | IPsec tunnels |
| Perimeter Control - Connection attempts between the Billing LAN and Cardholder LAN are actively blocked (no connections initiated from the Billing LAN or Internet are allowed into the Cardholder LAN). | Enterprise Firewall | |
| Segmentation - Isolating the Cardholder LAN from the rest of the organization’s network. | VPN | |
| Attack Prevention - Traffic between Corporate LAN and Cardholder LAN is actively monitored and inspected to detect anomalies and reduce the risk of compromising sensitive data. | Intrusion Prevention (IPS) | |
| HTTPS/TLS - Security measures must apply to end-to-end TLS-encrypted traffic. | TLS Proxy |
Let's translate the PCI-DSS security requirements to specific tasks.
- Enterprise Firewall:
- Only NTP and HTTP should be allowed from the Cardholder LAN (10.3.3.0/24) to the Billing LAN (10.1.4.0/24).
- Only DNS and HTTPS should be allowed from Cardholder LAN (10.3.3.0/24) to the Internet (0.0.0.0/0).
- Connections should only be initiated from the Cardholder's VPN. Connections initiated from the outside must be dropped.
- IPS:
- The traffic destined for VPNs 3 and 4 must be inspected for known threats and vulnerabilities with a Common Vulnerability Scoring System (CVSS) score of 10.
- If an attack is detected, the flow must be dropped.
- TLS Proxy:
- HTTPS/TLS connections between Cardholder LAN and Billing LAN should be sent to the Unified Thread Defense (UTD) engine for inspection.
- HTTPS/TLS connections from the Cardholder LAN to the Internet must be proxied and inspected by UTD.
Configuration Workflow
Figure 3 summarizes the configuration steps that we are going to make to implement PCI compliance to the lab topology using the vManage GUI.
- Uploading the necessary Unified Thread defense (UTD) file to vManage.
- Configuring a new security policy named "PCI-COMPLIANCE."
- Configuring a new firewall policy.
- Configuring a new IPS policy.
- Configuring TLS Proxy.
- Creating a new Secure App Hosting feature template.
- Attaching the security policy to cEdge-3's device template.
- Pushing vManage's root CA certificate to the clients' trust-store.

It is important to understand that the security functionalities such as Enterprise FW, IPS, and TLS Proxy are embedded into the firmware of edge routers and are executed by them. The end goal of all security policies we configure on vManage is to define the entire config of the attached edge routers. However, all security policies are just that - a more modern, scalable way of configuring edge routers via GUI without considering CLI and platform specifics (because vManage does that for us behind the scenes). However, there is nothing special about the security policies. You can as easily log onto a wan edge router and configure FW, IPS, and TLS proxy via the CLI in minutes if you know the CLI syntax. Think about security policies like this "I am configuring one or more edge routers via GUI instead of CLI."
Step 1. Uploading the UTD image to vManage
The first pre-requisite we need to satisfy is to download the Unified Thread Defense (UTD) container file from Cisco and upload it to vManage. The question is - how do you know which file you need for each router?
There is a CLI command on each IOS-XE router that shows the required UTD file, as shown in the output below.
cEdge-3# show utd engine standard version
UTD Virtual-service Name: utd
IOS-XE Recommended UTD Version: 1.0.3_SV2.9.16.1_XE17.7
IOS-XE Supported UTD Regex: ^1\.0\.([0-9]+)_SV(.*)_XE17.7$
UTD Installed Version: 1.0.3_SV2.9.16.1_XE17.7
In our lab example, edge routers run SD-WAN version IOS-XE 17.07.01a. As you can see, the UTD file required looks like this:
secapp-utd.17.07.01a.1.0.3_SV2.9.16.1_XE17.7.x86_64.tarOnce we download the UTD file from software.cisco.com, we go to Maintenance > Software Repository > Virtual Images > Upload Virtual Image and select vManage. Then we drag and drop the file into the popup window and click Upload.
Later on, when we finish with the security policy configuration and attach it to a device template, vManage will push the UTD virtual image to the respective WAN edge routers.
Step 2. Configuring a new security policy
For this lab example, we will use the first predefined security scenario that comes with Cisco vManage. We go to Configuration > Security > Add Security Policy and select Compliance, as shown in figure 4 below.
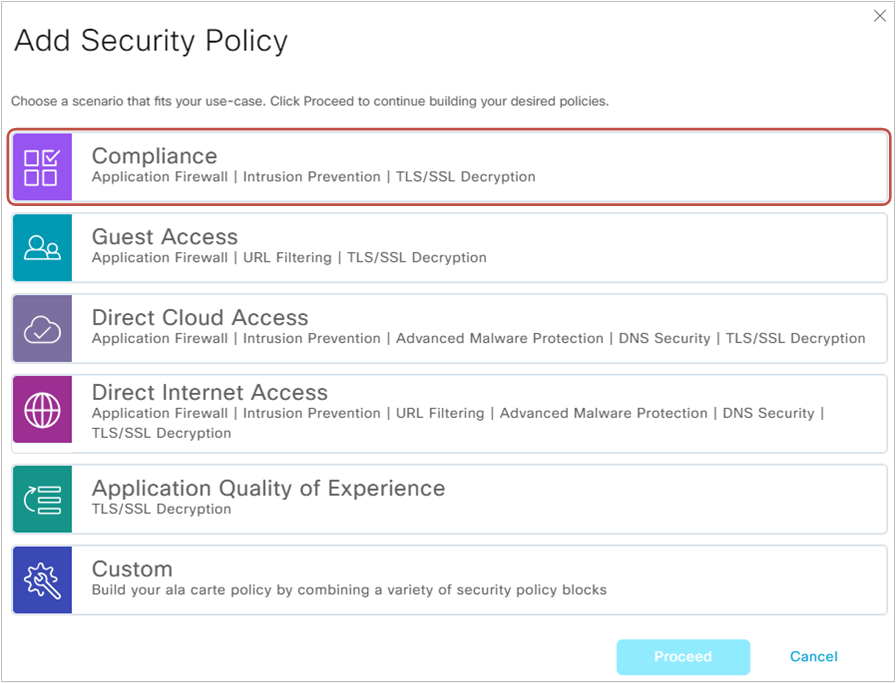
The security policy is a logical container that holds all other security policies that will be applied to one or more edge routers.
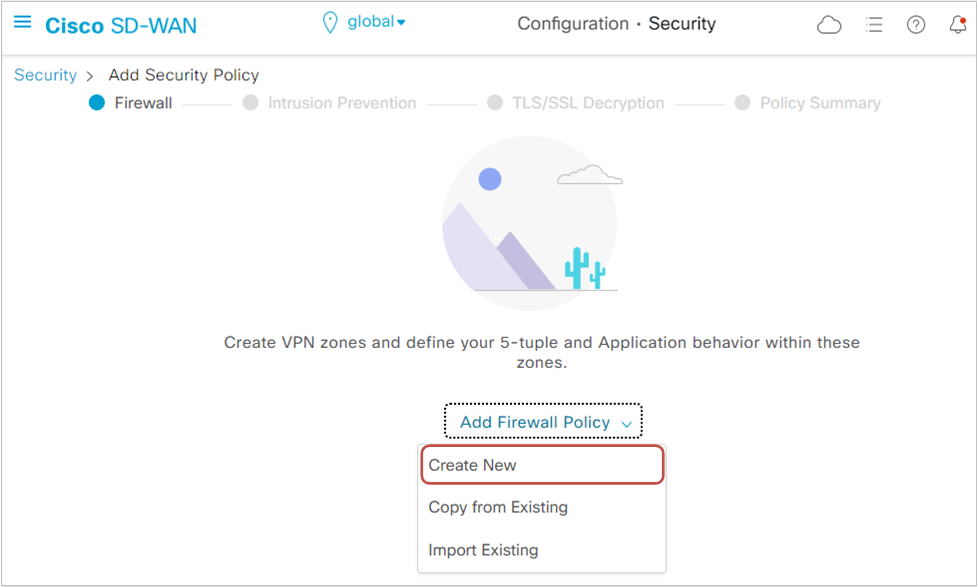
Step 3. Configuring a new firewall security policy
The first policy that we will create is the Enterprise Firewall policy. Go to Add Firewall Policy and select Create New, as shown in figure 5 below.
As per our lab requirement, we will need to create two Firewall policies - one that inspects the inter-zone traffic from the Cardholder LAN to the Billing LAN and another one that inspects the traffic from Cardholder LAN to the Internet. We start with the first one.
Inter-zone Firewall policy
We will name the first firewall policy "CARDHOLDER-CARDHOLDER."
Zones
Once we create a new firewall policy, the first thing we do is specify the zones and the zone pairs we need. We click to Apply Zone-Pairs and then create two zones:
- Zone CARDHOLDER (VPN3)
- Zone BILLING (VPN4)
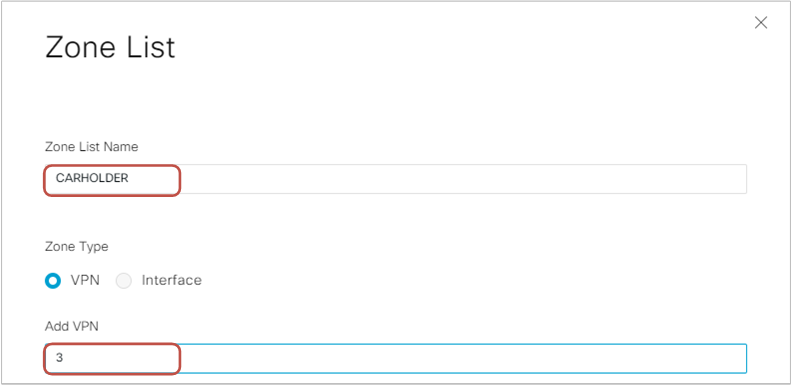
Then we specify the zone-pair CARDHOLDER-BILLING.
Rules
Once we configure the zones, it's time to configure the firewall rules by clicking Add Rule, as shown in figure 7 below.
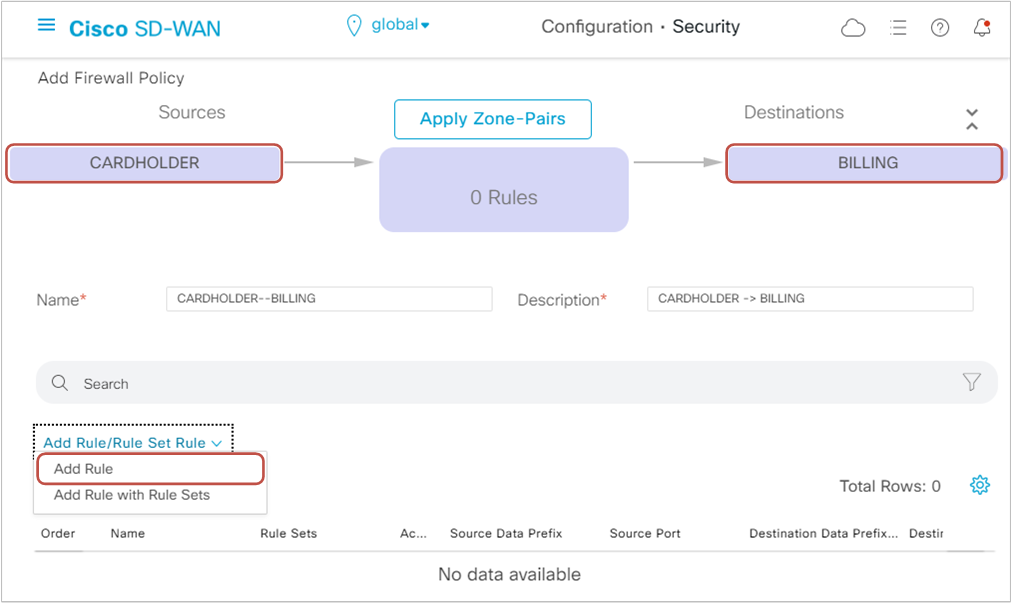
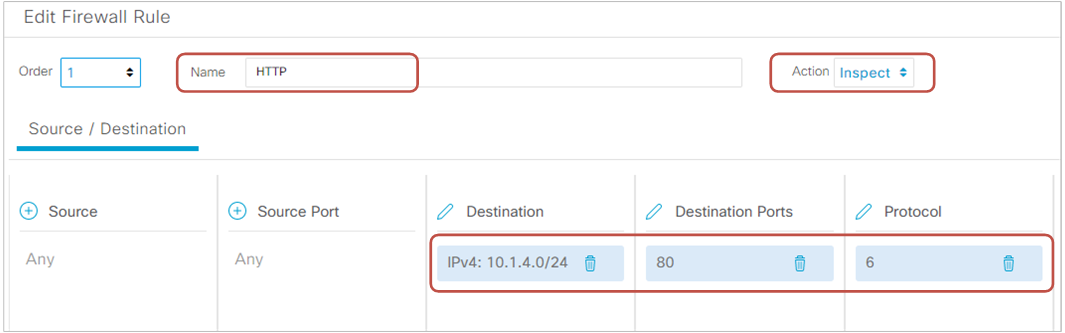
Per our lab requirements, we must permit NTP and HTTP traffic from the Cardholder LAN (VPN3-10.3.3.0/24) to the Billing LAN (VPN4-10.1.4.0/24). We name the first sequence HTTP and specify the destination network and port, and change the action to Inspect, as shown in figure 8 below.
Then we create one more rule for NTP traffic and specify the action "Inspect" as well.
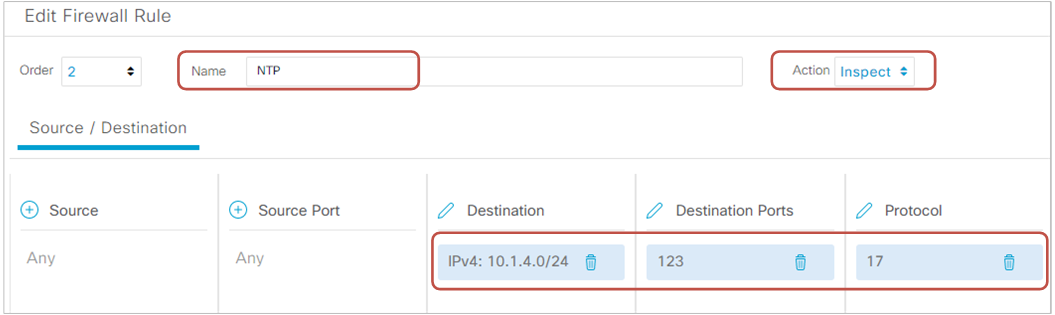
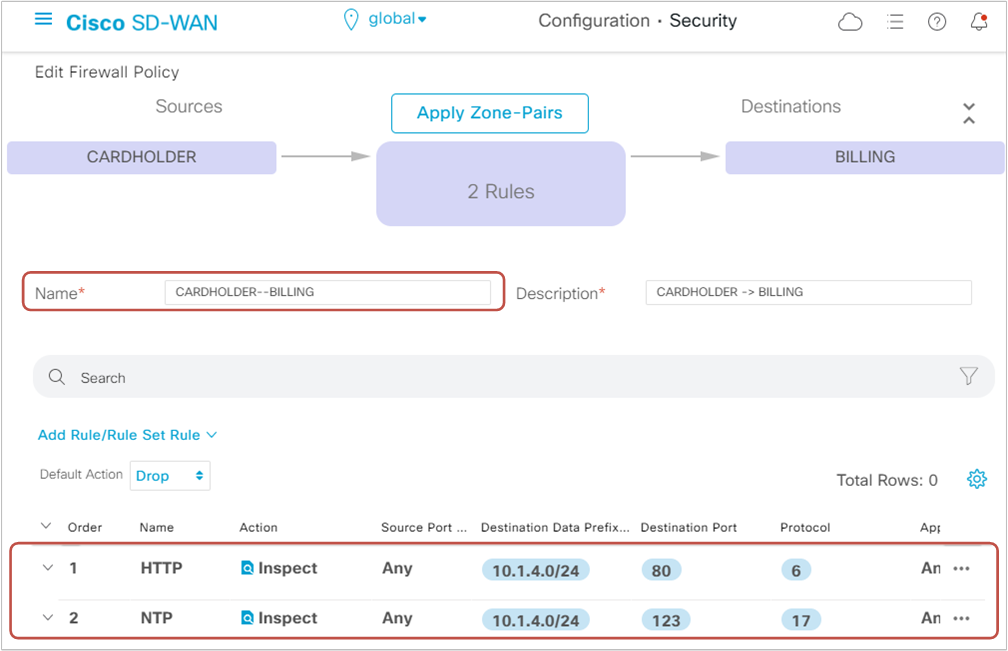
Figure 10 below shows an overview of the first firewall policy named "CARDHOLDER-BILING." Notice the zone-pair that the rules apply to and that the default-action is set to Drop.
Intra-zone Firewall policy
It is time to create the second firewall policy named "CARDHOLDER-CARDHOLDER." We go to Add Firewall Policy > Create New.
Zones
We will use the same zones we have created but create a different zone-pair, "CARDHOLDER-CARDHOLDER."
Rules
Per the lab requirements, we must permit only DNS and HTTPS traffic from the Cardholder LAN to the Internet. However, since we will apply the firewall rules to the intra-zone pair "CARDHOLDER-CARDHOLDER," all flows within VPN3 will be subject to the firewall policy. Therefore, we need to create a sequence at the very begging that matches intra-VPN3 traffic flows and let them pass through. We will do this by matching flows destined to RFC1918 addresses and specifying the action "Pass." See Seq 1 in figure 11 below.
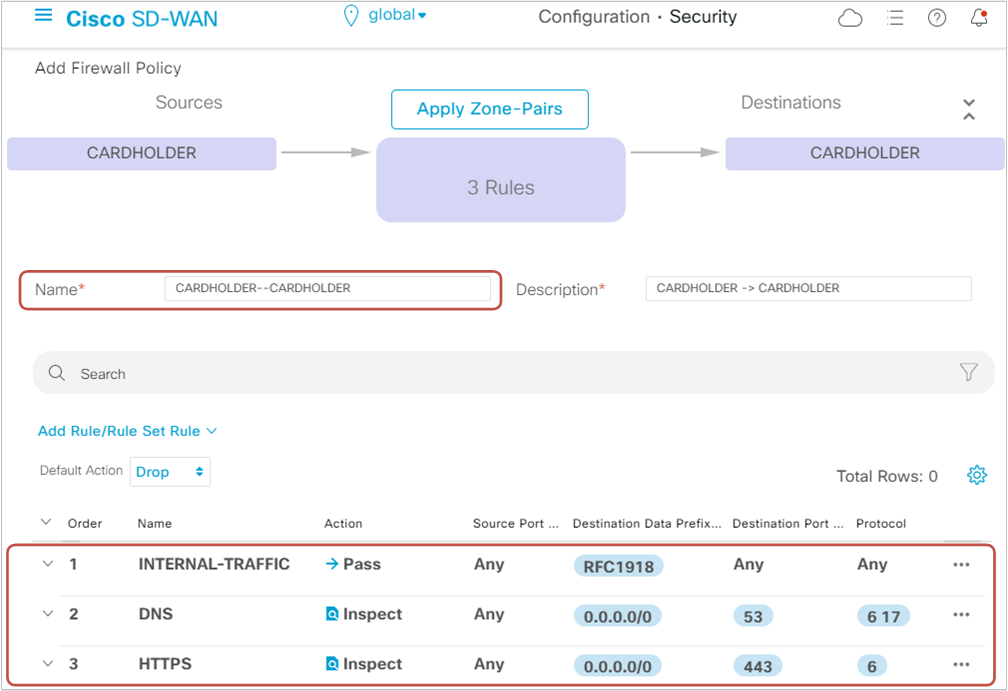
Then we need to create two more sequences - one for DNS traffic and one for HTTPS traffic destined for the Internet (0.0.0.0/0) and specify the action "Inspect." All other traffic flows will be dropped by the default action at the end.
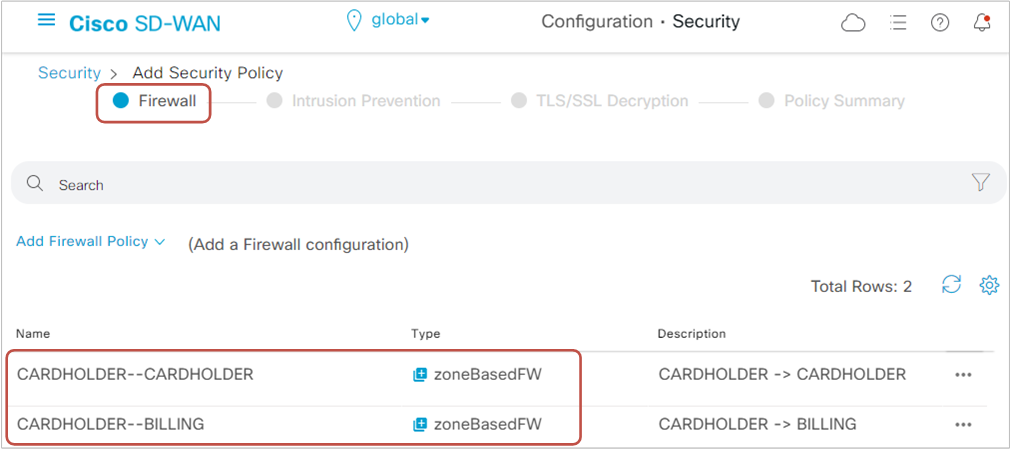
In the end, we must see both firewall policies configured in the "Firewall" section, as shown in figure 12 below.
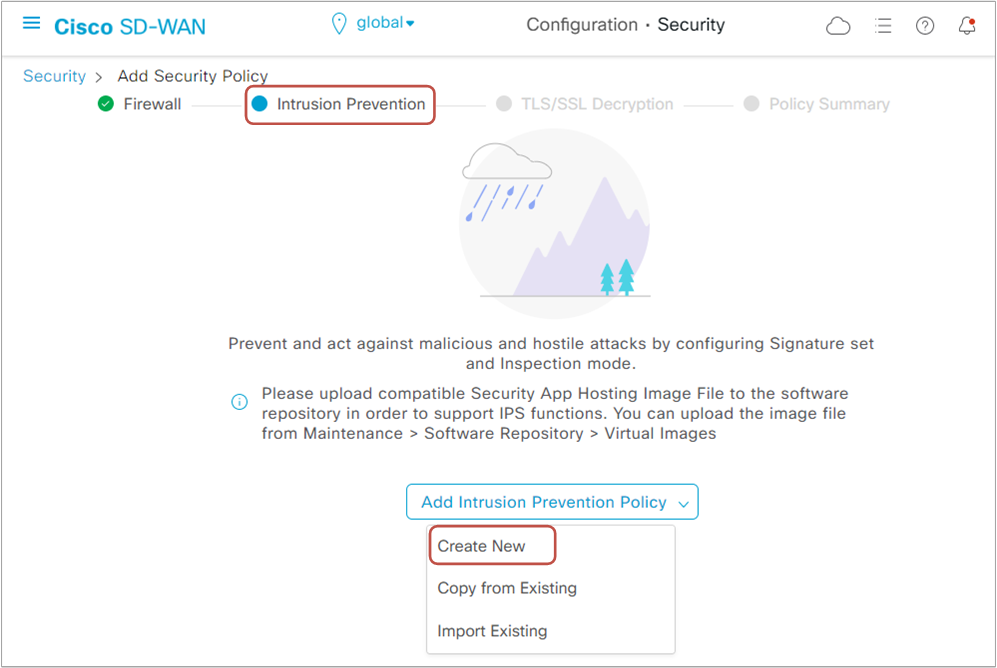
Step 4. Configuring a new IPS policy
Now let's go ahead and create a new IPS policy, as shown in the picture below.
On the configuration screen, we first define the target VPNs. Based on the inspection mode, traffic destined to the target VPN(s) is either detected (IDS mode) or prevented (IPS mode).
Then we set the signature set to "Connectivity," meaning that only signatures for vulnerabilities with CSS index 10 from the previous two years will be included.

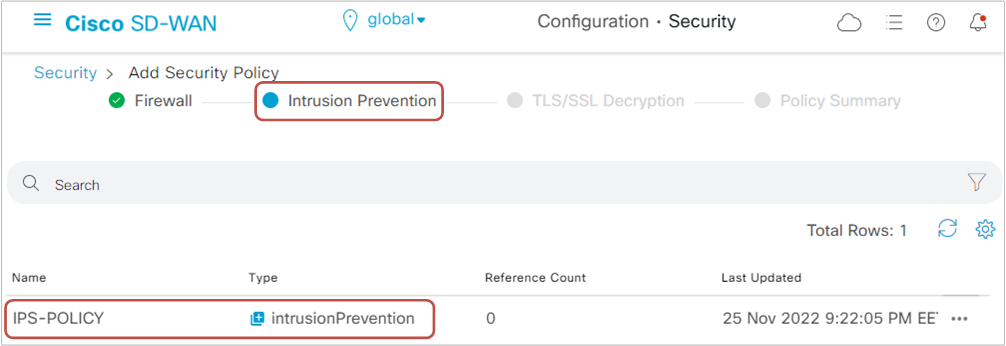
We leave all other settings by default and name the policy "IPS-POLICY."
Step 5. Configuring TLS Proxy
The next step is to configure the router to act as a TLS proxy, decrypting and re-encrypting HTTPS traffic so it can get inspected by the Unified Thread Defense (UTD) engine.
Full Content Access is for Subscribed Users Only...
- Learn any CCNA, CCIE or Network Automation topic with animated explanation.
- We focus on simplicity. Networking tutorials and examples written in simple, understandable language.