Another common use case of localized data policies is enabling quality of service (QoS) on vEdge interfaces. QoS allows us to classify incoming data flows by their importance for the organization into multiple user-defined forwarding classes. Then spread the forwarding classes across different output queues on the egress interface and schedule the transmission rate at which each traffic class is sent out.
Why is QoS important?
Organizations are increasingly using 10/40 GigabitEthernet across the local area network of data centers and remote sites. However, the WAN circuits generally have limited network capacity, which in most cases is many times slower than the LAN capacity. This makes the WAN links a congestion point where routers must manage the contention for network resources. When a router handles all packets as equal because there is no mechanism to differentiate the different importance of traffic flows, the router randomly buffers and drops packets. This typically leads to packet loss, latency, and jitter on business-critical applications.

QoS aims to maximize the application quality of experience (AppQoE) by managing the WAN network resource using the logic that not all traffic flows are equal for the business!
What Type of traffic does the organization have?
Each organizations' WAN network transports multiple different types of application traffic. Depending on the organization's business niche, some applications may be of critical importance while others may be simply irrelevant to the business.

The QoS strategy of every organization always starts with the process of identifying the important applications for the business.
The QoS Framework
It is important to understand that QoS is not just a single tool or feature. Instead, it is a framework that accomplishes the quality of service objective using multiple tools as shown in figure 3 below:
- Classification and Marking
- Policing, Shaping, and Dropping
- Congestion Management
- Platform/Interface Specific Tools

The configuration of QoS in Cisco SD-WAN does not necessarily happen in the order in which the different tools and capabilities interact. Let's see how we enable QoS on Cisco vEdge using the CLI.
Configuring QoS in Cisco SD-WAN
In Cisco SD-WAN, QoS is configured separately on each WAN edge router in the network. In a production deployment, this is generally done at scale using vManage Device templates. The process of enabling QoS can be summarized in the following six steps:
Step 1. Define forwarding classes and map them to hardware queues
Step 2. Configure the QoS scheduler for each user-defined forwarding class
Step 3. Group the QoS schedulers together into a single QoS map
Step 4. Apply the QoS map on the egress transport interfaces
Step 5. Classify incoming data flows into appropriate forwarding classes
Step 6 (optional). Specify the egress rewrite rule for the other IP header
Keep in mind that QoS functionalities and configurations may vary significantly between different hardware platforms. All lab lessons of this course use the vEdge-cloud router image. Generally, almost all features that are supported on the vEdge-cloud are standard across all Cisco SD-WAN routers and platforms. However, some QoS features may not be supported on some platforms, so always check the official configuration guides for the underlying hardware.
Step 1: Define forwarding classes and map them to hardware queues
Since we are using the vEdge cloud image before we begin with any QoS configuration, we should first enable the QoS service on the router by configuring the following two commands under the local policy:
vEdge-3# conf t
Entering configuration mode terminal
vEdge-3(config)# policy
vEdge-3(config-policy)# cloud-qos?
Possible completions:
  cloud-qos                Enable/Disable QoS for vEdge Cloud
  cloud-qos-service-side   Enable/Disable QoS for vEdge Cloud on service side
vEdge-3(config-policy)# cloud-qos
vEdge-3(config-policy)# cloud-qos-service-side
vEdge-3(config-policy)# commit and-quit
Commit complete.
Then, the first step in the QoS configuration process is to define the forwarding classes and assign them to the available hardware queues. We do this under the local policy configuration on a vEdge router.
Each interface on a Cisco SD-WAN router has eight hardware queues, which are numbered 0 to 7. Queue 0 is always the Low-Latency Queue (LLQ). It is used for both control traffic such as DTLS/TLS/BFD and application traffic mapped for low-latency queueing. The other queues, 1 through 7, are available for user-defined data traffic. The default scheduling method for these queues is weighted round-robin (WRR).
Let’s create three forwarding classes on vEdge-3: REAL-TIME class mapped to queue 0, CRITICAL-DATA class mapped to queue 1, and BEST-EFFORT class mapped to queue 2. The CLI configuration on vEdge-3 will look like the output shown below:
policy
 class-map
  class REAL-TIME queue 0
  class CRITICAL-DATA queue 1
  class BEST-EFFORT queue 2
!
When a WAN edge router doesn’t have any QoS configuration applied, queue 2 is the default queue used for data traffic, and queue 0 is used for control traffic.
Step 2. Configure the QoS scheduler for each user-defined forwarding class
The next step in the configuration process is to define the QoS scheduling parameters for each hardware queue. Each QoS scheduler is given a user-defined name and contains the following information:
- a reference to the user-defined forwarding class
- the maximum amount of the available bandwidth that will be used during congestion
- percentage of the shared interface buffer that is allocated for this queue
- scheduling mechanism - Low Latency Queuing (llq) or Weighted Round Robin (wrr)
- congestion management technique - tail drop or random early detection (red).
The qos-schedulers are configured under the local policy configuration on a vEdge router as shown in the output below:
policy
 qos-scheduler REAL-TIME
  class             REAL-TIME
  bandwidth-percent 30
  buffer-percent    30
  scheduling        llq
  drops             tail-drop
 !
 qos-scheduler CRITICAL-DATA
  class             CRITICAL-DATA
  bandwidth-percent 40
  buffer-percent    40
  scheduling        wrr
  drops             red-drop
 !
 qos-scheduler BEST-EFFORT
  class             BEST-EFFORT
  bandwidth-percent 30
  buffer-percent    30
  scheduling        wrr
  drops             red-drop
 !
Notice that any forwarding class that is mapped to queue 0 must always be configured to use LLQ scheduling and drop profile using tail-drops (highlighted in green). The other traffic classes are configured with a scheduling method WRR and a drop profile of RED by default. Weighted Round Robin (WRR) means that the traffic weighting is proportional to the configured bandwidth percentage. Random early detection (RED) means that before the queue gets congested, packets are dropped randomly instead of waiting for the queue to be full and then dropping from the tail.
Step 3. Group the QoS schedulers into a single QoS map
The next step in the configuration process is to combine all qos-schedulers into one qos-map assigned to egress interfaces.
policy
  qos-map 3-QUEUES-QOS-MAP
    qos-scheduler REAL-TIME
    qos-scheduler CRITICAL-DATA
    qos-scheduler BEST-EFFORT
!
We can verify the configured qos-scheduler parameters using the show policy qos-scheduler-info command as shown below:
vEdge-3# show policy qos-scheduler-info

QOS SCHEDULER  BANDWIDTH  BUFFER
NAME           PERCENT    PERCENT  QUEUE  QOS MAP NAME
------------------------------------------------------------
REAL-TIME      30         30       0      3-QUEUES-QOS-MAP
CRITICAL-DATA  40         40       1      3-QUEUES-QOS-MAP
BEST-EFFORT    30         30       2      3-QUEUES-QOS-MAP
Step 4. Apply the QoS-map on the egress transport interfaces
The last step in the queues configuration is to apply the qos-map to the egress transport interfaces. We do this under the interface configuration hierarchy.
vEdge-3# conf t
Entering configuration mode terminal
vEdge-3(config)# vpn 0 interface ge0/0
vEdge-3(config-interface-ge0/0)# qos-map 3-QUEUES-QOS-MAP
vEdge-3(config)# vpn 0 interface ge0/1
vEdge-3(config-interface-ge0/1)# qos-map 3-QUEUES-QOS-MAP
vEdge-3(config-interface-ge0/1)# commit and-quit
Commit complete.
We can verify on which interfaces the qos-map is applied using the show policy qos-map-info command as shown below:
vEdge-3# show policy qos-map-info

                  INTERFACE
QOS MAP NAME      NAME
-----------------------------
3-QUEUES-QOS-MAP  ge0/0
                  ge0/1
Step 5: Classify incoming data flows into forwarding classes
The last step in the QoS configuration process is to assign traffic flows coming from the service-side to the appropriate forwarding classes. We can do this with either a centralized data policy on a per-VPN basis or with a localized data policy on a per-interface basis. Classification and Marking can be done at different network layers:
- Layer 2: 802.1q, MPLS EXP
- Layer 3: IP precedence, DSCP, IP ECN, Source/Destination IP
- Layer 4: TCP/UDP ports
- Layer 7: DPI/NBAR
In our example, we will configure an access list in our lab example that classifies the data traffic into different forwarding classes. The ACL configuration is shown below:
policy
 access-list CLASSIFY-INCOMING-TRAFFIC
  sequence 11
   match
    dscp 46
   !
   action accept
    class REAL-TIME
  !
  sequence 21
   match
    dscp 22 24 26
   !
   action accept
    class CRITICAL-DATA
  !
  sequence 31
   action accept
    class BEST-EFFORT
  !
  default-action drop
!
Once the ACL is configured, we apply it on a service-side interface in the inbound direction with respect to the vEdge router.
Step 6 (optional). Specify an egress rewrite rule for the other IP header
Step 6 is an optional one in the QoS configuration process that allows us to rewrite the DSCP value of the original packet before it is copied in the outer header of the encapsulated packet. As we know, Cisco WAN edge routers encapsulate the traffic sent out on the transport side using either GRE or IPsec. To prevent the end-to-end QoS marking of being lost, WAN edge routers copy the DSCP value of the original IP packet into the outer IP header of the encapsulated packet, as shown in figure 4 below.

However, in many cases, the organization’s forwarding classes will not match the QoS classes of the service provider. The rewrite-rule gives us the ability to rewrite the DSCP values of a given forwarding class in order to match a specific class of the WAN circuit. This gives the ability to map specific applications into the correct QoS classes on the SP side.
We configure a rewrite-rule by referencing the forwarding class and the PLP priority of packets. Then we set the new DSCP value to be written in the outer IP header when packets are encapsulated.
policy
 rewrite-rule REWRITE-TO-MPLS
  class CRITICAL-DATA low dscp 22
  class CRITICAL-DATA high dscp 18
  class BEST-EFFORT low dscp 8
  class BEST-EFFORT high dscp 0
!
Notice that PLP low|high is an internal locally-significant for a vEdge router value set by a QoS policer’s exceed action. By default, all packets have a PLP value of low. However, packets that exceed a configured policer rate can be dropped or marked with a PLP value of high. A data policy can then match the PLP high value and set different local TLOC for these packets.
A rewrite rule is always applied on an egress transport interface. In our example, we are going to configure it on vEdge-3’s interface facing the MPLS cloud.
vEdge-3# conf t
Entering configuration mode terminal
vEdge-3(config)# vpn 0 int ge0/1
vEdge-3(config-interface-ge0/1)# rewrite-rule REWRITE-TO-MPLS
vEdge-3(config-interface-ge0/1)# commit and-quit
Commit complete.
Once applied, the rule will match packets classified as CRITICAL-DATA and a Packet Loss Priority (PLP) of low and mark them with a DSCP value of 22 in the outer IP header. On the other hand, packets classified as CRITICAL-DATA and a Packet Loss Priority (PLP) of low will be remarked with a dscp value of 18 and so on.
Now that the rewrite rule is applied on the transport interface toward the MPLS cloud, we can test it by pinging from the service-side of vEdge-3 over the MPLS cloud to any remote location.
SITE3-R1# ping 10.1.5.1
Type escape sequence to abort.
Sending 5, 100-byte ICMP Echos to 10.1.5.1, timeout is 2 seconds:
!!!!!
Success rate is 100 percent (5/5), round-trip min/avg/max = 61/66/74 ms
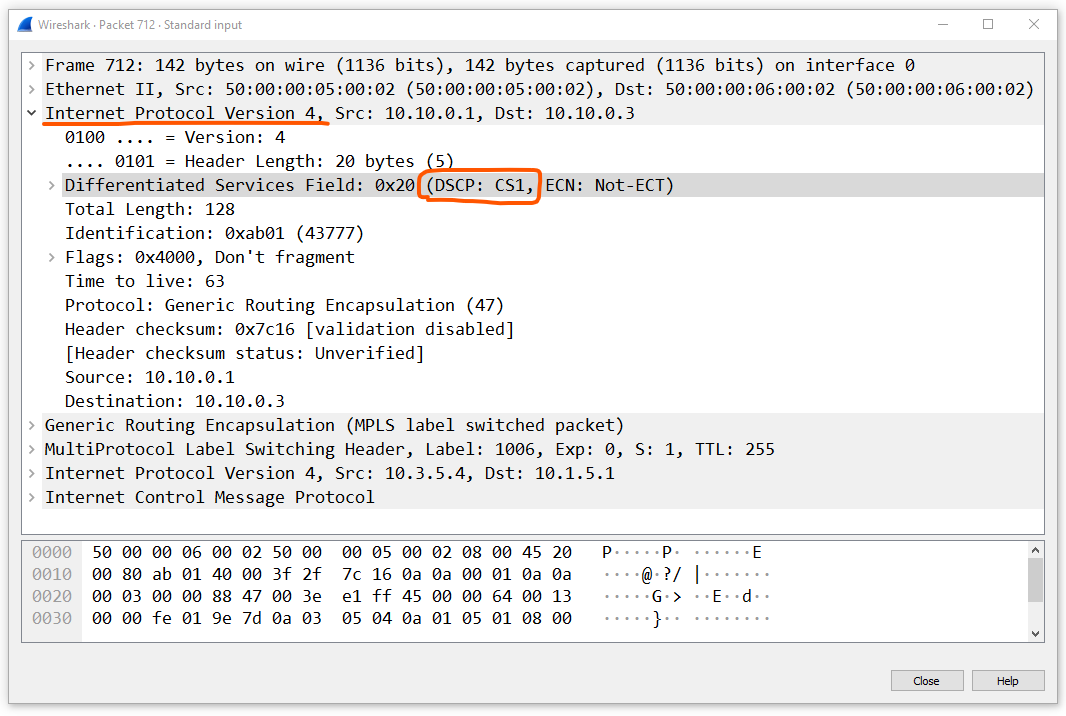
Since the BEST-EFFORT class is match-all, the ICMP packets should be matched by the class BEST-EFFORT low dscp 8 rule and sent out with a DSCP value of CS1 (8).
If we make a packet capture and check the outermost IP header, we will indeed see that the ICMP ping packets are marked with CS1, which verifies that the rewrite-rule works as expected.
Key Takeaways
- Classification of data traffic can be done by:
- 6-tuple filter or the DPI engine
- Local or central data policy
- Each interface on a Cisco SD-WAN router has eight hardware queues:
- The queues are numbered Q0 through Q7
- Queue 0 is always the Low-Latency Queue (LLQ). It is used for both control traffic such as DTLS/TLS/BFD, and application traffic mapped for low-latency queueing. The default scheduling method for queue 0 is low-latency queueing (LLQ). The unused bandwidth is distributed between the other queues.
- The other queues 1 to 7 are available for data traffic. The default scheduling method for these queues is weighted round-robin (WRR).