In the previous lesson, we have seen how to set up a Cisco SD-WAN version 18.4 home lab on EVE-NG without using a Cisco Smart Account. The home lab is a convenient way to practice for the CCIE Enterprise Infrastructure exam and test different features of the solution.
This lesson will show how to run the latest Cisco SD-WAN software version on a PNETlab virtual machine - an alternative network emulator that some think is better than EVE-NG. However, the process is absolutely the same for all network emulators. This method requires a Cisco Smart Account, though.
Setup PNETlab
Cisco SD-WAN requires a lot of processing power and resources. For a small practicing topology consisting of 1 controller of each type and 3-4 vEdges, you should give the PNETlab VM at least eight vCPUs and 16GB of RAM. However, if you want to make a large topology with redundant controllers and many vEdge devices, you must have a lot of computing resources at your disposal. Additionally, do not forget to enable the Intel VT-x or AMD-V option within the virtual machine and add a secondary NIC card.
Cisco SD-WAN Images
You will need to have the following Cisco SD-WAN images to set up this practice lab environment on PNETlab:
| EVE-NG Image | Filename | Version |
|---|---|---|
| vmanage-20.4.1 | viptela-vmanage-20.4.1-genericx86-64.qcow2 | 20.4.1 |
| vsmart-20.4.1 | viptela-smart-20.4.1-genericx86-64.qcow2 | 20.4.1 |
| vbond-20.4.1 | viptela-edge-20.4.1-genericx86-64.qcow2 | 20.4.1 |
| vedge-20.4.1 | viptela-edge-20.4.1-genericx86-64.qcow2 | 20.4.1 |
Once you have the images, you need to create a folder for each one and then transfer them to the PNETlab VM using a Frezzila or WinSCP tool. After uploading the images to their respective folders in the virtual machine, you need to rename the original files to "virtioa". Additionally, you need to create an additional virtual disk for the vManage controller. You can do this with the command highlighted in green:
#  Creating Folders
mkdir /opt/unetlab/addons/qemu/vtbond-20.4.1
mkdir /opt/unetlab/addons/qemu/vtsmart-20.4.1
mkdir /opt/unetlab/addons/qemu/vtmgmt-20.4.1
mkdir /opt/unetlab/addons/qemu/vtedge-20.4.1
## vManage
cd /opt/unetlab/addons/qemu/vtmgmt-20.4.1
mv viptela-vmanage-20.4.1-genericx86-64.qcow2 virtioa.qcow2
/opt/qemu/bin/qemu-img create -f qcow2 virtiob.qcow2 150G
## vSmart
cd /opt/unetlab/addons/qemu/vtsmart-20.4.1
mv viptela-smart-20.4.1-genericx86-64.qcow2 virtioa.qcow2
## vBond
cd /opt/unetlab/addons/qemu/vtbond-20.4.1
mv viptela-edge-20.4.1-genericx86-64.qcow2 virtioa.qcow2
## vEdge
cd /opt/unetlab/addons/qemu/vtedge-20.4.1
mv viptela-edge-20.4.1-genericx86-64.qcow2 virtioa.qcow2
## Fix permissions
/opt/unetlab/wrappers/unl_wrapper -a fixpermissions
Physical Topology
The physical topology that we are going to use is as follows. You should create it on PNATlab. If you want to copy/paste the bootstrap configs shown below, ensure that you use the same interface names when creating the topology.

Default credentials for all devices are admin/admin. When vManage boots for the first time, it will ask which storage device to use for installing the software. Please make sure to use the virtual disk you have created in the previous step.
viptela 20.4.1
vmanage login: admin
Password:
Welcome to Viptela CLI
admin connected from 127.0.0.1 using console on vmanage
You must set an initial admin password.
Password:
Re-enter password:
Available storage devices:
vdb     100GB
hdc     3GB
1) vdb
2) hdc
Select storage device to use: 1
Would you like to format vdb? (y/n): y
Deploying the Controllers
Bootstrap Configuration
Once all devices boot up, it is time to enable basic connectivity between the Cisco SD-WAN controllers. The following bootstrap configurations are the minimum required to achieve basic connectivity. Notice that the tunnel interfaces are disabled in the beginning. Once all devices join the control plane, we will enable the overlay fabric.
vBond
!
system
 host-name vBond
 system-ip 1.1.1.10
 site-id 1
 organization-name networkacademy-io
 vbond 10.1.1.10 local
!
vpn 0
 interface ge0/0
  ip address 10.1.1.10/24
  no tunnel-interface
  no shutdown
 !
!
vManage
!
system
 host-name vManage
 system-ip 1.1.1.20
 site-id 1
 organization-name networkacademy-io
 vbond 10.1.1.10
!
vpn 0
 interface eth0
  ip address 10.1.1.20/24
  no shutdown
 !
!
vpn 512
 interface eth1
  ip address 192.168.115.20/24
  no shutdown
 !
!
vSmart
system
 host-name vSmart
 system-ip 1.1.1.30
 site-id 1
 organization-name networkacademy-io
 vbond 10.1.1.10
!
vpn 0
 interface eth0
  ip address 10.1.1.30/24
  no tunnel-interface
  no shutdown
 !
!
At this point, each controller should successfully ping any other in VPN0. If for whatever reason, there is no reachability to one of the devices, you should not continue ahead but troubleshoot and resolve the issue.
Certificates
Cisco SD-WAN Controllers can not be brought into operation unless an established chain of trust validates their identity. This identity validation process is intended to ensure that only trusted devices can join the SD-WAN solution while still retaining flexibility. Each controller must have a root certificate installed and a controller certificate installed and signed by a trusted Certification Authority (CA).
We will use the vBond controller as a Root CA to create this lab environment.
vBond as Root CA
The first step to configure the vBond to act as a root of trust is to generate an RSA private key. Then we generate a ROOTCA.pem certificate and sign it with the private key that we have just created.
#Use vshell / viptela_cli to switch between shell and cli modes
vBond# vshell
vBond:~$ openssl genrsa -out ROOTCA.key 2048
Generating RSA private key, 2048 bit long modulus
........+++..............................................+++
e is 65537 (0x10001)
vBond:~$ openssl req -x509 -new -nodes -key ROOTCA.key -sha256 -days 1024 \
>     -subj "/C=US/ST=NY/L=NY/O=networkacademy-io/CN=root.certificate" \
>     -out ROOTCA.pem
vBond:~$ ls -l
total 12
-rw-r--r-- 1 admin admin 1679 Mar 23 09:41 ROOTCA.key
-rw-r--r-- 1 admin admin 1285 Mar 23 09:41 ROOTCA.pem
-rw-r--r-- 1 admin admin  392 Mar 23 09:37 archive_id_rsa.pub
Now you need to log in to the vManage GUI interface. This is done using a web browser and entering the URL https://[vManage-VPN512-IP-address]:8443. Default credentials are admin/admin.
Once logged in, you need to configure the following:
- go to Administration > Settings and set the Organization Name to be networkacademy-io
- edit the vBond address, and put it to 10.1.1.10
- make sure that Controller Certificate Authorization is set to Enterprise Root Certificate
- ensure that the WAN Edge Cloud Certificate Authorization is set to Automated.
The steps are shown below:
The first step is to set up the Organization Name. It should be the same on all devices and within the Cisco Smartnet account that you are going to create in the later steps.
Then you need to specify the vBond VPN0 address as is shown in the screenshot below:
Then you need to take the root certificate that you have created in the previous step and past it in the Certificate window as shown below:
vBond# vshell
vBond:~$ cat ROOTCA.pem
-----BEGIN CERTIFICATE-----
MIIDhTCCAm2gAwIBAgIJALo9MATOn77TMA0GCSqGSIb3DQEBCwUAMFkxCzAJBgNV
BAYTAkFVMQwwCgYDVQQIDANOU1cxDDAKBgNVBAcMA05TVzEaMBgGA1UECgwRbmV0
d29ya2FjYWRlbXktaW8xEjAQBgNVBAMMCXNkd2FuLmxhYjAeFw0yMTA1MzEwOTA5
MzRaFw0yNDAzMjAwOTA5MzRaMFkxCzAJBgNVBAYTAkFVMQwwCgYDVQQIDANOU1cx
DDAKBgNVBAcMA05TVzEaMBgGA1UECgwRbmV0d29ya2FjYWRlbXktaW8xEjAQBgNV
BAMMCXNkd2FuLmxhYjCCASIwDQYJKoZIhvcNAQEBBQADggEPADCCAQoCggEBAMNN
aLvGyHemWTmFn8KfGgbjkJbrLu2thUi5vHM4VyJh9KR/JC8wmsga8Sw/f0WLgVE/
s9sVrykpkRdbIpDaNoAXpNQqlhARAau7hyC3UxrpYIovgdJAj0m6k7pNw8sClAME
xpE0A3GclO1F5S+RdSRWIkcEyToPZTLufY27DdtBpVc8jPViCmqAO3qGiwc1nZoy
42I56WHfaYhEdbbbMI+NuHjc4JWUMYbPnIznI8AGLcThXvYl0Pr+QcH9aZWJQZWy
uTbZD7ckYx3MIB+sDL2mN4YoguenA3lz6DGtAv7jFqCmCJNwkCnG3fL2ws1pInr1
BVqH1M2BDVvKnc59s+UCAwEAAaNQME4wHQYDVR0OBBYEFAAAvbklonXV/Od9GXPc
2XwINchOMB8GA1UdIwQYMBaAFAAAvbklonXV/Od9GXPc2XwINchOMAwGA1UdEwQF
MAMBAf8wDQYJKoZIhvcNAQELBQADggEBAKUkTMTq++yudMgmhwgwqRvE8V9EJKQ2
PJVrtVw2uAMMM8D/cEcY3BH8Y4T3nZoOXM0KkhU5Epcc1KFkX2SEVBwsiMjA2HkH
4mii9lOXLc8kJkkxDkmcHQrPI6vibPwk1EQCZuvOb3uT/hMLCVgWYO/Qtvvt4P4P
aSD0cdEvOt81tI5kIfymQajFBVXfp08/xc0QGewgly+dvEmJFnL10jc7IYdMnKH3
5DFQ2JYymaMAIEfKFdHHSavw40oUwjrlOFuo0oG8xCWvQRibMhHXaoBN+olRtwqn
8yg1/PYkE+HQa3R0Mk3ikB0QR8qqwKtxy/Hfo26rhW4FqnPlvdC3rEo=
-----END CERTIFICATE-----
Once you copy/paste the value within the GUI window, you click Import & Save.
In the end, you must ensure that the WAN Edge Cloud Certificate Authorization is set to Automated. This means that once a vEdge successfully authenticates with vBond and is allowed to join the fabric, vManage will automatically generate CSR, sign, and install a device certificate to that device.
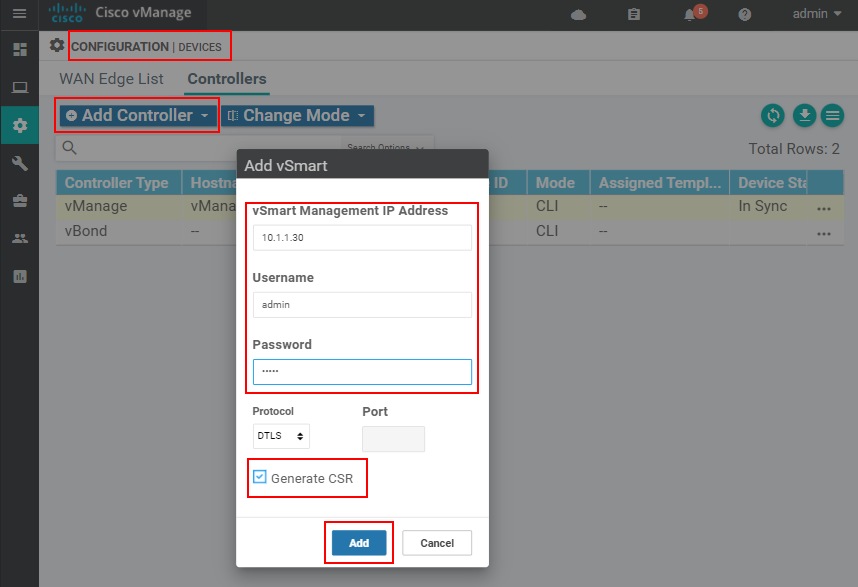
Once we complete these steps, the vManage controller will have our root certificate. It is time to add the other SD-WAN controller via the vManage GUI. W go to Configuration > Devices > Controllers > Add Controller and add all vBond and vSmart controllers.
Once all controllers are added to vManage, we go to Configuration > Certificates> Controllers and click Send to vBond.
At this point, the vManage controller will install the root certificate to each SD-WAN controller. Once completed, each controller must have a root certificate installed. We should verify this using the show certificate root-ca-cert command as shown below.
vManage# show certificate root-ca-cert | in networkacademy
        Issuer: C=US, ST=NY, L=NY, O=networkacademy-io, CN=root.certificate
        Subject: C=US, ST=NY, L=NY, O=networkacademy-io, CN=root.certificate
---------------------------------------------------------------------
vSmart# show certificate root-ca-cert | in networkacademy
        Issuer: C=US, ST=NY, L=NY, O=networkacademy-io, CN=root.certificate
        Subject: C=US, ST=NY, L=NY, O=networkacademy-io, CN=root.certificate
---------------------------------------------------------------------
vBond# show certificate root-ca-cert | in networkacademy
        Issuer: C=US, ST=NY, L=NY, O=networkacademy-io, CN=root.certificate
        Subject: C=US, ST=NY, L=NY, O=networkacademy-io, CN=root.certificate
If a controller does not have our custom root-of-trust, you should not continue ahead but instead troubleshoot the problem.
Device Certificates
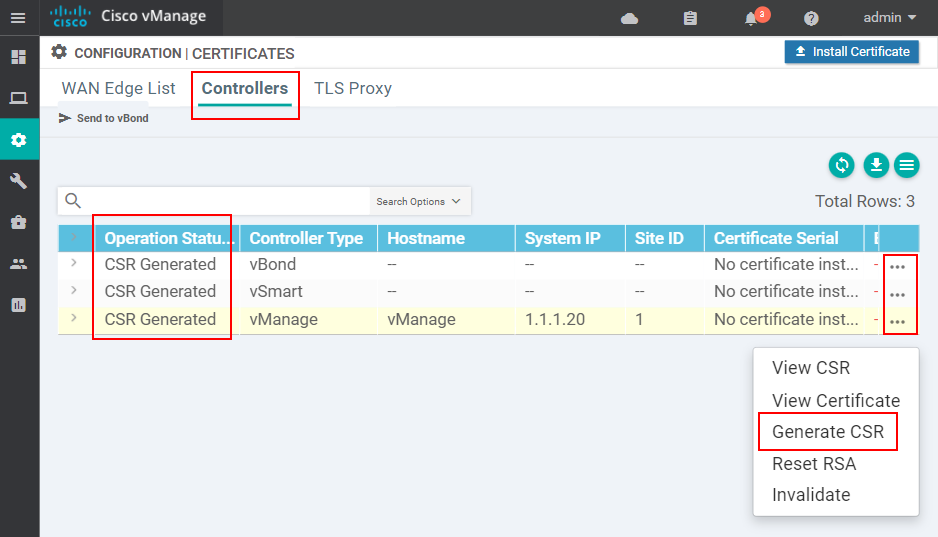
Now it is time to install a device certificate to each SD-WAN controller. We go to Configuration > Certificates> Controllers and generate a certificate signing request (CSR) for each one.
Once done, we need to copy all certificate signing requests in our vBond controller (the root CA).
vBond# vshell
vBond:~$ scp admin@10.1.1.30:/home/admin/vsmart_csr vSmart.csr
vBond:~$ scp admin@10.1.1.20:/home/admin/vmanage_csr vManage.csr
vBond:~$ scp admin@10.1.1.10:/home/admin/vbond_csr vBond.csr
vBond:~$ ls -l
total 28
-rw-r--r-- 1 admin admin 1679 Mar 23 09:41 ROOTCA.key
-rw-r--r-- 1 admin admin 1285 Mar 23 09:41 ROOTCA.pem
-rw-r--r-- 1 admin admin  392 Mar 23 09:37 archive_id_rsa.pub
-rw-r--r-- 1 admin admin 1224 Mar 23 12:12 vBond.csr
-rw-r--r-- 1 admin admin 1228 Mar 23 12:12 vManage.csr
-rw-r--r-- 1 admin admin 1224 Mar 23 12:12 vSmart.csr
-rw-r--r-- 1 root  root  1224 Mar 23 12:05 vbond_csr
When you list the directory and see that all CSRs are present, you can go ahead and sign them.
vBond:~$ openssl x509 -req -in vBond.csr \
>     -CA ROOTCA.pem -CAkey ROOTCA.key -CAcreateserial \
>     -out vBond.crt -days 500 -sha256
Signature ok
vBond:~$ openssl x509 -req -in vSmart.csr \
>     -CA ROOTCA.pem -CAkey ROOTCA.key -CAcreateserial \
>     -out vSmart.crt -days 500 -sha256
Signature ok

vBond:~$ openssl x509 -req -in vManage.csr \
>     -CA ROOTCA.pem -CAkey ROOTCA.key -CAcreateserial \
>     -out vManage.crt -days 500 -sha256
Signature ok
Now you should see all controllers' certificates.
vBond:~$ ls -alh | grep crt
-rw-r--r--  1 admin admin 1.3K Feb 12 09:40 vBond.crt
-rw-r--r--  1 admin admin 1.4K Feb 12 09:41 vManage.crt
-rw-r--r--  1 admin admin 1.3K Feb 12 09:41 vSmart.crt
vBond:~$
It is time to install all controller certificates via the vManage GUI. Go to Configuration > Certificates > Controllers > Install Certificate.
Now that you have all certificates (.crt) in vBond's directory, you simply cat each of them and paste the output in the Install Certificate window as shown below:
vBond:~$ cat vManage.crt
-----BEGIN CERTIFICATE-----
MIIDpjCCAo4CCQCpxofKmIPl+TANBgkqhkiG9w0BAQsFADBZMQswCQYDVQQGEwJB
VTEMMAoGA1UECAwDTlNXMQwwCgYDVQQHDANOU1cxGjAYBgNVBAoMEW5ldHdvcmth
Y2FkZW15LWlvMRIwEAYDVQQDDAlzZHdhbi5sYWIwHhcNMjEwNDEwMDk0MDQwWhcN
MjIwODIzMDk0MDQwWjCB0DELMAkGA1UEBhMCVVMxEzARBgNVBAgTCkNhbGlmb3Ju
aWExETAPBgNVBAcTCFNhbiBKb3NlMRowGAYDVQQLExFuZXR3b3JrYWNhZGVteS1p
bzEUMBIGA1UEChMLdklQdGVsYSBJbmMxQzBBBgNVBAMUOnZtYW5hZ2VfOWVmYTcz
Y2MtMmIxNi00NzNhLWFjMGUtNTQyZjhjNGRhMzg5XzAudmlwdGVsYS5jb20xIjAg
BgkqhkiG9w0BCQEWE3N1cHBvcnRAdmlwdGVsYS5jb20wggEiMA0GCSqGSIb3DQEB
AQUAA4IBDwAwggEKAoIBAQDO4mHeqgQ/i59TRuKjmB+i70wbzvTVf606nBzf44MD
qgsFY3hwBgWcu5dcOEkkI8uCkTFoQqinQtgtw5Ucd3aE0e8skLwy6W1xzcl1YtvV
88C23BSVc66A7p/dT5g7Z4UWCm4O4BER46uNMalTZKYBGGRONMv0e1VfJgAUEN9/
bLgQMwyFdawhIYq/32rEUhms3mSunO56pAjmUBWcO19FVAFBJQXdUlpqFvniMfWW
K6/YXFZQ5Y9kj7TH3tLLfkZQJ62/vohBVkdwLQvm9N2XJqL/ZEa8XPRSLs56Wy0W
/WbqX2gs0emSXTQN99Npq7ILX8fF+w7W+Rqcb9Pqe3cRAgMBAAEwDQYJKoZIhvcN
AQELBQADggEBABssqE1Ds8bEVp5+NXDzw1gNZmU1S+j/1Affk+FVHivIXXp8tJq5
iJU8yUYFQQeXSXQHtJWeDEIGKZ5q3Q7MB/NnxqQtyDzF3ejQ69DDWwoWI2YcCz0e
g5H1Lk+2wKLRXYCvFkarMDIlbMNwoehUSiJDQUbDBJsNo5oqFa2bARB5NHoLYHrS
O7yU24F0qSRBR4HmZuwAbvBgTrVMUyjj0NIgprb3IqpqdSpwIxtL1o8GS10Q82sR
ICO1TBbYlqPvozd7HYRRgFGmG+9VIaORKLhPoJcM7tvIdQxmdrCItYATUy2djp6E
GyOO7U0MLBDbTzCkfl4huCOcbu/dWNk6zJk=
-----END CERTIFICATE-----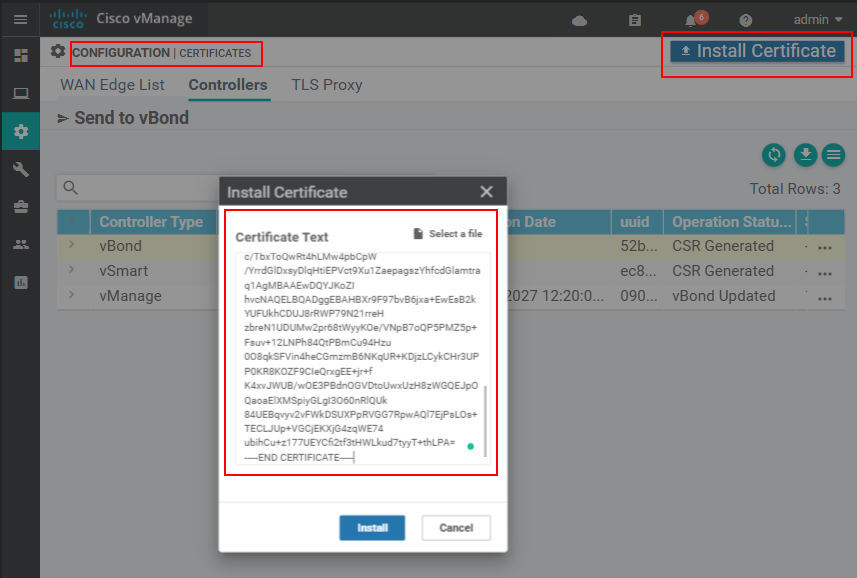
If everything is good up to this point, the certificate should install successfully.
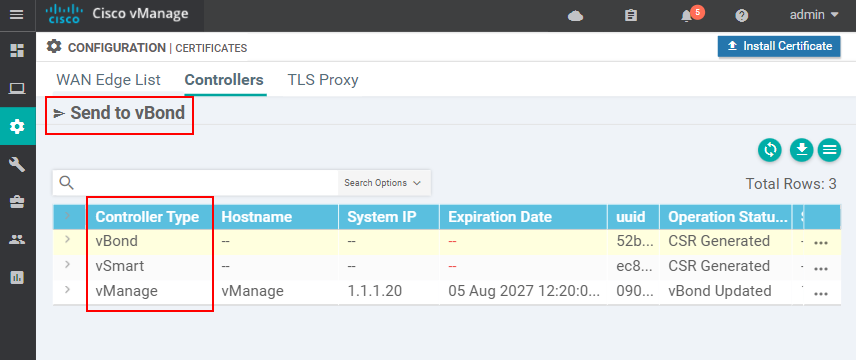
You repeat this for all controllers. In the end, when you go to Configuration > Certificates > Controllers, you should see that all controllers have Certificate Serial numbers. If that is the case, you click the Send-to-vBond function to propagate this information to vBond.
At this point, all controllers should be operational with valid certificates. Now it is time to bring up the tunnel interfaces using the configuration below:
# on vManage and vSmart
!
vpn 0
 interface eth0
  tunnel-interface
!
# on vBond and vEdges
!
vpn 0
 interface ge0/0
  tunnel-interface
   encapsulation ipsec
   allow-service all
!
Verification
If everything has successfully completed up to this point, each controller should have both root and device certificates installed and a serial number, as shown in the output below.
vBond# show control local-properties
personality                       vedge
sp-organization-name              networkacademy-io
organization-name                 networkacademy-io
root-ca-chain-status              Installed
!
certificate-status                Installed
certificate-validity              Valid
certificate-not-valid-before      Feb 12 09:40:49 2022 GMT
certificate-not-valid-after       Jun 27 09:40:49 2023 GMT
!
dns-name                          10.1.1.10
site-id                           1
domain-id                         1
protocol                          dtls
tls-port                          0
system-ip                         1.1.1.10
chassis-num/unique-id             52a6b4e6-6cb4-452b-xxxx-xxxxxxxxxxxx
serial-num                        CB7838EBXXXXXXXX
subject-serial-num                N/A
token                             Invalid
keygen-interval                   1:00:00:00
retry-interval                    0:00:00:18
no-activity-exp-interval          0:00:00:20
dns-cache-ttl                     0:00:02:00
port-hopped                       TRUE
time-since-last-port-hop          0:04:14:59
pairwise-keying                   Disabled
embargo-check                     success
cdb-locked                        false
number-vbond-peers                0
number-active-wan-interfaces      1
Additionally, each one must have established control connections to all other controllers as shown in the output below.
vBond# show orchestrator connections

         PEER     PEER     PEER       SITE           ORGANIZATION
INSTANCE TYPE     PROTOCOL SYSTEM IP  ID     STATE   NAME               UPTIME
----------------------------------------------------------------------------------
0        vsmart   dtls     1.1.1.30   1      up      networkacademy-io  0:00:01:17
0        vsmart   dtls     1.1.1.30   1      up      networkacademy-io  0:00:01:17
0        vmanage  dtls     1.1.1.20   1      up      networkacademy-io  0:00:02:22
0        vmanage  dtls     1.1.1.20   1      up      networkacademy-io  0:00:02:22
0        vmanage  dtls     1.1.1.20   1      up      networkacademy-io  0:00:02:23
0        vmanage  dtls     1.1.1.20   1      up      networkacademy-io  0:00:02:23
If everything is working up to this point, we can now go ahead and provision the vEdge routers.
Cisco Smart Account
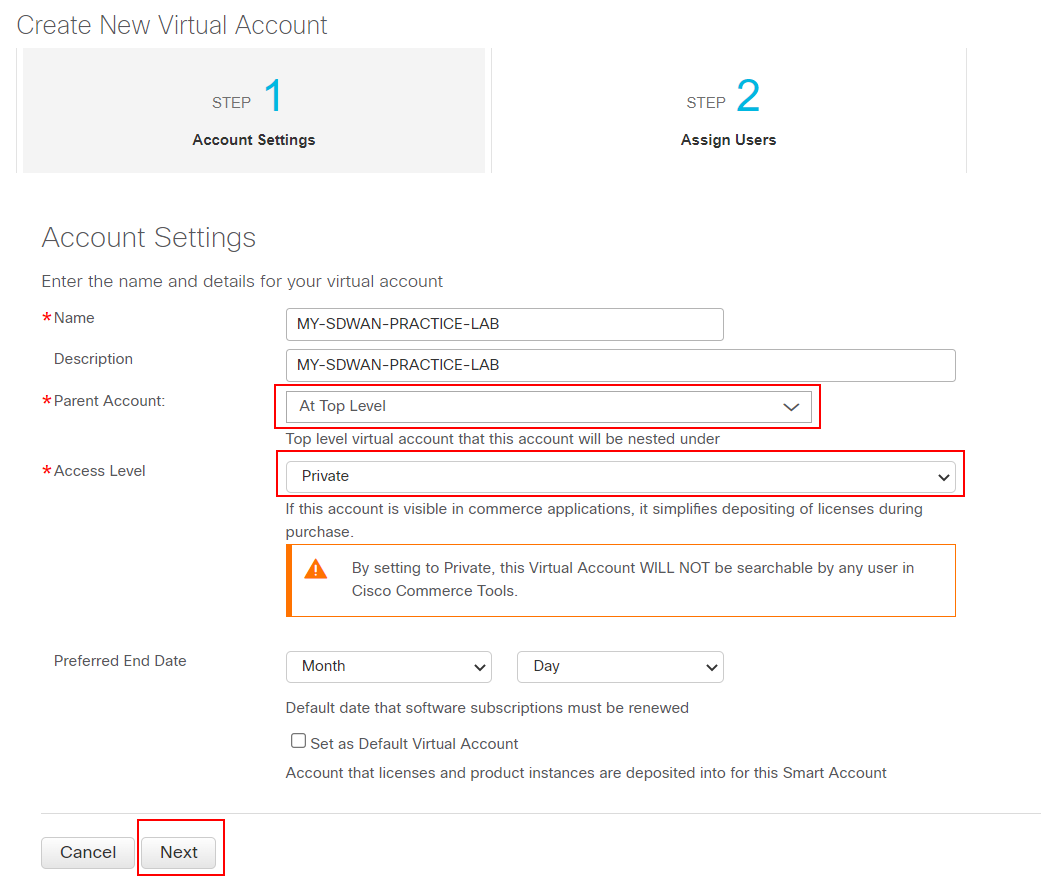
To add vEdge devices to the SD-WAN overlay fabric, we need to have a Cisco Smart Account at the Cisco Software Central (https://software.cisco.com). We create a new Virtual Account for each independent SD-WAN overlay domain within the account. Therefore, when setting up a new lab environment, we should create a new dedicated virtual account, as shown in the screenshot below.
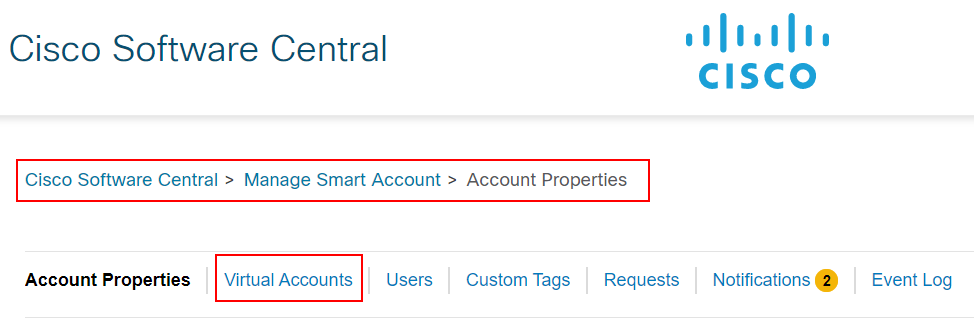
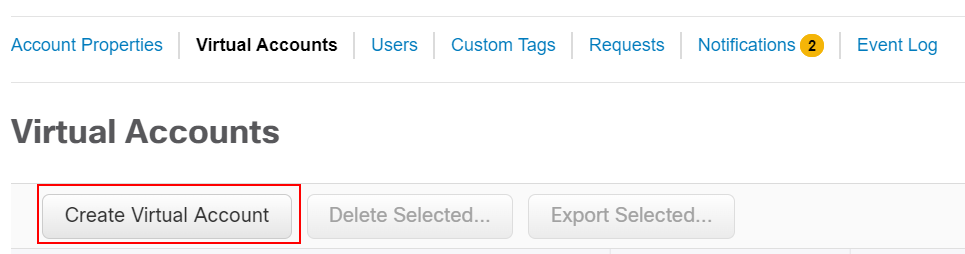
We go to Cisco Software Central > Manage Smart Account > Account Properties and navigate to the Virtual accounts page. There, we go to Greate Virtual Account, as shown in the screenshot below.
We give the virtual account a name and description and make it private. The virtual account is a logical container for all devices and licenses participating in this SD-WAN domain.
Once the Virtual Account is created, we go to the Cisco Software Central > Plug and Play Connect, as shown in the screenshot below. Then we switch from the DEFAULT virtual account to the one we have created in the previous step.

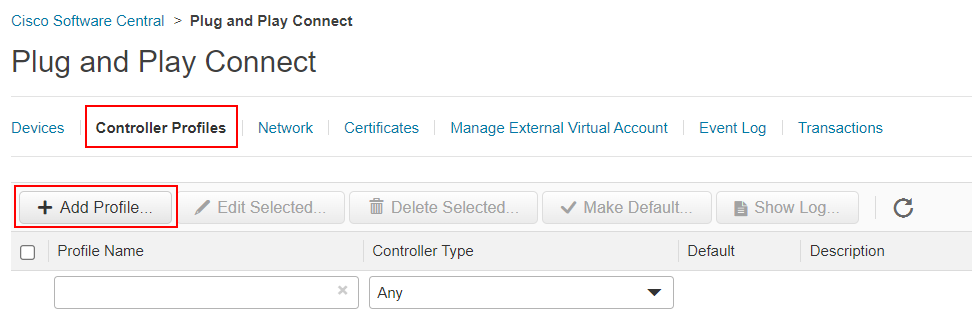
In there, we navigate to the Controller Profile page and select Add Profile. We should add a new vBond profile with the organization name that we will use within the lab topology.
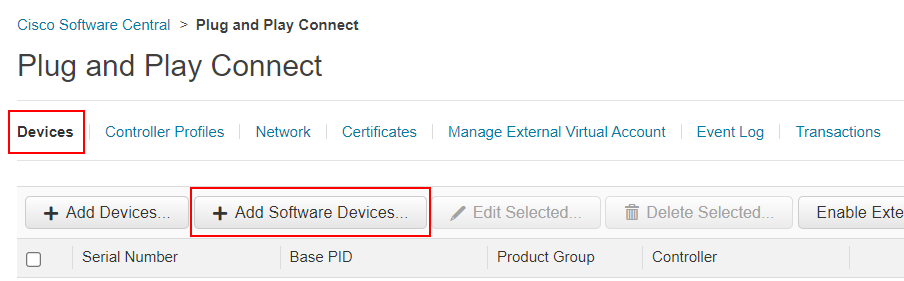
Once we have added the vBond profile, we go to Devices and select Add Software Devices, as shown in the screenshot below.
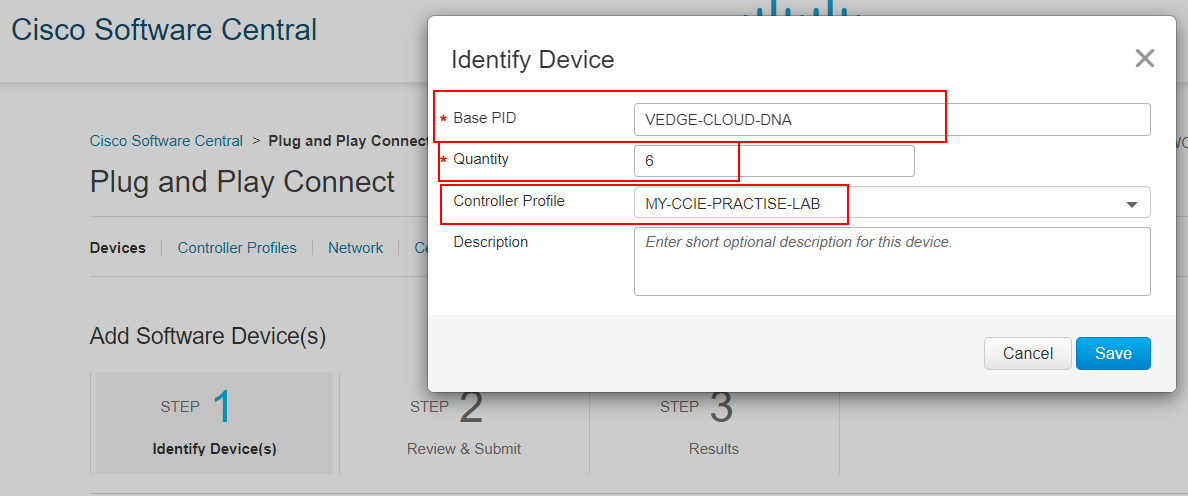
There, we add as many vEdge cloud routers as we will use in the lab topology and assign them to the Controller Profile that we created in the previous step.
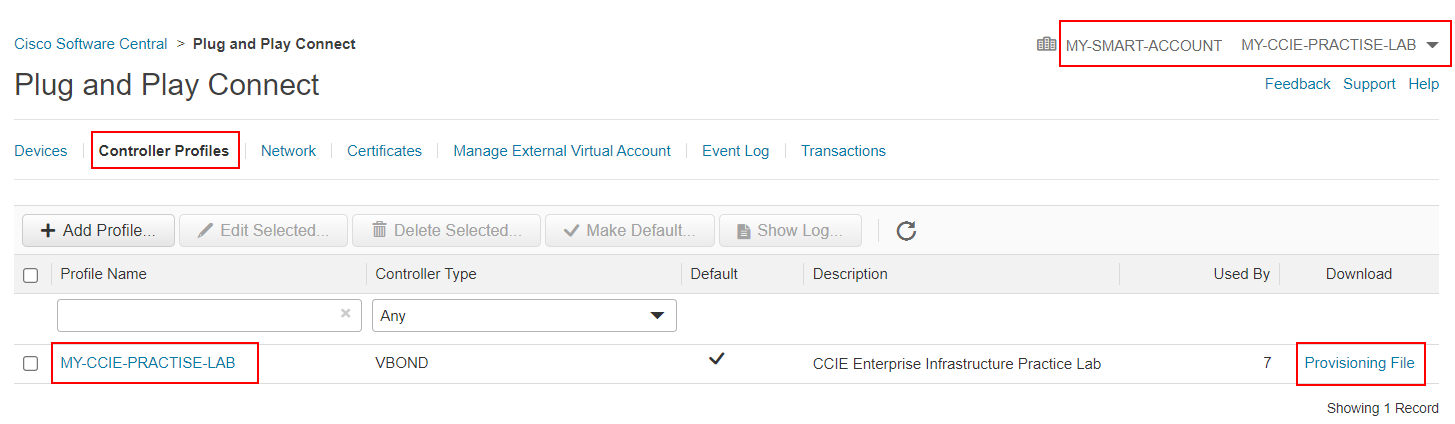
Once we have added all virtual routers that we are going to need, we go to Controller Profile and download the vEdge list by clicking the Provisioning File.
Now that we have got the vEdge list, we can go back to the lab and import the file to vManage.
vEdges
Now that the SD-WAN controllers are deployed, it is time to provision the vEdge routers.
vEdge List
The first step is always to upload the vEdge list to vManage. There are two options here:
- In scenarios where the vManage controller does not have access to the Internet, we download the vEdge list and upload it to vManage at Configuration > Devices > WAN Edge list, as shown in the screenshot below.
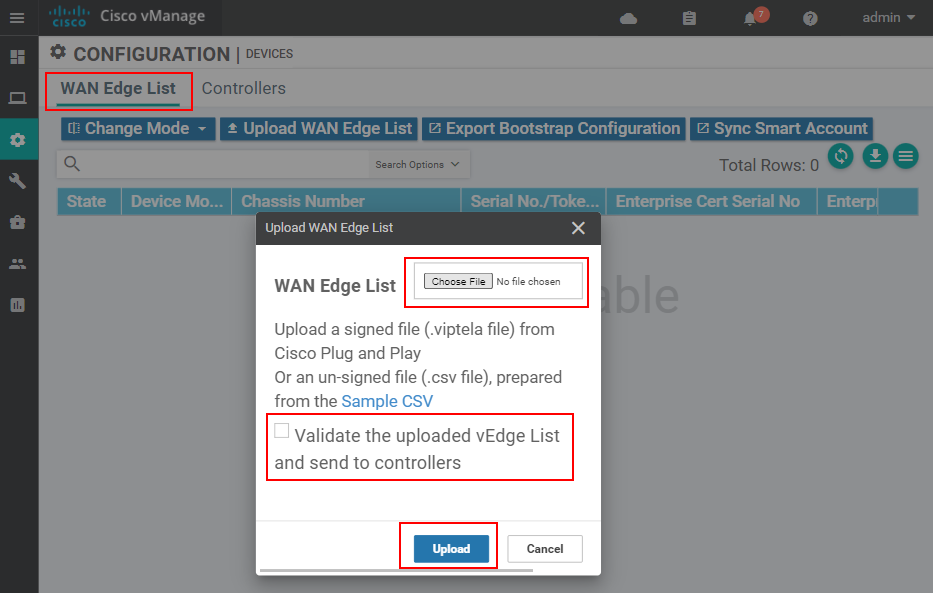
- In scenarios where the vManage controller has access to the Internet, we could synchronize it with our Cisco Smart Account by adding the credentials directly at Administration > Settings > Smart Account Credentials, as shown in the screenshot below.
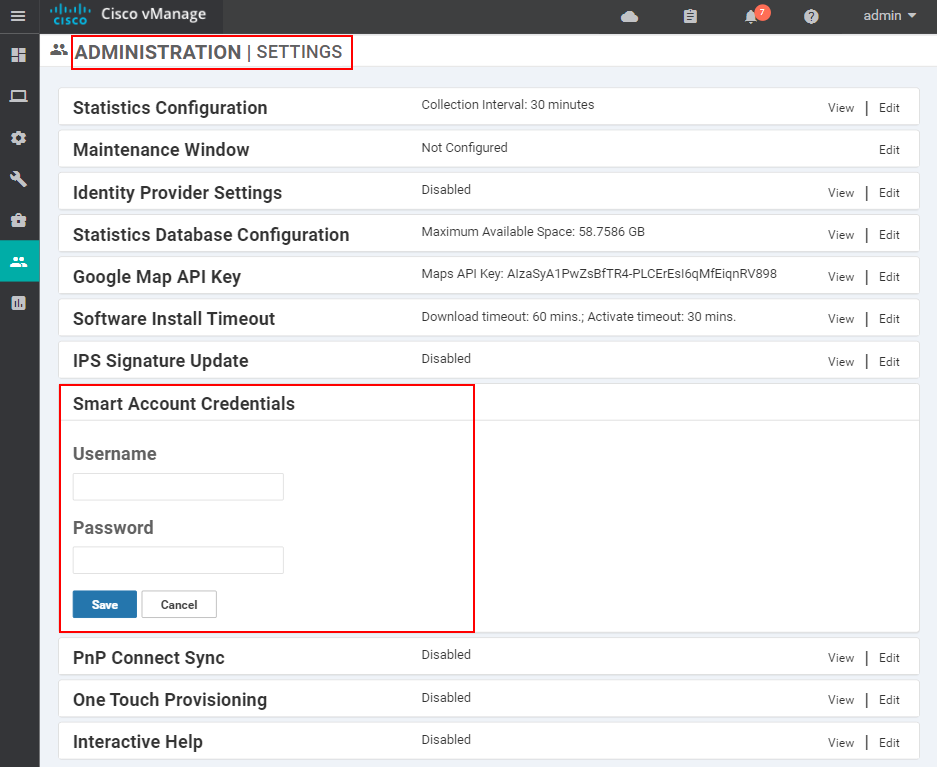
Regardless of the method, vManage must have a list of the WAN edge routers that we are going to use in the lab topology.
Bootstrap
Once the vEdge list has been added to vManage, we need to bootstrap the routers so that they have IP reachability to the SD-WAN controllers. The example below shows the process for one vEdge router. However, you will need to adjust the IP addressing for all other vEdges so that there are no duplicate IPs.
system
 host-name vEdge-1
 system-ip 1.1.1.40
 site-id 100
 organization-name networkacademy-io
 vbond 10.1.1.10
!
vpn 0
 interface ge0/0
  ip address 10.1.1.40/24
  tunnel-interface
   encapsulation ipsec
   color biz-internet
   allow-service all
  no shutdown
!
Once IP connectivity has been established, we should copy the root certificate from vBond and install it on the router as shown in the output below.
vEdge-1# vshell
vEdge-1:~$ scp admin@10.1.1.10:/home/admin/ROOTCA.pem ROOTCA.pem
The authenticity of host '10.1.1.10 (10.1.1.10)' can't be established.
ECDSA key fingerprint is SHA256:ReVYCCci7rlqIbk0jFkubohNSZGiBlVXKiMECyyP2nY.
Are you sure you want to continue connecting (yes/no)? yes
Warning: Permanently added '10.1.1.10' (ECDSA) to the list of known hosts.
viptela 20.4.1
Password:
ROOTCA.pem                                    100% 1294    31.0KB/s   00:00
vEdge-1:~$
vEdge-1:~$ viptela_cli
Welcome to Viptela CLI
admin connected from 127.0.0.1 using console on vEdge-1
vEdge-1#
vEdge-1# request root-cert-chain install /home/admin/ROOTCA.pem
Uploading root-ca-cert-chain via VPN 0
Copying ... /home/admin/ROOTCA.pem via VPN 0
Updating the root certificate chain..
Successfully installed the root certificate chain
At this point, the router has our custom root-chain-of-trust installed. Now we need to install a device certificate.
We go to Configuration > Certificates > WAN Edge List and take the next available Chassis Number and Token.
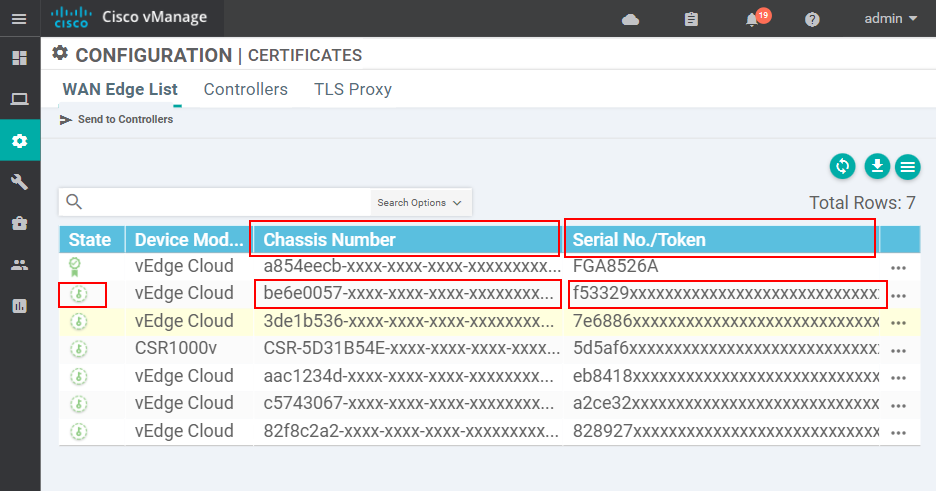
Then we need to active the router with the values we have taken from the vEdge list.
vEdge-1# request vedge-cloud activate
Value for 'chassis-number': be6e-0057-xxxx-xxxx-xxxxxxxxxxxx
Value for 'token': f53329xxxxxxxxxxxxxxxxxxxxx
vEdge-1#
Once the chassis number and the token are entered on the WAN edge router, we have to wait a couple of minutes. The vManage controller will automatically install a device certificate to the router. When this is completed, we should see that the router has a serial number, as shown in the output below.
vEdge-1# show certificate serial
Chassis number: be6e-0057-xxxx-xxxx-xxxxxxxxxxxx serial number: FFA6XXXX
And the ultimate test would be to check whether the vEdge has joined the SD-WAN control plane, as shown below.
vEdge-1# show control connections | t

          PEER     SITE SYSTEM              LOCAL    REMOTE
INSTANCE  TYPE     ID   IP        PROTOCOL  COLOR    COLOR    STATE  UPTIME      V ORG NAME
--------------------------------------------------------------------------------------------------
0         vsmart   1    1.1.1.30  dtls      default  default  up     0:02:53:10  networkacademy-io
0         vbond    0    0.0.0.0   dtls      default  default  up     0:02:53:10  networkacademy-io
0         vmanage  1    1.1.1.20  dtls      default  default  up     0:02:53:10  networkacademy-io
We repeat this process for each vEdge router that we will use in the lab topology. Once all routers join the SD-WAN control plane, we can go ahead and re-design the topology as we wish. We can change the system-ips, site-ids, and all other parameters of each vEdge router, and it will still be able to join the control plane.
Full Content Access is for Subscribed Users Only...
- Learn any CCNA, CCIE or Network Automation topic with animated explanation.
- We focus on simplicity. Networking tutorials and examples written in simple, understandable language.