The Default Overlay Fabric
As we have already discussed throughout this course - the default behavior of the Cisco SD-WAN overlay fabric is to build a full mesh of IPsec tunnels between all WAN edge routers with different site-ids. Let's visualize this with the example shown in figure 1. If we have six WAN edge routers connected to a single WAN transport as shown on the left, the default overlay outcome with no policies applied results in 15 IPsec tunnels as shown on the right side. You can easily calculate how many tunnels will be established with the full mesh formula n*(n-1)/2. In case the company has 100 branches, there will be 4950 overlay tunnels.


At this point, it is important to understand the behavior of the WAN edge routers and what is a TLOC. A TLOC (Transport Locator) is a data plane attachment point identified by a 3 values tuple - (System IP, Color, Encap). TLOCs do not have a straight one to one analog in traditional networking, but the closest simplest explanation is that they are just tunnel endpoints. Therefore, if a vEdge device receives a TLOC (tunnel attachment point) from the vSmart controllers, it attempts to establish a tunnel from each of its own TLOCs to this new TLOC. If the tunnel is successfully built, it establishes a BFD session over the tunnel and starts keeping track of the state and the characteristics of it.
IMPORTANT The number of established IPsec tunnels and the arbitrary network topology is controlled by the advertisements of Transport Locators (TLOCs) by the vSmart controllers. By default, all TLOCs are advertised to all vEdge routers, resulting in a full mesh overlay fabric. To create a custom network topology, you must filter which TLOCs are advertised to which specific WAN Edge devices.
The next example is not very common but illustrates well the overlay fabric creation. If we have four WAN edge routers attached to two underlay transports as shown on the left in figure 3 and there is full reachability between both clouds, in this case, IPsec tunnels are established between different color TLOCs resulting in the overlay shown on the right. Even with only four sites, there are 24 tunnels, because blue TLOCs can reach green TLOCs, and tunnels between blue and green endpoint are also built. Therefore, if the company has 100 sites, this results in 200*199/2-100 = 39700 IPsec tunnels! If there are two vEdge devices per site, the number is doubled, and so on.

You can clearly see that in some rare cases, this could be the desired topology, but in most mid-sized and enterprise networks, there is little need to have direct branch-to-branch communication. There is also a scaling limitation because WAN edge devices at the remote sites are typically not sized to handle hundred of thousands of IPsec tunnels and BFD sessions. A better more practical design approach is the use of a Hub-and-Spoke topology.
Configuring a Centralized Policy
In Cisco SD-WAN, to implement hub and spoke topology means to restrict the spoke-to-spoke overlay connections. To do this, a centralized policy must be created and applied so that the remote sites will only receive the Transport Locators of the data center WAN Edges from the vSmart controllers. Each vEdge router attempts to establish a tunnel to all known TLOCs, so the goal is to make the vSmart advertise only the data center TLOCs toward the branches.
For this set of lab examples, we are going to use the topology shown in figure 4.

The end goal after applying the centralized policy is to have the data center Site-50 act as a hub and all other sites (60,70,80,90) act as spokes and establishing tunnels to the DC only and not in between them.
To understand the overlay fabric at the moment, let's check how many BFD sessions one of the spoke routers has. This is the easiest way to quickly check how many operational IPsec tunnel a WAN edge device has.
vEdge-4# show bfd sessions
                                SOURCE TLOC      REMOTE TLOC
SYSTEM IP      SITE ID STATE  COLOR            COLOR            SOURCE IP   DST IP
-------------------------------------------------------------------------------------
50.50.50.50    50      up     mpls             mpls             10.70.1.1   10.50.1.1
50.50.50.50    50      up     mpls             public-internet  10.70.1.1   50.1.1.1
50.50.50.50    50      up     public-internet  mpls             70.1.1.1    10.50.1.1
50.50.50.50    50      up     public-internet  public-internet  70.1.1.1    50.1.1.1
50.50.50.51    50      up     mpls             mpls             10.70.1.1   10.50.2.1
50.50.50.51    50      up     mpls             public-internet  10.70.1.1   50.1.2.1
50.50.50.51    50      up     public-internet  mpls             70.1.1.1    10.50.2.1
50.50.50.51    50      up     public-internet  public-internet  70.1.1.1    50.1.2.1
60.60.60.60    60      up     mpls             lte              10.70.1.1   60.1.1.1
60.60.60.60    60      up     public-internet  lte              70.1.1.1    60.1.1.1
80.80.80.80    80      up     mpls             mpls             10.70.1.1   10.80.1.1
80.80.80.80    80      up     mpls             public-internet  10.70.1.1   80.1.1.1
80.80.80.80    80      up     public-internet  mpls             70.1.1.1    10.80.1.1
80.80.80.80    80      up     public-internet  public-internet  70.1.1.1    80.1.1.1
90.90.90.90    90      up     mpls             mpls             10.70.1.1   10.90.1.1
90.90.90.90    90      up     public-internet  mpls             70.1.1.1    10.90.1.1
You can see based on the site-id, that vEdge-4 has overlay connections to all other spoke sites (highlighted in yellow). If we successfully configure the hub-and-spoke topology, we should only see connections to Site-50, which would be the hub site.
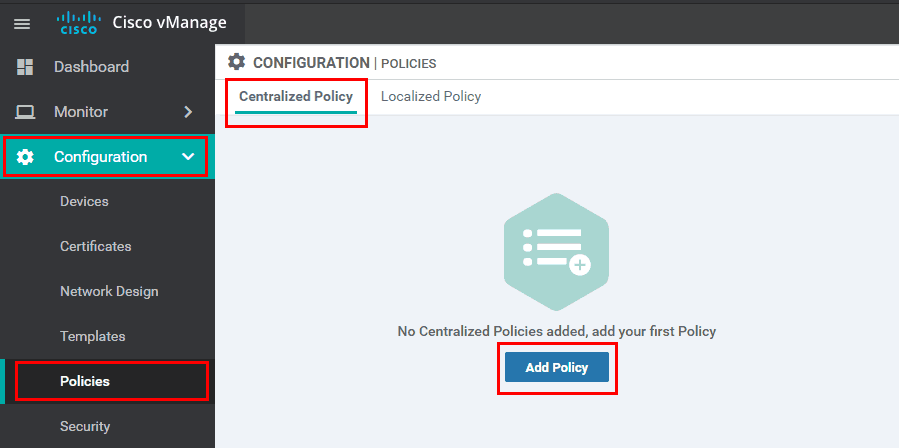
The first step to constructing the Centralized Control Policy is to use the Policy Wizard in Configuration > Policies as shown below.
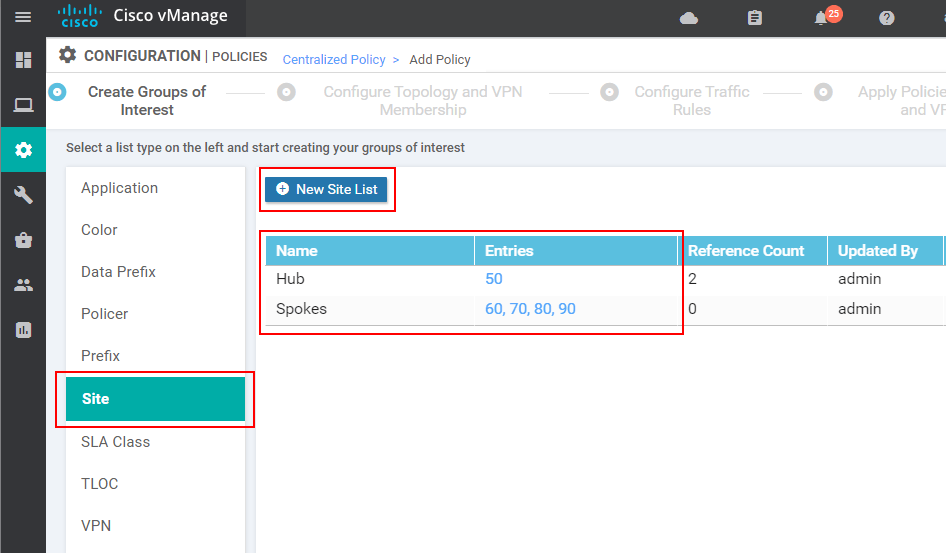
From inside the Centralized Policy Wizard, we need to create two Lists that will be used to match the hub and spokes site-ids. Lists are very simple constructs that are used to match specific values. In Cisco SD-WAN, lists work the same way as they do in traditional networking where we use access-lists and prefix-lists to match specific routes and then specify the action in another construct called a route-map.
For this example, we create one list called Hub that matches site-id 50 and one called Spokes that matches the site-ids of all remote sites - 60,70,80,90.
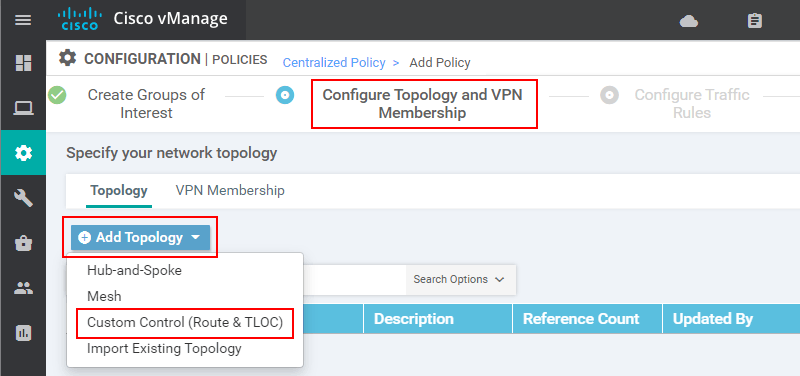
After clicking Next, the wizard moves to the next page called "Configure Topology and VPN Membership". There we select the Custom Control (Route and TLOC) from the Add Topology drop-down menu. You can see in the available options that there is a pre-defined Hub-and-Spoke topology, but to better understand the principles of the Centralized policies, it is better to go down this route.
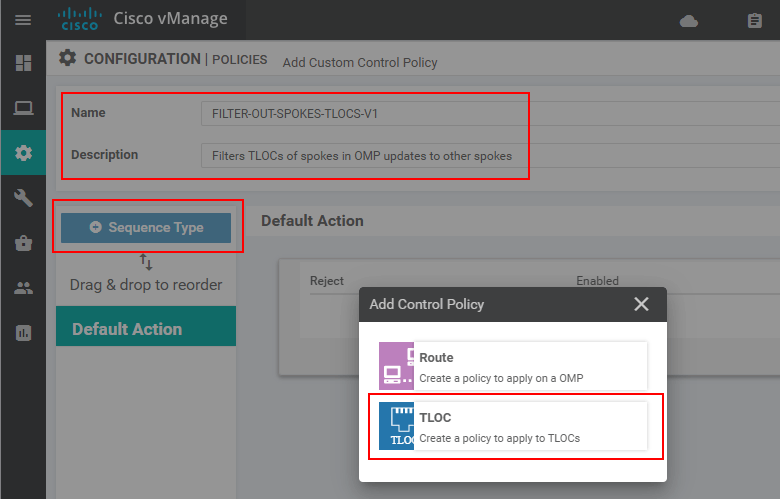
On the next page, the first thing that we have to specify is the Name and Description of the Control Policy. Composing good and scalable policy names is a skill in itself. A general rule of thumb is to use all capital letters and always include a version number.
Next, we click Sequence Type and select TLOC to create a policy that applies to TLOCs.
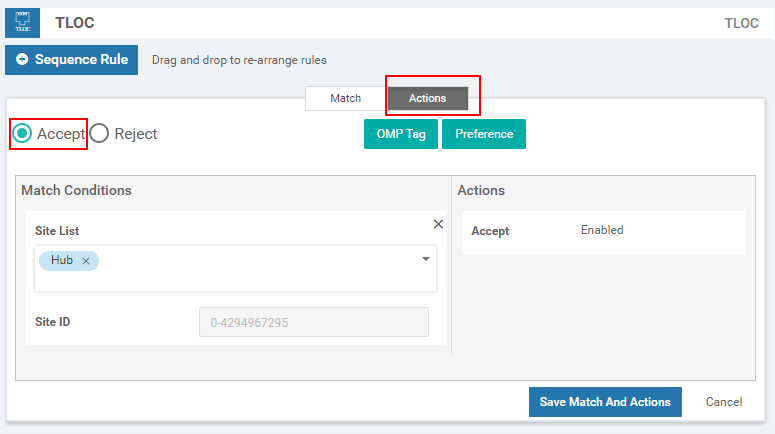
At this point, we should add a new Sequence Rule that matches the Hub sites and then specify Action: Accept. The idea is that the control policy has a default action Reject at the end similarly to Cisco IOS access-lists having explicit deny all at the end. Therefore, the idea is to explicitly match the TLOCs of the Hub site and accept them, and all other TLOCs (of the spoke sites) will be rejected by the default action. In the end, the spokes will only know the TLOCs of the hub and won't establish IPsec tunnels to other spokes.
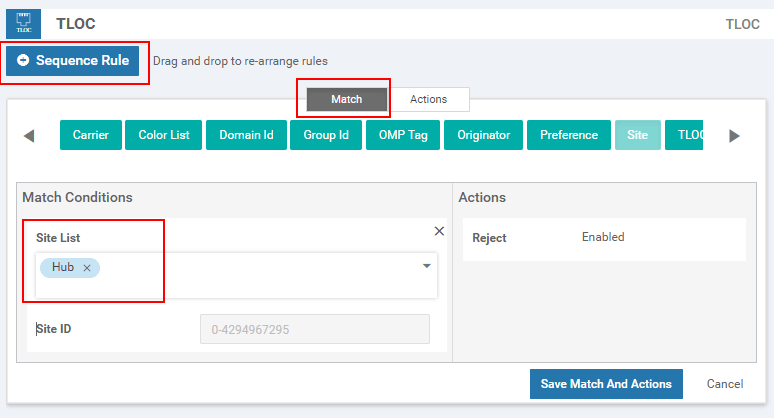
As we explained above, after we match the hub sites, we specify the Accept action.
In the end, on the Configure Topology and VPN Membership page, you should see the control policy we have just created. If that is the case, we click Next and go to the Configure Traffic Rules page. For this lab, there is nothing that needs to be configured to this page, so we click Next and go to Apply Policies to Sites and VPNs page.

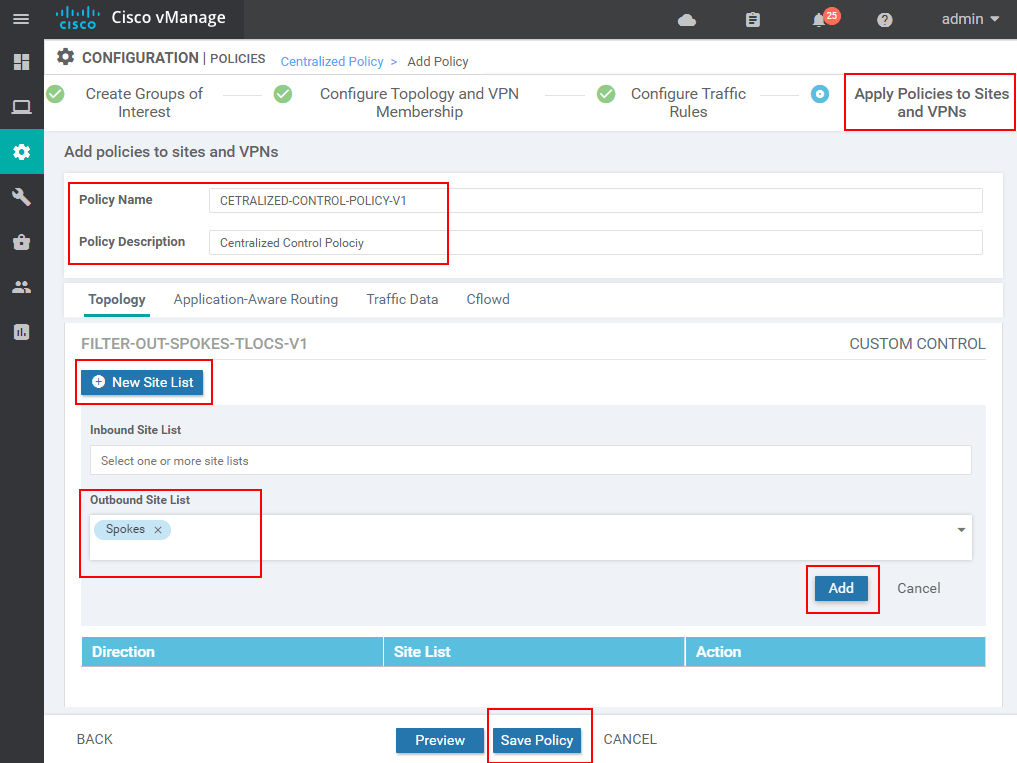
The first piece of configuration required on this page is the policy name and description. Then under the Topology tab, we must specify where and in what direction the FILTER-OUT-SPOKES-TLOCS-V1 control policy will be applied. In our case, we apply it in the outbound direction to the spoke sites.
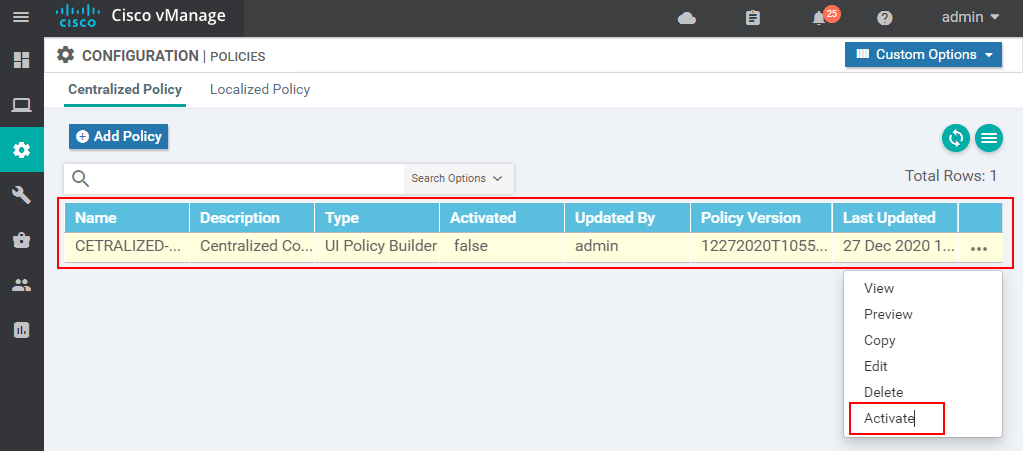
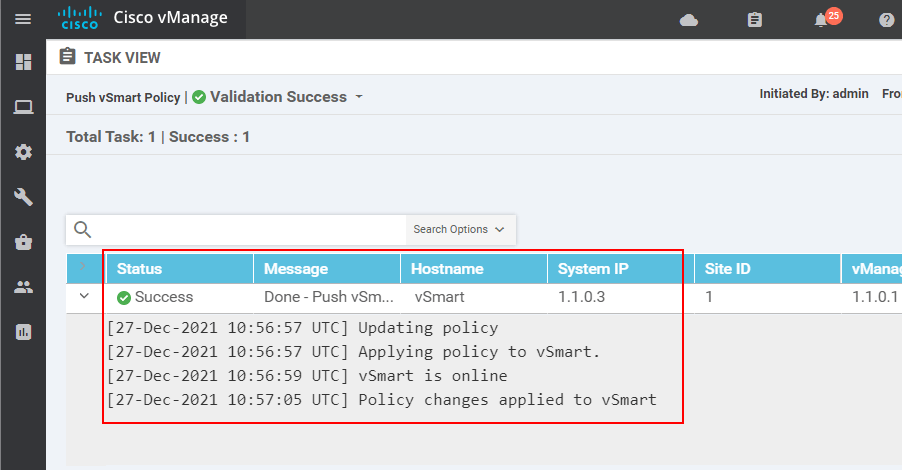
In the end, we should see the Centralized Policy created but not activated. The last thing we must do is to activate it as shown in the screenshot below.
Note that the vSmart won't accept the policy if it is not in a "vManaged mode". This means that the vSmart must have a template applied from vManage. The type of the template does not matter, it could be a Device template or a Feature template, but a template has to be applied. This enables vManage to have authoritative control over the vSmarts. It is common for production environments to initially deploy the vSmart controllers with a CLI template from vManage, so the controllers are in "vManaged mode" from the get-go.
In our lab example, the vSmart has been initially deployed with a CLI template so vManage can successfully push the Centralized Policy to the controllers.
At this point, the overlay fabric must be analogous to a traditional Hub and Spoke topology. We can now check again the active BDF sessions on one of the spokes WAN edge devices. If our control policy is correct and has taken effect, we must see IPsec tunnels to the hub site only (site-id 50) and not to other spokes (sites 60,70,80,90).
vEdge-4# show bfd sessions
                                SOURCE TLOC      REMOTE TLOC
SYSTEM IP      SITE ID STATE  COLOR            COLOR            SOURCE IP   DST IP
-------------------------------------------------------------------------------------
50.50.50.50    50      up     mpls             mpls             10.70.1.1   10.50.1.1
50.50.50.50    50      up     mpls             public-internet  10.70.1.1   50.1.1.1
50.50.50.50    50      up     public-internet  mpls             70.1.1.1    10.50.1.1
50.50.50.50    50      up     public-internet  public-internet  70.1.1.1    50.1.1.1
50.50.50.51    50      up     mpls             mpls             10.70.1.1   10.50.2.1
50.50.50.51    50      up     mpls             public-internet  10.70.1.1   50.1.2.1
50.50.50.51    50      up     public-internet  mpls             70.1.1.1    10.50.2.1
50.50.50.51    50      up     public-internet  public-internet  70.1.1.1    50.1.2.1
Obviously, vEdge-4 has overlay connections only to the data center site 50.
Key Takeaways
Let's recap what we have done in this lab and highlight the key takeaways from this lesson. Use figure 15 for a reference.
We created a Centralized Policy using the vManage GUI. In this policy, we have created another Control Policy that matches the hub TLOCs and accepts them, all other TLOCs are rejected by the default action at the end - Reject. After that, we applied this policy in an outbound direction to the spoke sites. Note that the OUT direction is from the perspective of the OMP updates of the vSmart controller to the WAN edge devices. So what happened after we activated the policy. As it is shown in figure 15, vManage pushed this Centralized policy as a NETCONF transaction to the vSmart controllers.

If we check the policy in the running configuration of the vSmart, it looks like the output shown below. Note that it has a very similar construct as the route-maps in Cisco IOS. We have lists that match something (in green). In route-maps, we typically use access-lists, prefix-lists, or as-path lists to specify values of interest.
Then we have a sequence with a match-action construct (in yellow). In Cisco IOS we have route-maps with similar match-set logic, for example, match ACL1 set local-preference 110.
And then we apply this match-action construct somewhere (in orange). In the case of Cisco SD-WAN, we have applied it to the OMP updates in the outbound direction. In the case of a typical route-map, we apply it on a BGP neighbor for example.
!
policy
 lists
  site-list HUB
   site-id 50
  !
  site-list SPOKES
   site-id 60
   site-id 70
   site-id 80
   site-id 90
  !
 !
 control-policy FILTER-OUT-SPOKES-TLOCS-V1
  sequence 1
   match tloc
    site-list HUB
   !
   action accept
   !
  !
  default-action reject
 !
!
apply-policy
 site-list SPOKES
  control-policy FILTER-OUT-SPOKES-TLOCS-V1 out
 !
!
You can see that there is nothing quite new in the way the overlay fabric is configured with Centralized Policies, only the underlying mechanisms are different. The logical construct is pretty much the same as it has always been in traditional networking.