The primary requirement of the Secure Guest Access use case is to allow guests to securely access the Internet without being able to do illegal online activities leading to potential legal liabilities for the organization.
The secondary requirement is to offload the Internet traffic from the expensive WAN connections to the data center and allow local Internet exit at the remote site.

The pre-defined security policy Guest Access is designed to apply the following security features to the Guest's Internet Access:
- Zone-based Enterprise Firewall for stateful inspection based on 5-tuple or application lists.
- URL Filtering (URLF) for URL-based policy control.
- TLS Proxy for decryption of HTTPS traffic.
Configuring Secure Guest Access
Figure 2 shows the lab topology that we are going to use in this lesson. cEdge-3 is a remote branch that provides Internet access via Direct Internet Access (DIA).

Initial State
Before we begin with the configuration, let's describe the initial state of the topology.
- All routers run IOS-XE version 17.07.01a. The necessary UTD file is already uploaded to vManage's software repository.
- Guest LAN is in VPN6 subnet 10.3.6.0/24 at the branch.
- The branch router is attached to a device template named "SPOKE-SINGLE-HOMED."
- Guest LAN has full IP reachability to the entire Internet. (NAT DIA default route leaks traffic from VPN6 to the Internet)
- Guest LAN has no connectivity to other remote sites over the sdwan fabric. (A VPN membership policy for VPN6 is applied to all remote sites)
Lab Requirements
Table 1 lists the security requirements to ensure that the Guest's Internet Access in VPN6 is secured. The first column shows each requirement, and the last column lists the SD-WAN technique that satisfies the requirement.
| Use case | Security Requirement | SD-WAN Security Technique |
| Secure Guest Access | Segmentation - The Guest LAN must be isolated from the rest of the organization’s network. | VPN and ZONE |
| Perimeter Control - Connection attempts between the Guest LAN and the rest of the organization's network are actively blocked. No connections initiated from the Internet are allowed into the Guest LAN. | Enterprise Firewall | |
| Liability Protection - The Guest LAN must prevent guests from using Internet access for illegal online activities. | URL Filtering | |
| Local Internet Exit - Guest traffic must not be backhauled to the data center over the sd-wan fabric but instead must be routed locally out to the Internet. | NAT DIA Route | Centralized Data Policy |
Let's translate the Guest Access security requirements to specific tasks for this lab.
- Enterprise Firewall:
- Only DNS, HTTP, NTP, and HTTPS should be allowed from the Guest LAN (10.3.6.0/24) to the Internet (0.0.0.0/0).
- Traffic destined to Entperise IP addresses (RFC1918) should be denied.
- Connections should only be initiated from the Guest VPN. Connections initiated from the Internet toward the branch must be denied.
- URL Filtering:
- HTTP(s) requests destined to the following Web Categories must be denied:
- Adult
- Games
- Illegal
- HTTP(s) requests to websites with a web reputation below than or equal to 40 must be denied.
- HTTP(s) requests to websites with the domain name "networkacademy" must be denied, while requests to "networkacademy.io" must be allowed. For example, "networkacademy.com" must be denied while "networkacademy.io" must be allowed.
- HTTP(s) requests destined to the following Web Categories must be denied:
Configuring Secure Internet Access
Workflow
Figure 3 summarizes the configuration steps that we are going to make to implement Secure Guest Access to the lab topology using the vManage GUI.

- (Done in the previous lab) Uploading the necessary Unified Thread defense (UTD) file to vManage.
- Configuring a new security policy named "SECURE-GUEST-ACCESS."
- Configuring a new firewall policy named "GUEST-ACCESS-FW."
- Configuring a new URLF policy named "GUEST-ACCESS-URLF."
- Creating a new Secure App Hosting feature template named "SECURE-APP-HOSTING."
- Attaching the security policy "SECURE-GUEST-ACCESS" to cEdge-3's device template "SPOKE-SINGLE-HOMED."
Notice that step one is already completed in the previous lab. If you are coming directly to this lab lesson, I recommend checking out our PCI Compliance use case.
Step 2. Configuring a new security policy
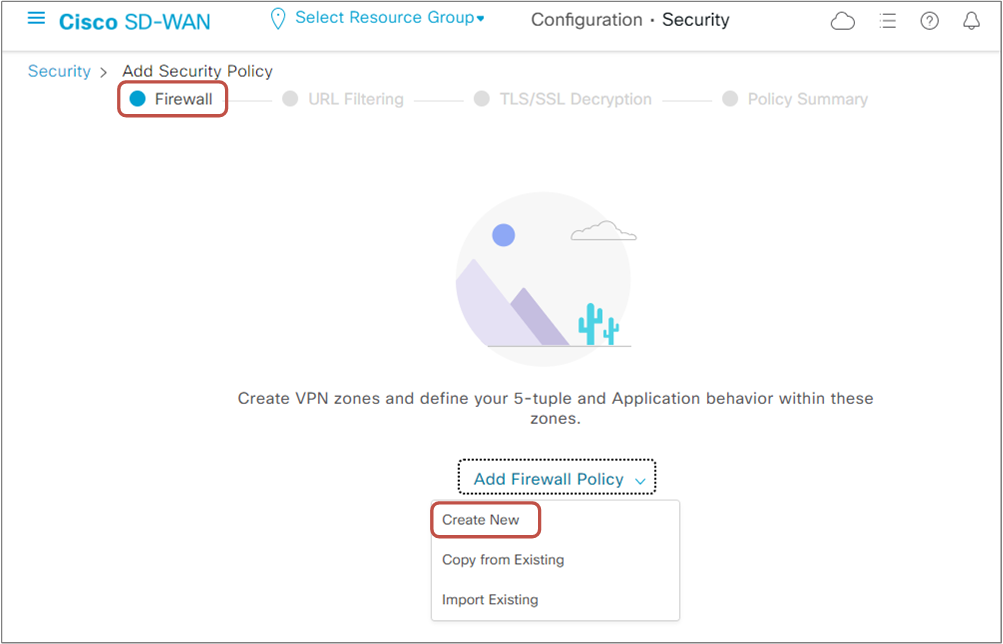
For this lab example, we will use the second predefined security scenario with Cisco vManage. We go to Configuration > Security > Add Security Policy and select Guest Access, as shown in figure 4 below.

Notice that the scenario includes a TLS proxy that we won't implement in the lab. The reason that Cisco has decided to include the TLS proxy in this scenario is that for HTTPS traffic, the edge router cannot respond with a block page if the URL-F engine denies the requested URL. The TLS handshake is already underway when the router determines whether to permit or deny the HTTPS request. Therefore, when the router injects the HTTP block page or HTTP redirect, it causes a TLS protocol error to occur. The TLS proxy allows the router to insert the block page into the HTTPS session.
The TLS Proxy solves one problem but creates another. The proxy issues proxy server certificates to hosts. It is not feasible to push vManage's CA certificate to guest devices that the organization does not own nor manage. Therefore, guest devices won't trust the TLS proxy certificate, and users will have to click through the security error in the web browser, which is not professional. (check out our previous lab lesson for more info)
Step 3. Configuring a new firewall policy
We start by creating a new Firewall policy. Go to Add Firewall Policy and select Create New, as shown in figure 5 below.
As per our lab requirement, we will need to create two Firewall rules- one that denies traffic destined to Enterprise IP addresses (RFC1918) and another that inspects the traffic destined for the Internet. Figure 6 below shows a summary of both rules.

Notice that we have created two zones - a source zone, "GUEST-ZONE," which includes VPN6, and a destination zone, "DIA," which includes VPN0. Therefore the firewall rules apply to the traffic coming from VPN6 towards VPN0 (DIA traffic).
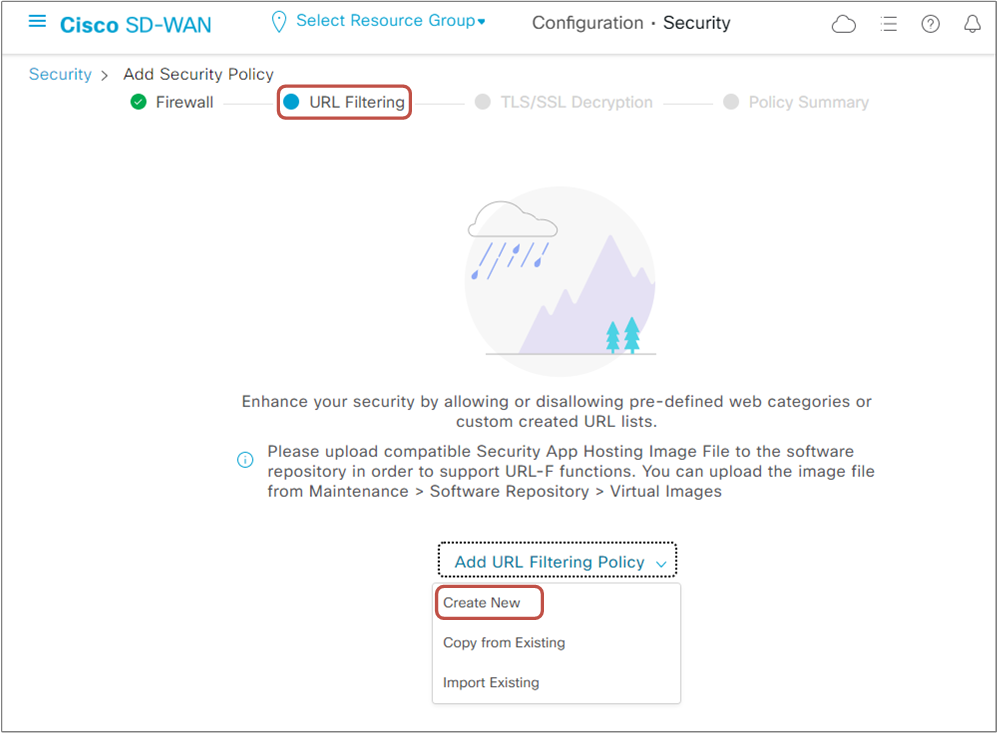
Step 4. Configure URL Filtering (URL-F) policy
Now that the Firewall policy is complete, it is time to create a new URL Filtering policy by going to URL Filtering > Add URL Filtering Policy > Create New, as shown in the screenshot below.
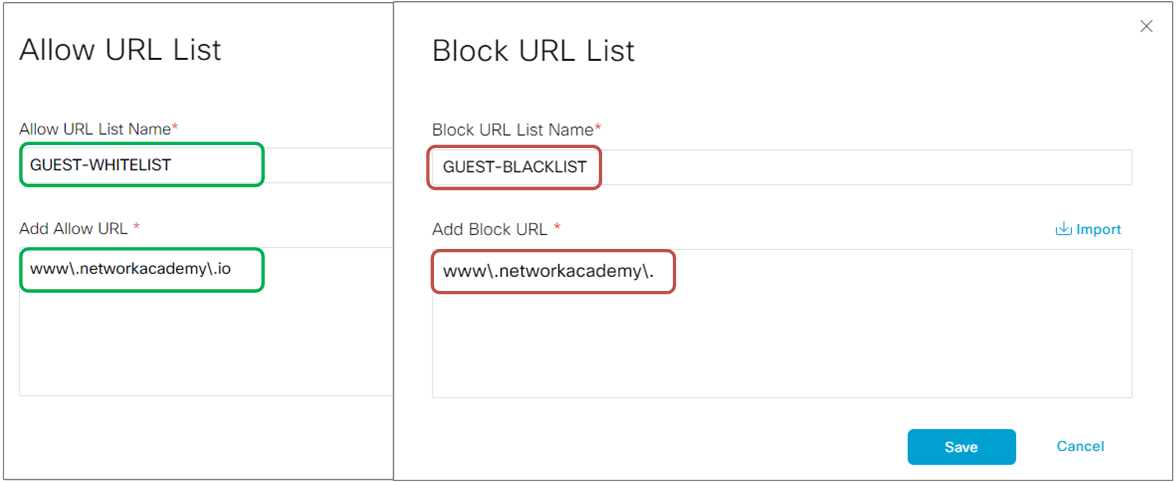
As per the order of operation of the URLF engine, the intercepted HTTP(s) request is first checked against the user-defined Whitelist and Blacklist.
It is important to know that an URL request can match both lists but on different patterns. This allows us to combine less specific and more specific matches (the most specific takes precedence). For example, if we want to allow requests to "www.example.com." and at the same time deny requests to websites with the same domain name but different extensions, such as "www.example.org" and "www.example.net."
To accomplish the objective, we will configure an allow list that permits "www\.networkacademy\.io" and a block list that denies "www\.networkacademy\." as shown in the screenshot below.
Then we specify the blocked Web categories per the lab requirements and set the Web Reputation to "Suspicious."
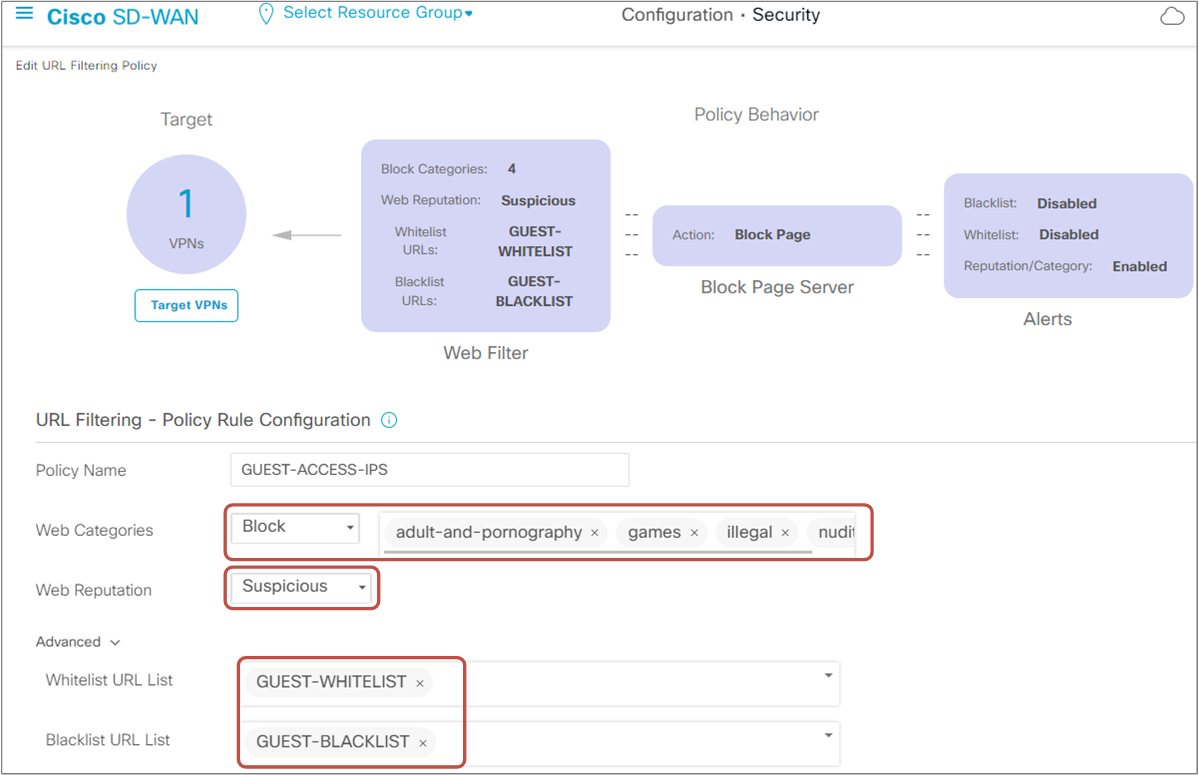
With that, the URL-F policy is done.
On the next page, we specify a name for the Secure Policy and configure Additional Policy Settings such as High-Speed Logging, External Logging Server, and Audit Trail.
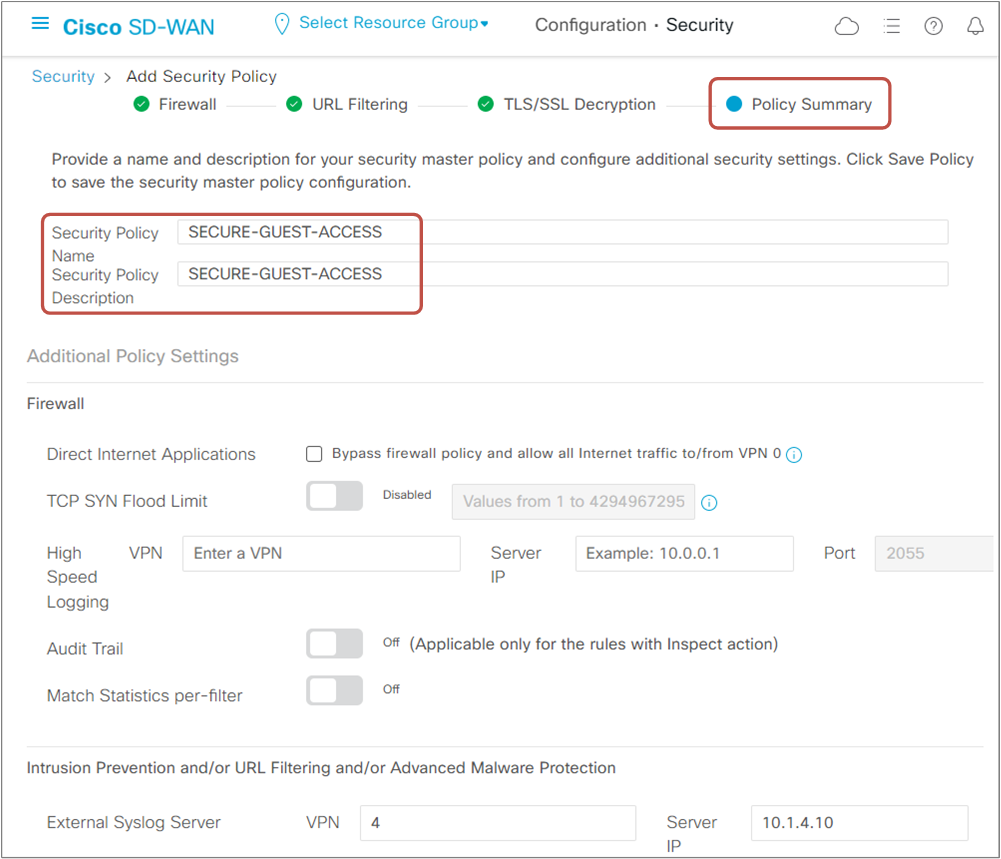
As shown in figure 2, there is a Syslog server located in the data center with IP address VPN4:10.1.4.10. Then we save the policy.
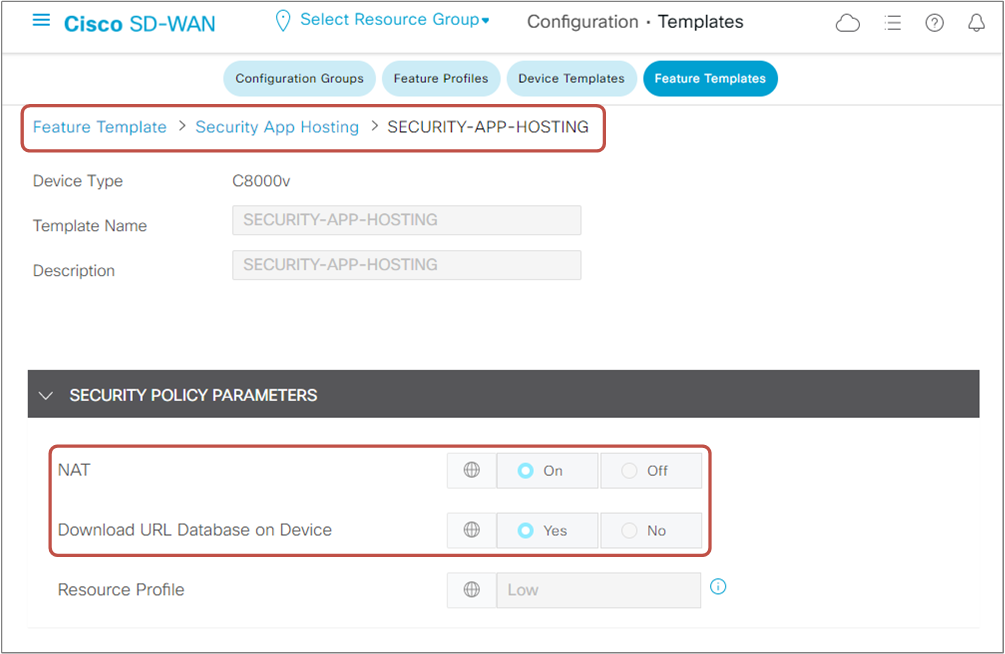
Step 5. Creating a new Secure App Hosting
The next step, before attaching the security policy to cEdge-3's device template, is to create a new Secure App Hosting Profile.
To enable WAN Edge routers to download the URL database locally from the cloud, we must enable the "Download URL Database on Device" and turn on NAT in the Security App Hosting Feature Template, as shown in the screenshot below. Notice that the router will allocate additional memory to download the database, so we must ensure that there are enough resources available.
Step 6. Attaching the security policy
Once we have the security policy and the app hosting template ready, we edit cEdge-3's device template and go to Additional Templates, as shown below.
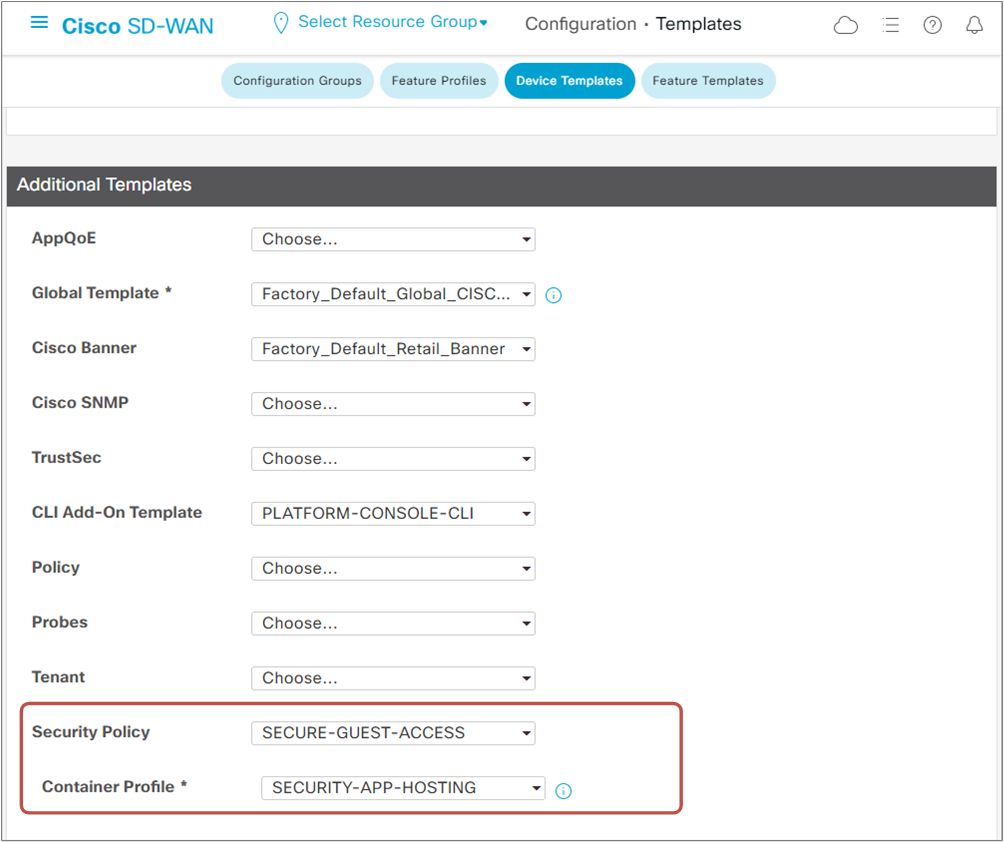
Then we update the device template. vManage will push the new configuration on cEdge-3.
Verifications
Now, if we open a browser on a PC located in the Guest VPN on cEdge-3 and try to open "www.networkacademy.com," we will see that the URL-F engine denies the request because the URL matches our configured blocklist. At the same time, if we open "www.networkacademy.io," we will see that the request is allowed.
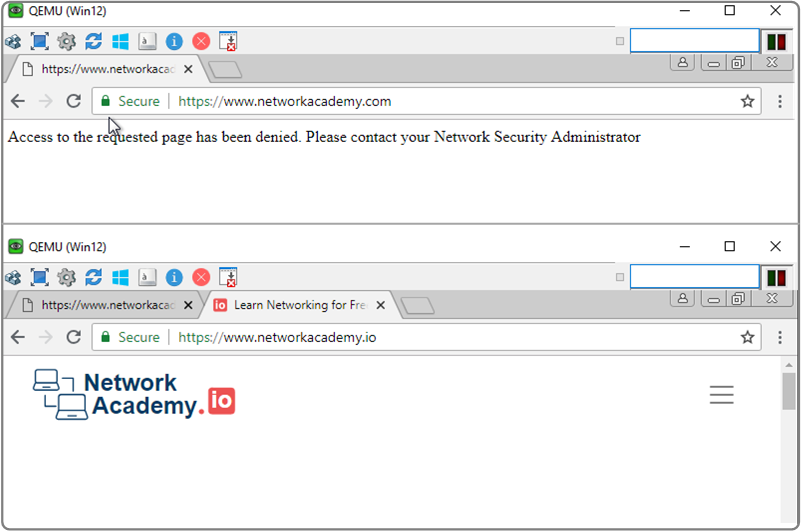
Additionally, for requests to Web pages with low reputation scores or from one of the blocked Web Categories, the URLF engine will deny the HTTP(s) request.